The advent of powerful mobile devices has revolutionized creative workflows, and video editing is no exception. For content creators focusing on YouTube and social media, the ability to edit high-quality video on the go is no longer a luxury but a necessity. This article explores a practical approach to video production using DaVinci Resolve on an iPad Pro, detailing a streamlined workflow designed for efficiency and simplicity, without compromising on professional results.
Understanding the iPad Pro and DaVinci Resolve Ecosystem
The iPad Pro, particularly models equipped with Apple's M-series chips, has emerged as a formidable platform for demanding creative tasks. When paired with DaVinci Resolve Studio, a professional-grade video editing, color correction, visual effects, and audio post-production application, it offers a compelling alternative to traditional desktop setups. This integration allows for a portable yet powerful editing suite, suitable for a range of projects from short social media clips to more involved YouTube content. The core philosophy behind this workflow is to maintain simplicity while leveraging the robust features of DaVinci Resolve.
Gear and Setup: The Foundation of the Workflow
The chosen hardware and software form the bedrock of this mobile editing process. The setup involves:
- DaVinci Resolve Studio 19: The latest version of the software, offering the most comprehensive feature set.
- M4 11” iPad Pro with 2TB SSD: A powerful, portable device with ample storage for media and projects. The internal SSD ensures fast data access.
- Magic Keyboard: Provides a more ergonomic typing experience and includes a trackpad for precise cursor control, enhancing the editing process.
- Apple Pencil: Useful for fine-tuning edits, making annotations, or precise adjustments within the application.
This combination ensures that the iPad Pro can handle the demands of DaVinci Resolve, from importing and editing high-resolution footage to color grading and exporting final products. The 2TB SSD is crucial for storing raw footage, project files, and backups, minimizing reliance on external drives for on-the-go editing.
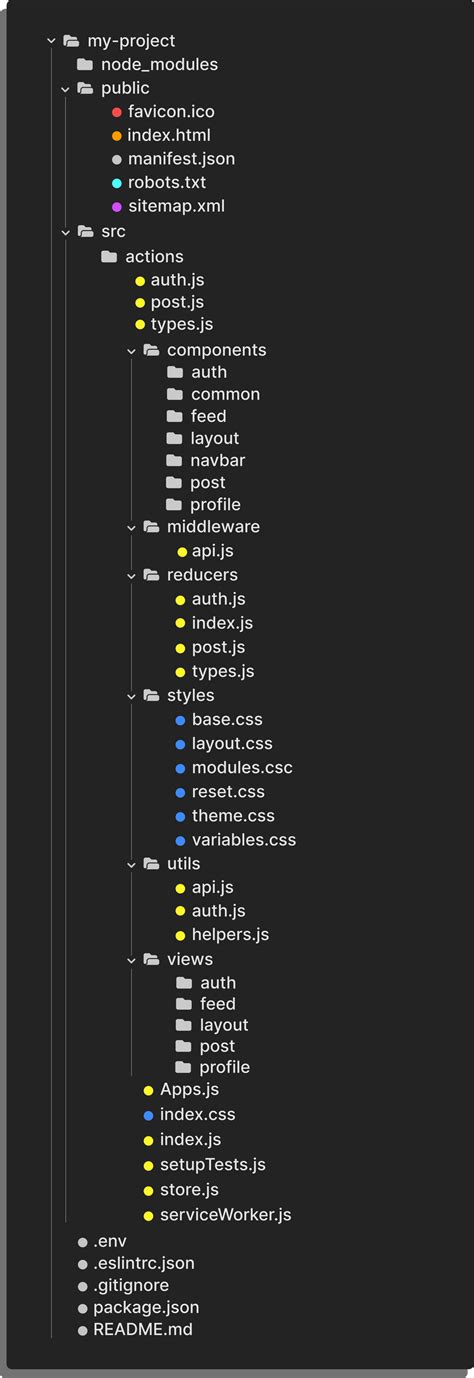
Media Management: Organizing for Efficiency
Effective media management is paramount for any video editing workflow, and the iPad Pro is no exception. The first step involves establishing a clear and consistent folder structure within the iPad's Files app. This structure serves as the central hub for all project-related media and backups.
Files App Folder Structure
Whether storing media internally on the iPad's SSD or utilizing an external fast SSD, a well-organized folder system prevents chaos and saves valuable editing time. The recommended structure is as follows:
- A Roll: Primary footage, typically the main narrative or action.
- B Roll: Supplementary footage used to illustrate points, add visual interest, or cover edits.
- Photos: Still images, graphics, or logos to be incorporated into the video.
- Music: Audio tracks for background music.
- Sound Effects: Any specific sound effects required.
- Voiceover: Recorded narration or dialogue.
- Assets: This can include lower thirds, branding elements, or any other reusable graphical components.
- Project Backups: Crucial for safeguarding work in progress.
Note: The naming convention for "A Roll" and "B Roll" can be adapted based on the project type, such as using location names or camera identifiers for better context.
To streamline future projects, it is highly recommended to duplicate this folder structure and save it as a template. This ensures consistency and reduces the time spent setting up each new project.
DaVinci Resolve Project Structure: Manual Bin Creation
Unlike the desktop version of DaVinci Resolve, where folders can be directly dragged from the Files app to automatically create bins, the iPad version requires a manual approach. This process, while slightly more involved, ensures that imported media is organized logically within the project itself.
Importing and Organizing Media
- Create a New Project: Start by launching DaVinci Resolve and creating a new project.
- Access Media Tab Settings: Navigate to the Media tab. In the bottom right corner, click the gear icon to access project settings.
- Create Bins: Within the Media tab, locate the "Master" section. Manually create a series of new bins that mirror the folder structure established in the Files app (e.g., "A Roll," "B Roll," "Music," etc.).
- Import Clips: Proceed to import all video clips, audio files, and other media assets into their corresponding bins. This manual organization ensures that each piece of media is readily accessible and categorized from the outset.
Enhancing the Editing Experience: Enabling the Edit Page
To unlock the full potential of DaVinci Resolve on the iPad, enabling the Edit page is essential. While this page is not yet fully ported and is disabled by default due to its complexity, it remains functional and significantly enhances the editing workflow.
Activating the Edit Page
- Access Workspace Settings: Go to the "Workspace" tab.
- Show Page: Select "Show Page" from the dropdown menu.
- Assign Custom Button: Assign a custom button to the "Edit" page. This makes it easily accessible.
- Save Changes: Click "Save" to apply the changes.
By enabling the Edit page, users gain access to a more traditional timeline-based editing interface, offering greater control over clip placement, trimming, and overall timeline management, which is crucial for efficient video editing.
The Video Editing Process: A Simplified Approach
This section focuses on the practical steps of editing, keeping the workflow as straightforward as possible for YouTube and social media content. The goal is to achieve a polished final product without getting bogged down in overly complex techniques.
Timeline Assembly and Basic Editing
The editing process on the Edit page typically follows a layered approach:
- Primary Footage (A Roll): Place the main A Roll clip onto the timeline. Trim it down to its essential parts, establishing the core narrative.
- Supporting Footage (B Roll): Overlay B Roll clips on a higher track. These are used to visually accompany the A Roll, add context, or cover cuts.
- Graphics and Photos: Images and graphics are placed on tracks above the video layers.
- Audio: Music and sound effects are placed on tracks below the video layers. Voiceovers are typically placed on dedicated audio tracks.
Crucial Tip: Regularly save your work by hitting CMD+S. This simple act prevents data loss and provides peace of mind during the editing process.
Saving Progress and Project Backups
Whenever significant progress is made or before taking a break, it's wise to return to the Projects page. From there, export the project. This export should include all stills and LUTs, saving them into the designated "Project Backups" folder within the Files app. This creates a snapshot of your project at that point, providing a safety net.
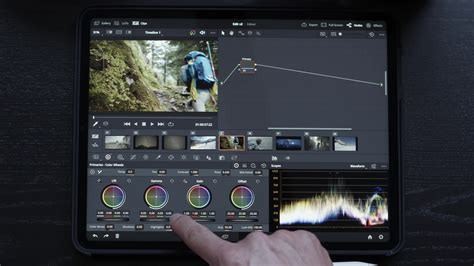
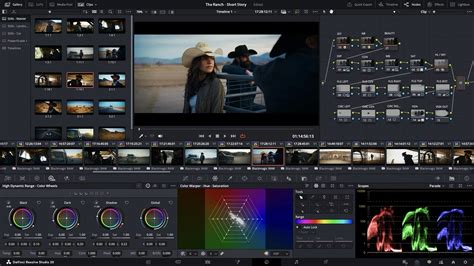
Color Grading: Building a Node Tree
Color grading is a critical step in enhancing the visual appeal of videos. DaVinci Resolve is renowned for its powerful color grading tools, and even on the iPad, these can be effectively utilized. While this is not an exhaustive guide to color grading, the following node tree structure is a practical and effective starting point for many projects:
- EXP / CON: Adjustments for Exposure and Compensation. This is the first step to correcting the general brightness and contrast of the footage.
- WB / SAT: White Balance and Saturation. Correcting the color temperature to ensure accurate colors and adjusting the intensity of colors.
- HSL: Hue, Saturation, and Luminance adjustments. This node group allows for targeted adjustments to specific color ranges, enabling fine-tuning of individual colors.
- Local: Localized adjustments. This can involve using power windows or masks to affect specific areas of the frame.
- Grade: The primary color grade. This is where the overall look and feel of the video are established, such as applying a cinematic aesthetic.
- Clean Up: Fixing any minor issues, such as skin tone blemishes or distracting elements. This is also for final touch-ups.
- VFX: Visual Effects. This node is for adding subtle cinematic effects like film grain or halation, which can add a professional polish.
- LUT: Applying a Look-Up Table (LUT). This is often used to convert footage shot in a Log color space to a standard color space like Rec.709 for broadcast and web delivery.
A base edit of this node tree can be created and then copied across all clips. If performance issues arise during playback or grading, switching to a lower playback resolution on the Cut page can help maintain a smooth experience.
The Easiest Way to Color Grade On iPad
Exporting and Archiving: Finalizing and Storing Your Work
The final stages of the workflow involve exporting the finished video and managing project assets for future use or archival.
Exporting the Master File
Typically, two copies of the video are exported:
- Social Media Upload: A standard 4K H.264 file is exported for direct uploading to platforms like YouTube and other social media channels. This format offers a good balance of quality and file size.
- Archival (Optional): If the project is definitively complete and unlikely to require further revisions, the project can be removed from DaVinci Resolve. However, it's good practice to retain the raw B Roll footage. This footage can be moved to a larger external storage solution, such as the aforementioned 8TB SSD, for archival purposes. This ensures that any reusable B Roll is safely stored and accessible for future projects.
Blackmagic Design Certified Training: Deepening Your Skills
For those looking to further refine their DaVinci Resolve skills, Blackmagic Design offers comprehensive certified training programs. These courses are designed for both beginners and seasoned professionals and cover a wide array of topics, including:
- Editing Fundamentals: Mastering the art of editing, including techniques for interviews, dramatic scenes, documentaries, and music videos.
- Visual Effects (Fusion Page): Learning to create cinematic visual effects and motion graphics directly within DaVinci Resolve, utilizing advanced compositing tools and a true 3D workspace.
- Color Correction and Grading: Discovering the powerful color correction tools used by Hollywood colorists, with hands-on exercises to master color grading techniques.
- Audio Post-Production (Fairlight Page): Understanding sound editing, sweetening, recording, mixing, and mastering, including advanced features like Dolby Atmos and channel mapping.
- Multicam Editing: Efficiently working with multiple camera angles for live events and sports replays.
- Workflow Optimization: Learning to work faster and more creatively with tools like the DaVinci Resolve Mini Panel and dedicated editing consoles.
- Content Delivery: Preparing content for final delivery across various platforms.
These training resources are invaluable for anyone serious about leveraging DaVinci Resolve to its fullest potential, whether on a desktop or an iPad Pro. The curriculum is structured to provide practical, hands-on experience, ensuring that users can confidently apply what they learn to their own projects.

Exploring DaVinci Resolve Hardware and Accessories
Blackmagic Design also offers a range of hardware designed to enhance the DaVinci Resolve experience. These accessories are engineered to improve speed, efficiency, and creative control for editors, colorists, and sound engineers.
Control Surfaces for Enhanced Workflow
- DaVinci Resolve Micro Panel: A compact panel offering essential controls for quick color grading adjustments.
- DaVinci Resolve Mini Panel: Provides more advanced controls, ideal for refined color grading and faster adjustments.
- DaVinci Resolve Advanced Panel: The flagship control surface, offering the highest level of precision and a comprehensive set of controls for professional colorists.
- DaVinci Resolve Editor Keyboard: A full-sized QWERTY keyboard with dedicated editing keys and a search dial designed for fast cutting and timeline navigation.
- DaVinci Resolve Speed Editor: A compact keyboard focused on multi-cam editing and live sports replay, enabling extremely fast camera selection and editing.
Fairlight Consoles for Audio Post-Production
The Fairlight audio post-production suite within DaVinci Resolve is complemented by dedicated hardware consoles:
- Fairlight Desktop Console: A versatile console offering quick access to most Fairlight features, suitable for a wide range of audio tasks.
- Fairlight Progressive Console: A larger console designed for more complex mixing scenarios with a massive number of channels and tracks.
- Fairlight Production Console: The largest and most comprehensive console, offering an extensive array of controls for professional audio engineers working on demanding projects.
These hardware solutions, when integrated with DaVinci Resolve, can significantly accelerate workflows and provide a more tactile and intuitive user experience, even when working remotely with an iPad.
The Future of Mobile Editing with DaVinci Resolve
The ability to edit professional-grade video on a device as portable as an iPad Pro represents a significant leap forward for content creators. DaVinci Resolve's commitment to developing its iPad application ensures that users can achieve high-quality results without being tethered to a traditional workstation. While the workflow may require some adaptation, particularly in media management, the core editing, color grading, and exporting capabilities remain robust. This approach empowers creators to be more agile, productive, and creative, wherever inspiration strikes. The continued evolution of both the iPad hardware and DaVinci Resolve software promises even more powerful and seamless mobile editing experiences in the future.