Adobe Photoshop offers a versatile toolkit for achieving a wide range of artistic effects, and the airbrush technique is a prime example. Whether you're aiming for the vibrant, retro aesthetics of the 1980s or the polished, flawless appearance of magazine-cover skin, Photoshop provides the means to accomplish these goals. This guide delves into various airbrushing techniques within Photoshop, from creating stylized text to achieving professional-grade skin retouching.
Crafting 80s-Inspired Airbrush Text
The 1980s are synonymous with bold typography and vibrant, airbrushed aesthetics. Ditching the ordinary and letting your imagination soar is key to capturing this nostalgic vibe. Adobe Photoshop's capabilities allow for the creation of unique 80s airbrush text effects, transforming plain text into eye-catching retro designs.
To begin, open Photoshop and navigate to File > New to create a new document. It's crucial to work with layers to maintain flexibility. Create a new layer above a Color Fill layer and name it "Airbrush Spray." Adding a mask to this layer allows for random masking of areas using the Brush Tool (B), contributing to a textured, sprayed look.
The foundation of your text design will be the characters themselves. Utilize the Type Tool (T) to input your desired text. For an authentic 80s feel, consider using distinct fonts. For instance, typing the number "9" with the KOEEYA font at a substantial size of 1296 pt sets a strong visual anchor. Repeat this process for other characters like "0," "'", and "s," ensuring each character is slightly rotated for a dynamic composition.
For prominent words, a bolder font like Mister Dangerous can be employed. Typing "BABY" at 845.75 pt creates a significant impact. Interestingly, the letter "o" can be placed on the same text layer as "BABY," allowing for cohesive styling.
To further enhance the text and prepare it for advanced styling, convert individual text layers into Smart Objects. Right-clicking on the "9" text layer and selecting "Convert to Smart Object" is the first step. Subsequently, applying Layer Styles to this Smart Object opens up a world of possibilities. Double-clicking the layer in the Layers panel will bring up the Layer Styles dialog box. After applying desired styles, you can easily copy these effects to other layers by right-clicking and selecting "Copy Layer Style."
For elements like a heart, use a font like Mister Dangerous Swatches, setting the size to 500 pt. Convert the heart to a Smart Object and apply a Gaussian Blur of 5 pixels to soften its edges. To control the scale of effects applied to the heart, select the Heart layer and go to Layer > Layer Style > Scale Effects, adjusting the Scale to 50%.
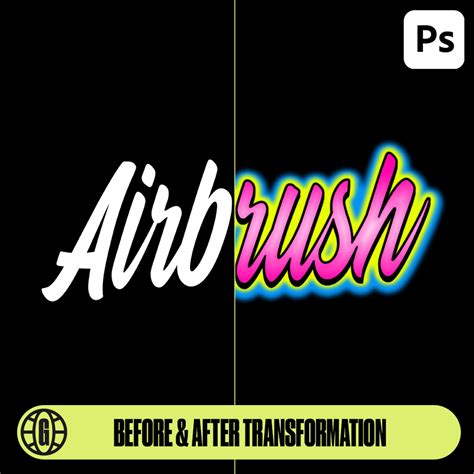
These techniques, combined with the vast array of effects available on platforms like Envato Elements, empower you to transform any plain text into a retro airbrush masterpiece. Products like "90s Airbrush Text Effect Photoshop" or "Graffiti Airbrush Text Photoshop" offer pre-made solutions to achieve an iconic airbrushed look with just a few clicks, turning ordinary text into vibrant, eye-catching graffiti. For those working in Procreate, a set of ten airbrush brushes can also help create stunning, awe-inspiring artwork. These tools and tutorials are specifically crafted for text effect enthusiasts, offering a gateway to exciting visual transformations.
Achieving Flawless Skin with Photoshop's Airbrush Techniques
Beyond stylized text, airbrushing in Photoshop is a cornerstone of professional photo retouching, particularly for achieving the coveted flawless skin seen in magazines. While great skincare contributes, professional airbrushing often plays a significant role in creating that smooth, radiant appearance. Fortunately, you can replicate this effect in Photoshop without resorting to beauty products.
The core principle behind effective skin airbrushing in Photoshop is the strategic use of layers and filters to smooth imperfections while retaining natural detail. This process requires careful attention to avoid an overly plastic or unrealistic look.
The Frequency Separation Method for Skin Retouching
A highly effective and widely used technique for skin retouching is Frequency Separation. This method divides an image into two layers: a low-frequency layer containing color and tone information, and a high-frequency layer containing texture and detail. By manipulating these layers independently, you can smooth skin tones without losing essential texture.
Step 1: Setting Up the LayersBegin by opening your desired photo into Photoshop. The first crucial step is to create duplicate layers. Layers are fundamental to Photoshop's power, allowing non-destructive editing. To create a new layer, go to your layer panel (typically found at the bottom right of your screen) and select "Duplicate Layer." Alternatively, you can right-click on the existing layer and choose "Duplicate Layer," or use the shortcut CTRL+J. You will need two duplicate layers, so perform this action twice.
Rename these layers for clarity: one should be labeled "Low" and the other "High." This naming convention helps in remembering their purpose within the Frequency Separation process.
Step 2: Applying Surface Blur to the Low LayerHighlight the "Low" layer by clicking on it in the Layers panel. Navigate to Filter > Blur Menu and select the "Surface Blur" option. This filter is ideal because it blurs pixels to create smoothness without sacrificing edge detail, preventing the facial features from becoming indistinct.
Within the Surface Blur dialog box, you'll find two primary options: Radius and Threshold. The Radius controls the size and strength of the blur, while the Threshold defines the area you want to blur. Adjust these sliders until the image appears blurry but you can still discern the main features. Subsequently, lower the Threshold slider to bring back definition. It's acceptable if some bumps or pores are still visible at this stage; the "High" layer will address these.
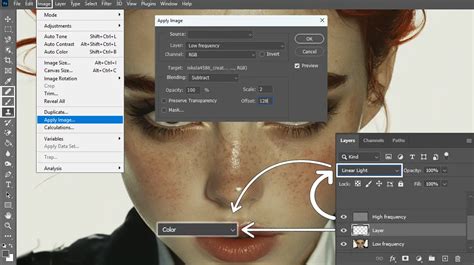
Step 3: Setting Up the High Layer and Blend ModeNow, highlight the "High" layer and ensure its visibility by clicking the eye icon next to it. The key to this layer is its blend mode. In the Layers panel, where it typically says "Normal," click the dropdown menu and select "Linear Light." This blend mode will interact with the "Low" layer to create the desired effect.
Step 4: Creating and Applying the Layer MaskA layer mask is essential for selectively applying the retouching effect. Look for the grey box with a white circle at the bottom of your Layers panel and click it. This action adds a white layer mask to the "High" layer.
Next, you need to "apply the image" to this mask. Go to Image > Apply Image. In the dialog box, select "Layer 0" (or your original image layer) from the dropdown list under "Merged." You should now observe a black and white version of your image appearing next to the thumbnail for the "High" layer in your Layers panel. Click on the colored thumbnail of the "High" layer to ensure it's selected for further adjustments.
Step 5: High Pass Filter for Detail EnhancementTo refine the details, zoom in significantly on the areas requiring work. Navigate to Filter > Other > High Pass. A dialog box will appear, allowing you to adjust the radius. Make small incremental adjustments until the skin begins to look more natural. This step helps to reintroduce sharper details that might have been lost during the blurring process.
Step 6: Adjusting Brightness and Contrast on the Layer MaskTo fine-tune the mask and control the intensity of the airbrush effect, go back to your Layers panel and click on the black and white thumbnail of the "High" layer (the mask itself). Then, navigate to Image > Adjustments > Brightness/Contrast. While you've smoothed the skin, the entire image might appear blurry. The goal now is to isolate the skin.
Step 7: Grouping Layers and Hiding the MaskTo isolate the skin from the background, combine the "Low" and "High" layers into a group. Highlight both layers by holding down CTRL and clicking on each. Then, press CTRL+G to create a group. You should see a folder icon labeled "Group 1" containing your two layers.
Now, hide the layer mask by going to Layer > Layer Mask > Hide All. This will replace the visible mask with a black thumbnail next to the group layer, effectively hiding the retouching effect initially.
Step 8: Visualizing the Painting AreaTo see where you are applying the airbrush effect, create a new layer above the "Low" layer (click the dog-eared page icon at the bottom of the Layers panel). Fill this new layer with red (Edit > Fill > Color > Red). This red layer acts as a visual guide, showing exactly where you are painting.
Step 9: Painting the Airbrushed AreasClick on the black thumbnail of the group layer to select its mask. Activate the Brush Tool by pressing B. Now, paint over the areas of the skin you want to airbrush. The areas you paint will appear red, indicating where the smoothing effect will be applied. Once you've covered the desired areas, delete the red fill layer. You will now see the smoothed skin appear through the mask.
Alternative: Texture Layer for Preventing Plasticity
Another variation of the skin retouching process involves adding a "Texture" layer to prevent the skin from looking overly smooth and plastic-like.
After creating and duplicating your initial layer into an "Airbrush" group with a "Blur" layer, apply the Surface Blur filter as described previously.
Create a new layer above the "Blur" layer and name it "Texture." Change its blend mode to "Hard Light." This layer will minimally contribute to the final texture, especially visible when zoomed in on high-resolution images.
To add texture, select the "Texture" layer and go to Edit > Fill (or Shift+F5). Use the "50% Gray" option. Then, apply Filter > Noise > Add Noise. Set the noise to "Gaussian" and "Monochromatic" with a small amount (e.g., 4-10%).
Next, apply Filter > Blur > Gaussian Blur with a very small radius (e.g., 0.3-0.5 pixels). This subtle blur helps integrate the noise.
To tint this layer and match the skin tone, use the Eyedropper tool to sample an average skin color. Then, open Image > Adjustments > Hue/Saturation (CTRL+U). Check "Colorize" and adjust the Hue, Saturation, and Lightness sliders to match the sampled skin tone.
Finally, add a layer mask to the "Airbrush" group (Layer > Layer Mask > Hide All). Set your foreground and background colors to default black and white (D). Zoom in to 100% and paint over the skin with white on the layer mask. This reveals the smoothing and texturing effects. You can then fine-tune the "Texture" layer's Hue/Saturation to perfect the skin tone.
Restoring Skin Details and Final Touches
To restore finer skin details, you can use the Image > Apply Image command. Selecting data from the Red channel, for example, can often reveal the least amount of skin imperfections, helping to reintroduce subtle texture.
The result of these techniques is smooth, natural-looking skin that appears airbrushed to perfection. Even when zoomed in, tiny skin bumps can remain visible, contributing to a realistic appearance, especially when the "Texture" layer is used.
Modern Frequency Separation: So Much Easier! - Photoshop
For those looking for more advanced or automated solutions, consider exploring Photoshop actions. Skin retouching actions can automate many of these steps, allowing you to airbrush skin, mattify it, restore highlights, and more with a single click. Some actions even utilize advanced frequency separation techniques, offering both modern (using Surface Blur) and traditional (using Gaussian Blur) approaches for varying levels of softness and diffusion. Actions designed for specific Photoshop versions or image bit depths (like 16 and 32-bit) can also provide more robust results. These tools, when used thoughtfully, can significantly elevate the quality of your photographic work.