The "Media Offline" error in DaVinci Resolve can be a frustrating roadblock for editors, halting the creative flow with a stark red warning symbol and a preview window filled with static. While this issue can seem daunting, it fundamentally signifies that DaVinci Resolve cannot locate or decode the source media files that make up your timeline. Unlike critical system failures, this is a manageable problem, often stemming from straightforward file management or codec issues. This guide delves into the common culprits behind the "Media Offline" message and provides actionable solutions to get your projects back on track, ensuring a smoother post-production experience.
Understanding the "Media Offline" Phenomenon
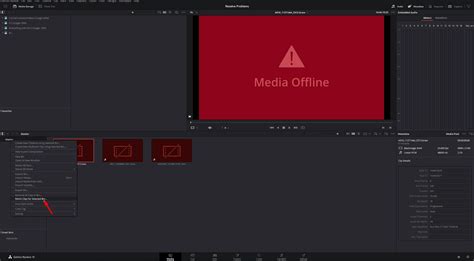
At its core, the "Media Offline" error in DaVinci Resolve means the software has lost its connection to the original video and audio files. DaVinci Resolve, like many non-linear editing (NLE) systems, does not embed media files directly into the project file. Instead, it maintains a link to the original media's location on your storage devices. When this link is broken - whether by moving, renaming, deleting files, or disconnecting the storage itself - Resolve can no longer access the necessary data to display and play your clips. This results in the ubiquitous "Media Offline" message, rendering your timeline unusable until the connection is re-established.
Common Triggers for Media Offline Errors
Several factors can lead to the "Media Offline" state. Understanding these common scenarios is the first step toward effective troubleshooting.
1. Moved, Renamed, or Deleted Media Files
The most frequent cause of the "Media Offline" error is a disruption in the file path that DaVinci Resolve relies on. If you've reorganized your project's media folder structure, renamed files, or accidentally deleted clips after importing them into your project, Resolve will no longer be able to find them. Even a minor change, such as moving a file within a folder, can break the established link. This is because Resolve needs to retain a direct link to the imported file; it doesn't create a local temporary copy within the software itself.
When Resolve imports footage, it creates a pathway to the original file. If this pathway is altered - for instance, if you've reorganized your folder structure or connected your media drive to a different USB port, registering it as a different directory - fixing this issue becomes necessary. You can often identify an unlinked clip by selecting it in the Media Pool and choosing "Open File Location." If the clip has been unlinked, you'll see a warning message indicating that the file cannot be found at its last known location.
2. Disconnected or Unmounted Storage Drives
External hard drives, network-attached storage (NAS) devices, or shared network drives are common storage solutions for video editors. If these drives are disconnected from your computer, unmounted, or go into a sleep mode while DaVinci Resolve is running or when you reopen a project, the software will report the media as offline. This is particularly prevalent when working with large project files or when relying on multiple storage devices.
For network storage, ensuring consistent mapping is crucial. This means the drive should always be mounted with the same drive letter (on Windows) or mount point (on macOS/Linux) before you open your DaVinci Resolve project. If you are working from a NAS or shared drive, verify that you are on the same network and that the network connection is stable.
3. Cache Corruption or Invalidation
DaVinci Resolve utilizes cache files, including optimized media and render cache, to speed up playback and rendering. If these cache files become corrupted or invalidated, Resolve may incorrectly display media as offline, even if the original source files are intact and accessible. This can happen due to software glitches, incomplete renders, or issues with the storage location of the cache files.
4. Unsupported Codecs or File Formats
While DaVinci Resolve boasts extensive codec support, it's not universally compatible with every file format. If your media is encoded with a codec that Resolve cannot decode or if the file format itself is not natively supported, it will be marked as offline. This is especially common with highly compressed formats like H.265 (HEVC) or certain RAW video formats, particularly in the free version of DaVinci Resolve.
For example, using 10-bit H.265 media can cause offline issues with the free version; upgrading to DaVinci Resolve Studio is often required for full support. Similarly, files generated by screen recording software or some cameras using variable frame rates (VFR) can also lead to decoding problems. If Resolve cannot decode a format (e.g., MOV, H.265, RAW), it will mark it offline.

5. Variable Frame Rate (VFR) Footage
Footage recorded with a variable frame rate (VFR) can cause significant issues in professional editing software that expects a constant frame rate (CFR). VFR allows the frame rate to fluctuate based on the complexity of the scene, which can lead to audio sync problems, playback glitches, and the "Media Offline" error. Software like OBS Studio or mobile phone recordings often produce VFR footage.
6. Project Migration and File Management Practices
When moving DaVinci Resolve projects between different computers or storage locations, improper media management can easily lead to offline clips. If the media files are not moved along with the project file or if their relative paths are broken during the transfer, Resolve will be unable to locate them.
Strategies for Fixing "Media Offline" Errors
Fortunately, the "Media Offline" error is usually resolvable with a systematic approach. Here are the primary methods for relinking and restoring your media.
1. Relinking Clips in the Media Pool
This is the most common and effective solution for unlinked or moved files.
- Select Offline Clips: In the Media Pool, identify the clips that are marked as offline. You can often select multiple offline clips at once.
- Right-Click and Relink: Right-click on any of the selected offline clips. Choose the "Relink Selected Clips" option.
- Navigate to Media Location: A file browser window will open. Navigate to the folder where your media files are now located.
- Relink Folder or Individual Files: If the clips are organized in folders, you can select the parent folder and choose "Relink Folder." If you need to relink individual files, browse to and select the specific clip.
- Automatic Search: DaVinci Resolve is intelligent and will often search subfolders automatically to find matching files.
- Match Using Timecode and Reel Name: If the clip name or metadata has changed (e.g., renamed by the OS or camera), you might need to use a more robust relinking method. When relinking, look for an option like "Match using timecode and reel name." This method relies on embedded metadata within the media file, which is more resilient to file renames.
Bulk Relinking: For projects with numerous offline clips, selecting all offline clips in the Media Pool, right-clicking, and choosing "Relink Clips" allows Resolve to automatically search subfolders and relink matching files efficiently.
2. Verifying Drive Paths and Media Storage Locations
Ensuring that DaVinci Resolve knows where to look for your media is fundamental.
- Check Media Storage Locations: In DaVinci Resolve, go to "Preferences" (or "Project Settings" depending on your version and context) and check the "Media Storage" locations. Ensure that all the drives and folders containing your project's media are listed and accessible. If a drive has been added or removed, you may need to add its path back into the Media Storage settings.
- Refresh Render Cache: If you suspect cache corruption, you can refresh or delete the cache. Go to "Preferences" > "User" > "Storage Management" and clear the render cache. Then, you may need to regenerate optimized media or proxies.
3. Installing Missing Codecs and SDKs
If unsupported codecs are the culprit, installing the necessary software can resolve the issue.
- QuickTime: For certain MOV files, especially on Windows, installing the QuickTime player (though older versions are recommended as Apple has discontinued its support) or ensuring its components are available can help.
- FFmpeg: On Linux systems, FFmpeg is essential for handling a wide range of codecs. Ensure it's installed and properly configured.
- Camera-Specific SDKs: Some professional camera manufacturers provide Software Development Kits (SDKs) that enable editing software to properly decode their proprietary RAW or compressed formats. Check your camera manufacturer's website for any relevant downloads.
- HEVC/H.265 Codecs: For Windows users, the HEVC Video Extensions can be purchased from the Microsoft Store. For Mac users, H.265 support is generally built-in.
4. Transcoding Variable Frame Rate (VFR) Footage
For VFR footage, transcoding to a Constant Frame Rate (CFR) is often the most reliable solution.
- Use Third-Party Software: Tools like HandBrake (free and open-source) or Adobe Media Encoder can be used to convert VFR footage to CFR.
- Process:
- Check Frame Rate: Use a tool like MediaInfo (free) to analyze your footage and confirm if it's VFR.
- Transcode: Import the VFR footage into HandBrake and select a Constant Frame Rate preset (e.g., 23.976, 24, 25, 29.97, 30 fps). Ensure you choose an editing-friendly codec like ProRes or DNxHD for optimal performance in DaVinci Resolve.
- Re-import: After transcoding, import the new CFR files into DaVinci Resolve and relink them if necessary.
FFMPEG: How to convert VFR to CFR without messing up the timing
5. Addressing Network and Drive Power Issues
If clips turn offline randomly, especially when working from external drives or network locations, investigate power and connection stability.
- Disable Disk Sleep: On your operating system, go into the power management settings and disable the option to "Put hard disks to sleep." This prevents drives from spinning down unexpectedly.
- Stable Power Supply: Ensure external drives have a stable and sufficient power supply. Use powered USB hubs if necessary, and avoid relying solely on bus power for critical drives.
- Consistent Network Connection: For NAS or shared drives, ensure your network connection is robust and that the drive remains consistently accessible.
6. Leveraging Optimized Media and Proxies
While not a direct fix for offline media, optimized media and proxies can prevent issues, especially when working with demanding codecs or slower storage.
- Optimized Media: Creates higher-quality, edit-friendly versions of your clips (e.g., ProRes or DNxHD) that are easier for Resolve to process.
- Proxies: Generates lower-resolution versions of your clips for smoother playback on less powerful systems.
- Note: If you are using proxies or optimized media and encounter "Media Offline," it's crucial to remember that you are seeing the proxy/optimized file, not the original. If these generated files are missing, your original media might also be offline.
7. Using Project Archive and Backups
Proactive measures can save significant troubleshooting time.
- Project Archive: DaVinci Resolve's "Project Archive" feature exports your project along with all its associated media into a single archive file. This is invaluable for moving projects between computers or for long-term storage.
- Manual Copying: If you need to move your project manually, ensure you copy the project file and the entire media folder structure. After moving, you will likely need to relink the media within DaVinci Resolve. Always keep your folder structures intact.
- Project Backups: Regularly utilize DaVinci Resolve's Project Backups feature. If your project becomes unrecoverable, you can roll back to a previous working version.
8. Updating DaVinci Resolve and GPU Drivers
Software updates often contain bug fixes that can resolve previously unexplained "Media Offline" issues.
- DaVinci Resolve: Always ensure you are running the latest stable release of DaVinci Resolve. Check Blackmagic Design's website for updates.
- GPU Drivers: Outdated or corrupt graphics card drivers can cause a myriad of problems, including media playback issues. Update your NVIDIA, AMD, or Intel graphics drivers to the latest version.
When All Else Fails: Recovery Options
If you've tried all the standard troubleshooting steps and your media remains offline, consider these advanced recovery methods.
1. Import Timeline into a New Project
Create a brand-new DaVinci Resolve project. Then, import your problematic timeline from the original project into this new project. Sometimes, this process can re-establish links or isolate the corruption to the original project file itself.
2. Use Project Backups
As mentioned earlier, DaVinci Resolve automatically creates project backups. Access these backups through the Project Manager and try opening an older version of your project that might not have encountered the "Media Offline" error.
3. Manual File Recovery (Advanced)
In extreme cases, if files were accidentally deleted and not overwritten, data recovery software might be able to retrieve them. However, this is a complex process and not guaranteed to succeed, especially with SSDs.
Preventing Future "Media Offline" Errors
The best approach to the "Media Offline" error is prevention. Adopting good media management habits is key:
- Organize from the Start: Establish a clear and consistent folder structure for your media before you import anything into DaVinci Resolve.
- Avoid Renaming/Moving: Once media is imported and used in a project, avoid renaming or moving the source files. If you must reorganize, do it before importing into Resolve or be prepared to relink meticulously.
- Keep Media and Projects Together: When archiving or moving projects, ensure all associated media files are transferred along with the project file. Use the "Project Archive" feature whenever possible.
- Stable Storage: Invest in reliable external drives and ensure they are always properly connected and powered.
- Regular Backups: Implement a robust backup strategy for both your project files and your media.
By understanding the causes and implementing these troubleshooting and preventative measures, editors can significantly reduce the occurrence of the "Media Offline" error and maintain a fluid and productive workflow within DaVinci Resolve.