When embarking on the creation of a flyer, especially for print, the choice of software and the precise dimensions of your document are paramount. While Adobe Photoshop is a powerful tool primarily known for photo manipulation and graphic design, it can indeed be utilized for flyer creation, though it's worth noting that programs like Adobe InDesign or Illustrator are often considered more efficient for page layout tasks. Nevertheless, for those who prefer or are set on using Photoshop, understanding the nuances of setting up your document for print is crucial.
The Importance of Flyer Size
Selecting the correct flyer size is a foundational step that significantly impacts how your message is received and how effectively it can be distributed. The intended use and distribution method should heavily influence this decision. For instance, a flyer intended for a quick handout at an event might benefit from a more compact size, while one designed to convey detailed information or act as a mini-poster might require a larger canvas.
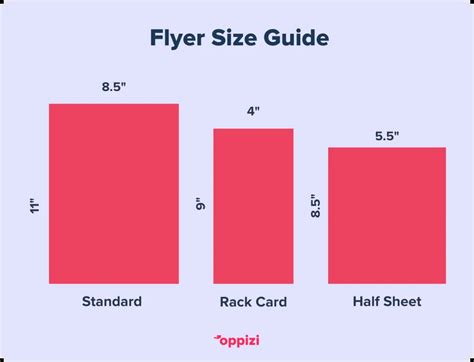
Commonly offered flyer sizes cater to a range of needs. These include:
- Mini Flyers (5 x 7 inches / 127 x 178 mm): This compact canvas is ideal for event invitations, concise product announcements, or showcasing essential information.
- Compact Flyers (5.5 x 8.5 inches / 140 x 216 mm): Striking a balance between portability and visual impact, this size allows for more content and creative expression, suitable for event promotions or informational handouts.
- Narrow Flyers (6 x 9 inches / 152 x 229 mm): Offering a larger canvas, this size is excellent for showcasing your message and design with ample space for captivating visuals and detailed information, making it a good choice for promotional materials or event programs.
- Standard Flyer Size (8.5 x 11 inches / 216 x 279 mm): This versatile letter-size format is perfect for advertising campaigns, informational brochures, or event posters. Its dimensions allow for impactful designs and comprehensive details.
- Legal-Sized Flyers (8.5 x 14 inches / 216 x 356 mm): The elongated canvas of this size permits unique and creative layouts, commonly used for event schedules, concert promotions, or community bulletins.
- Larger Formats (11 x 17 inches and above): For designs that demand a significant presence, larger formats like 11 x 17 inches are ideal for impactful visuals and attention-grabbing headlines, often bordering on poster size.
Beyond these common dimensions, international paper sizes also offer popular choices. A5 (148mm × 210mm) provides more space than A6 (105mm × 148mm) for images and text without being overly bulky, making it suitable for more detailed content. A4 (210mm × 297mm) offers ample room for detailed information like event schedules or menus, while DL flyers (99mm × 210mm) are long and slim, perfect for envelopes or display racks.
The ideal base size for leaflets created in Adobe Photoshop, particularly for print, is often cited as around 216 x 154 mm. It is also crucial to account for bleed areas, which extend the document's dimensions by approximately 3mm to ensure that no crucial content is cut off during the printing process. If you are distributing your flyer via PDF, the "Fit" option in the Print Dialog box can scale the printed file up or down to match your printer's paper size.
Designing Your Flyer in Photoshop: A Step-by-Step Approach
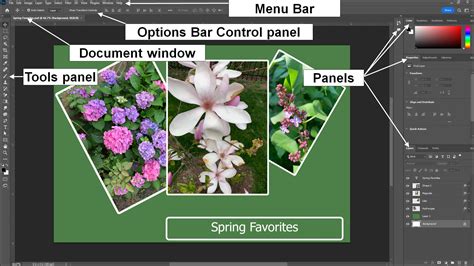
While Photoshop is primarily a photo editor, it offers a robust set of tools that can be leveraged for flyer design. The key is to set up your document correctly from the outset to ensure a smooth workflow and a professional final product.
Step 1: Creating Your Template
To begin crafting a flyer in Photoshop, initiate by creating a new document. For print, a common recommendation is a size of 1200 by 1800 pixels. Crucially, set the resolution to 300 dpi and the color mode to CMYK, as these settings are essential for high-quality printing.
To aid in precise alignment and design, configure your workspace by activating the rulers (Ctrl+R). Drag guides from the rulers to the center of the document to establish a clear visual axis. You can then add additional horizontal guides at specific pixel intervals, such as 500, 800, and 1600 pixels, to further subdivide your canvas.
Step 2: Establishing the Background
With your template set up, you can move on to creating the background. Create a new layer (Shift-Cmd-N) and fill it with white using the Alt+Backspace key combination. Ensure your color settings are indeed CMYK Sliders for print.
To add depth and visual interest, create a new adjustment layer and select "Gradient Overlay." Within the Layer Style panel, choose "Gradient." You can then customize the gradient by setting the white color's location to 30% and adjusting the black color value to a specific hue, such as Pale Yellow (C=9, M=6, Y=14, K=0).
Further design elements can be incorporated using the Rectangle Tool. For instance, create a rectangle of 216 mm by 56 mm and align it to the top-left edge of the document. Fill this shape with a Dark Brown color (C=49, M=74, Y=80, K=70). To introduce a dynamic edge, use the Pen Tool to add a point on the bottom edge of the rectangle. Then, employing the Direct Selection Tool, manipulate the anchor points to form a Bézier curve, ensuring sufficient space for document indents.
Step 3: Incorporating Images and Layers
The next phase involves integrating visual elements. Use File > Place Embedded to import your chosen images. Once placed, use the Move Tool to position them within your document.
To mask or crop an image to a specific shape, you can draw another rectangle using the Rectangle Tool, setting its dimensions (e.g., 216 mm by 100 mm) and positioning it precisely over the desired area of the photo. With the photo layer selected, click "Mask" in the upper Rectangle Tool Panel. This adds a vector mask to the photo. You can then use the Pen Tool and Direct Selection Tool to refine the mask's shape, creating curved edges or other desired forms.
Applying filters can further enhance your images. For example, a Gaussian Blur filter (Filter > Blur > Gaussian Blur) with a Radius of 6 can soften the image. Utilizing Smart Filters ensures that the blur effect is non-destructive, allowing for later adjustments. You can also use the Gradient Tool to guide lighting effects, directing them towards a specific edge of the image.
Adjustment layers are invaluable for fine-tuning colors and tones. Create a Brightness/Contrast adjustment layer and right-click on it, choosing "Create Clipping Mask." This ensures that the adjustment layer only affects the layer directly below it, in this case, your photo.
For more complex color treatments, a Solid Color fill layer can be introduced (e.g., C=30, M=80, Y=100, K=30). By holding Alt and dragging the vector mask from your photo layer to this new fill layer, you can transfer the mask's shape. Subsequently, using the Direct Selection Tool, adjust anchor points on the mask to reveal parts of the original photo where desired, perhaps using a soft brush with 75% opacity to blend elements.
Further design elements can be added by drawing another rectangle, filling it with a lighter brown (C=10, M=65, Y=100, K=0), and positioning it beneath the darker brown rectangle. Reshaping this light rectangle with the Pen Tool and Direct Selection Tool adds further visual layers and depth to your flyer.
Step 4: Adding Text and Logos
Typography plays a critical role in flyer design. Use the Horizontal Type Tool to add your text. For instance, you might create a circular element using the Ellipse Tool (U) with a diameter of 248 pixels, filled with brown (C=30, M=80, Y=100, K=30). Applying a "Drop Shadow" layer style can add depth. For a layered effect, create a second, larger circle (400 pixels in diameter) in a dark brown color (C=100, M=80, Y=45, K=50) and apply the same Drop Shadow effect. Copying and pasting layer styles is an efficient way to maintain consistency. Place this larger circle beneath the smaller one.
FLYER DESIGN in Photoshop!! ( EASY STEPS )
With your text, select a font family, such as Proxima Nova, and adjust the font size and leading for your main title (e.g., 17 pt). For subsequent lines of text, place each on a separate layer and use the Move Tool for precise positioning. Repeat this process for additional text elements, adjusting font sizes (e.g., 31 pt for the first line of a new text block) and styles (e.g., Proxima Nova Light, 18 pt for a title, 36 pt for a subheading with adjusted character tracking of -10). Duplicating text lines by holding the Alt key and dragging can quickly populate your flyer with similar text blocks.
Finally, incorporate your company logo by going to File > Place Embedded. Scale and position the vector image of your logo, perhaps in the upper right corner, and apply a Drop Shadow effect with specific opacity, distance, and size settings (e.g., Opacity 11%, distance 3 px, size 16 px). This systematic approach allows for the integration of various text elements and branding assets.
Design Principles for Effective Flyers
Beyond the technical aspects of Photoshop, several design principles contribute to a flyer's effectiveness.
Color Scheme and Visual Harmony
The color of a flyer is often the first element that captures a viewer's attention. Choosing the right color scheme is paramount. Harmonious color schemes frequently involve three colors that are evenly distributed around the color wheel, forming an equilateral triangle. Experimenting with color palettes can lead to a successful design.
While bright colors can be impactful, they can also be overwhelming, especially when occupying large areas. Rich designs can be achieved through thoughtful use of color, including the strategic application of black and white to emphasize color accents and create a balanced composition. Complementary colors, which are opposite each other on the color wheel (e.g., green and red, blue and orange, purple and yellow), can create strong visual contrast. If using intense colors, softening the composition with subtle patterns or calm basic hues can enhance visual appeal.
Content and Visual Hierarchy
When designing a flyer, clarity about its purpose is essential. If the flyer is intended to convey a few key points and a strong image, a smaller size can help maintain focus. Conversely, if you are sharing event schedules, multiple offers, or product lists, a larger size will prevent the information from feeling cramped.
A bold headline should immediately inform the reader about the flyer's subject. High-quality images that relate to the message are crucial. Limiting the color palette to two or three strong colors helps avoid an overwhelming design. Typography is also vital; choose fonts that are easy to read and ensure that the most important information stands out. Keep text concise and use bullet points for scannability.
Digital vs. Print Considerations
The distinction between digital and print flyers influences design decisions, including resolution and file size. Digital flyers require a resolution of at least 72 dpi for screens, while print flyers necessitate a minimum of 300 dpi for sharp, clear printing without pixelation. Digital flyers should also be optimized for quick loading, meaning file size is a consideration. For print, you can focus more on quality and color depth.
Online audiences tend to scroll quickly, making a smaller, punchier flyer potentially more effective for digital platforms. A printed A4 flyer, however, might capture longer attention spans at events or in-store.
Beyond Photoshop: Alternative Tools and Considerations
While this guide focuses on Photoshop, it's important to acknowledge other tools and workflows. For page layout and document creation, Adobe InDesign or Illustrator are often preferred due to their specialized features. However, if your heart is set on Photoshop, understanding its capabilities and limitations is key.
For those seeking alternative photo editing and collage creation apps, Luminar Neo is mentioned as an effective option. Additionally, leveraging pre-made templates can significantly simplify the design process. These templates can be customized to suit specific needs, allowing designers to focus on content and branding without starting from scratch.
When planning a print project, collaborating with an experienced commercial printer is advisable. Companies like Thomas Group Printing offer resources and expertise to ensure a seamless and high-quality printing experience. They provide helpful guides, free starter files in various formats (including InDesign, Illustrator, and Photoshop), and can offer custom quotes for printing jobs. Their services are designed to help clients navigate the often complex process of print production, ensuring that the final printed piece reflects the quality of their brand.
Ultimately, creating a successful flyer involves a thoughtful combination of choosing the right size, employing effective design principles, and utilizing the appropriate tools. Whether you're using Photoshop, InDesign, or another program, the goal remains the same: to deliver your message clearly, visually engage your audience, and achieve your promotional objectives.