Procreate, a powerful digital art application, offers a sophisticated suite of color selection and manipulation tools designed to cater to a wide range of artistic workflows. Among these, the eyedropper tool stands out as an indispensable feature for achieving color accuracy and efficiency. Whether you're meticulously color-matching for a specific project or freely exploring the vast spectrum of shades, understanding how to effectively utilize Procreate's color interfaces and the eyedropper functionality is paramount for any digital artist.
Navigating Procreate's Color Interfaces
Procreate presents users with several distinct color interfaces, each tailored to different approaches to color selection. These interfaces are accessible through the Color Panel, which can be summoned by tapping the color swatch in the top right corner of the Procreate interface, or by dragging the Active Color onto the canvas to invoke ColorDrop. The Color Panel can be repositioned anywhere on the canvas by dragging its small grey handle at the top.
The Color Disc: A Dynamic Approach to Hue and Saturation
When you first open the Color Panel, the Color Disc interface is presented by default. This dynamic tool features an outer Hue ring surrounding an inner, zoomable Saturation disc. This allows for intuitive exploration of color relationships. Within the Color Disc, a reticle, which is a clear circle, can be dragged to select a color. As you move a smaller, secondary reticle, it displays two colors in a split circle: the color the reticle currently hovers over on the right, and the most recent color selected on the left, which is part of your Color History.
Classic Interface: Familiarity and Tradition
For those who prefer a more traditional approach, the Classic interface offers a familiar color selection experience. This mode provides a straightforward way to pick colors, mirroring the interfaces found in many other digital art applications.
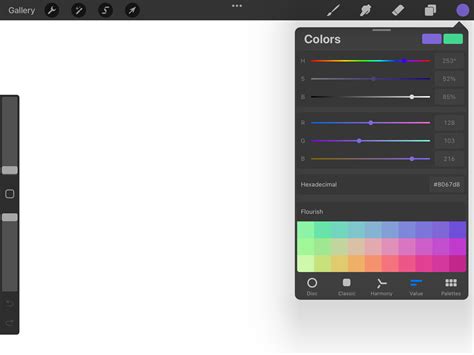
Value Interface: Precision and Numerical Control
The Value interface caters to artists who require a high degree of precision. It offers sliders for adjusting hue, saturation, and brightness, alongside numerical and hexadecimal values. This is particularly useful for precise color matching or when working with specific color codes. Hexadecimal values, a six-character alphanumeric code (0-9, A-F), represent a precise combination of red, green, and blue values, where 00 signifies zero and FF signifies 255. The alphanumeric field allows for easy copying and pasting of these hex values.
Harmony Interface: Exploring Color Relationships
The Harmony interface is designed to help artists select colors that are aesthetically pleasing and complementary. By tapping the Harmony tab within the Color Panel, users can choose from various color harmony algorithms. Dragging the primary color reticle around the color wheel in this mode allows you to select your active color, and the interface will then suggest harmonious color combinations.
Palettes: Organizing and Managing Your Color Sets
The Palettes tab is where you can create, import, and organize collections of color swatches, known as palettes. Procreate comes with several pre-installed standard palettes, and users can create their own or import them from external sources. The active palette, which is the set of swatches currently in use, is indicated by a tick next to its name at the bottom of the Color Panel. You can set a different palette as active by tapping the ellipsis on the far right and selecting 'Set as active'.
The Eyedropper Tool: Precision Color Sampling
The eyedropper tool is a fundamental feature for digital artists, enabling the quick and precise selection of colors directly from an image or artwork. Before using the eyedropper, ensure you have a reference image or your artwork open in Procreate. If you need to bring in a reference, you can do so by tapping the wrench icon (Actions menu) and selecting "Insert a photo."
Activating and Using the Eyedropper
There are multiple ways to activate the eyedropper tool in Procreate, and customizing this gesture can significantly streamline your workflow. One common method involves a specific touch gesture that you can assign within Procreate's settings. Once activated, the eyedropper allows you to sample any color on your canvas. The selected color will appear at the top of the eyedropper interface, while the previous color is displayed at the bottom, providing a useful reference for color interaction or for selecting similar shades.
Advanced Color Filling Techniques: ColorDrop and SwatchDrop
Procreate offers sophisticated tools for filling areas with color, namely ColorDrop and SwatchDrop, which provide control over the fill behavior.
ColorDrop: Effortless Filling with Threshold Control
ColorDrop is Procreate's primary fill tool. By dragging your currently selected color (the Active Color) onto the canvas, you can initiate a fill. A colored dot will detach from the Active Color and hover over the canvas, indicating where the fill will originate. Tapping the canvas then executes the fill.
The real power of ColorDrop lies in its Threshold setting. To activate Threshold, drag your Active Color over the desired area without releasing your finger. After a moment, ColorDrop Threshold will activate, indicated by a thin bar above the artwork. You can then adjust the fill area by dragging your finger left (to fill less area) or right (to fill more area). This threshold setting is remembered by Procreate until it is changed again.
For users with iPadOS 16.1 or newer on compatible iPad Pro models, ColorDrop offers a "hover" feature, providing a more precise location for initiating the fill before you commit with a tap.
What to Do if Your Color Spills | Procreate ColorDrop Fix
SwatchDrop: Filling with Palette Colors
SwatchDrop functions similarly to ColorDrop but allows you to use colors directly from your active palette. To use SwatchDrop, touch and hold a swatch color from a Color Palette and drag it onto your canvas. To activate the Threshold, continue to touch and hold the swatch as you drag it over the area you want to fill. A blue line will appear on the top of your screen, indicating that the threshold is active. Swiping your finger left or right adjusts the fill threshold, just as with ColorDrop. SwatchDrop also remembers the last threshold setting used.
Continue Filling Mode
After using ColorDrop, an option to "Continue Filling" may appear at the top of the interface. Tapping this allows you to enter a mode where you can further adjust the threshold of subsequent fills with additional taps and holds.
Recolor Mode: Transforming Artwork with Color
Recolor mode provides a powerful way to transform the colors within your artwork. To enter Recolor mode, you'll typically assign it as a QuickMenu button. Once activated, a small crosshair will appear in the center of the screen. You can then use the Flood slider at the bottom of the screen to gradually fill your artwork with a new color. The loupe displays your new color on the top half and the current color on the bottom half, offering a clear visual comparison.
Invoking the Floating Eyedropper
Within the sidebar, holding the "Modify" button can invoke a floating Eyedropper tool. This provides another method for sampling colors, and as noted, the new color appears at the top of the loupe with the previous color at the bottom.
Color History and Active Color Management
Procreate keeps track of your recently used colors in the Color History, which can display up to ten colors. When you first open a new artwork, this section is empty, with colors being added as you select them. You can choose to display your Color History instead of your active palette by tapping a specific option within the Color Panel settings. The Active Color swatch in the top right corner of the interface displays your currently selected color. Pressing and holding this swatch allows you to quickly switch between your current and previous color, a highly efficient feature for rapid color adjustments.
Beyond the Basics: Advanced Color Dynamics
The secondary color, often the second-to-last color you've used, can be incorporated into a brush's Color Dynamics settings. This allows for more complex and dynamic color effects within your brush strokes, adding another layer of artistic control and expressiveness to your work in Procreate. The ability to select, adjust, and drag and drop colors extends even to video creation within applications like Procreate Dreams, highlighting the platform's comprehensive approach to color management across different creative endeavors.
tags: #procreate #eyedropper #tool