DaVinci Resolve is a powerhouse for video editing, offering a vast array of tools for professionals and aspiring creators alike. Among its many capabilities, understanding and effectively managing video sizing, conforming, and aspect ratios are fundamental to achieving polished and platform-appropriate results. This guide delves into these crucial aspects, from the foundational concept of conforming to the practicalities of resizing and aspect ratio adjustments within DaVinci Resolve.
The Art of Conforming: Bridging the Quality Gap
Conforming is a cornerstone of professional post-production workflows, a process that can initially seem complex but is ultimately about ensuring the highest quality output. At its core, conforming is the act of replacing lower-quality media used during the editing process with higher-quality, camera-original files. Think of it like this: editing often involves working with "proxies" - smaller, more manageable files that make the editing process smoother and require less storage. This is akin to using readily available ingredients for a trial run of a recipe.
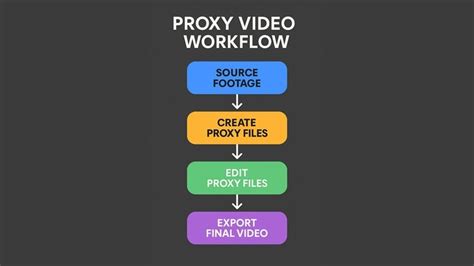
When an edit is finalized, or "locked," this sequence needs to be handed off for further stages like color grading, visual effects, or final mastering. This is where conforming becomes essential. Instead of continuing with the lower-quality proxies, the conforming process uses the original, high-resolution camera files. This ensures that the final product retains the maximum possible image quality, much like using premium ingredients to achieve the best possible taste in a dish.
Why Conform? The Necessity in Collaborative Workflows
The need for conforming becomes increasingly apparent as projects grow in scope and complexity. While it's possible to handle editing, graphics, and color within a single program for smaller projects, larger productions involve multiple artists and specialized software. A typical professional project might involve CG vendors, colorists, motion graphics teams, and online editors, each requiring specific file types and quality standards. Conforming is the bridge that allows these different artists to work with the appropriate media, ensuring seamless integration and maintaining project integrity. It's about preparing files for specific tasks: conforming for color grading, conforming for finishing, or conforming for CG. This ensures that low-resolution shots are replaced with high-resolution files in codecs and bitrates optimal for the next stage of the pipeline.
For instance, when sending a shot to a CG vendor, you'll conform the low-resolution edit file to a higher-resolution version suitable for CG work. Similarly, a colorist will conform the original camera files to your edit sequence before grading. After grading, these files might be sent back to an online artist who conforms them back into the edit, adding back editorial effects, graphics, and audio for the final master. In advanced workflows, original camera files might be transcoded into high-quality mastering formats like DPX or OpenEXR. This practice preserves maximum quality and facilitates a smoother color and VFX pipeline across multiple vendors.
Conforming for Collaboration: Communication is Key
Effective conforming hinges on clear communication between all parties involved: the editor, assistant editor, producer, post-supervisor, and the artists or vendors performing the conform. A crucial first step is to discuss the workflow and expectations. For example, if an offsite colorist is involved, understanding their preferred method of preparation, client expectations for the color grade, and the details of source file conforming is vital. Similarly, direct communication with CG companies about file preparation, required file types, and transfer methods is essential.
DaVinci Resolve is a powerful tool for conforming, simplifying the process of matching edits back to source files and outputting in the necessary formats, color spaces, and resolutions. When all stakeholders are aligned on project requirements, the conform process can proceed smoothly.
Common Conform Scenarios
Several common scenarios highlight the importance of conforming:
- Commercial Conforming (Color and Shots): An edit sequence is prepared without effects. The colorist conforms and grades the source shots. Individual colored shots are then rendered with handles.
- Online and Sequence (Commercial): An edit sequence is prepared with all effects. An online artist conforms to the colored shots, reintroduces graphics, audio, and elements from the offline edit.
- Film/TV Conforming (Online and Shots): An edit sequence with effects is prepared. An online artist conforms source shots, which are then rendered for CG or VFX. The sequence is rendered for color grading.
- Color Grading Workflow: A conformed sequence with baked-in effects is imported. The colorist or assistant adjusts the edit. The color-graded sequence is rendered back to the online editor.
DaVinci Resolve: A Practical Guide to Sizing and Aspect Ratios
Beyond conforming, mastering the intricacies of video sizing and aspect ratios is crucial for delivering content that looks its best on various platforms. DaVinci Resolve offers robust tools to manage these aspects, whether you're working with standard formats or creating content for specific online platforms.
Understanding Aspect Ratios
An aspect ratio defines the proportional relationship between a video's width and its height. The choice of aspect ratio is dictated by the intended viewing platform and aesthetic goals.
- 4:3 and 1.37:1 (Academy Ratio): These were early standards in filmmaking, offering pleasing visual aesthetics often tied to principles like the "golden ratio." The 4:3 ratio was declared the standard for American films in 1909. The 1.37:1 ratio is closely related and was the standard for many years.
- 16:9: This is the international standard for high-definition television and is the preferred aspect ratio for most streaming videos today. It offers a balance between the older 4:3 and the wider cinematic formats.
- 2.35:1 (Widescreen): Originating in the 1940s, this wider aspect ratio was developed to help movie theaters compete with the rise of television. It provides a cinematic feel with a broad field of view.
- 9:16: This vertical aspect ratio is common for short-form mobile content, such as TikTok and Instagram Reels. It offers a narrow frame, which can present unique compositional challenges but is highly effective for vertical viewing.
The evolution of these ratios reflects the changing landscape of film, television, and digital media. Wider aspect ratios generally offer a broader sense of space, allowing for larger scenes to be depicted.
Calculating Aspect Ratio
To calculate the aspect ratio of a video, simply divide the width by the height. For a resolution of 1920x1080 pixels, the aspect ratio is 1920 ÷ 1080 ≈ 1.778, which corresponds to 16:9. It's important to note that pixel aspect ratios can differ from display aspect ratios; for instance, a 16:9 video on a computer might appear horizontally stretched on a TV if pixel ratios aren't accounted for.
Changing Aspect Ratio in DaVinci Resolve
DaVinci Resolve provides several ways to manage aspect ratios, from project settings to individual clip adjustments.
Project Settings and Timeline Creation
When creating a new project in DaVinci Resolve, you can define the project settings, including the timeline resolution and frame rate.
- Create a New Project: Launch DaVinci Resolve and start a new project.
- Project Settings: Navigate to "File" > "Project Settings" (or use the shortcut, typically Ctrl+9 or Cmd+9).
- Master Settings: Under "Master Settings," you can set the "Timeline resolution." You can choose from presets or input custom dimensions.
- Create New Timeline: When creating a new timeline within a project, you have the option to "Use Project Settings" or customize the resolution and frame rate for that specific timeline. To do this, uncheck "Use Project Settings" in the "Create New Timeline" panel. This allows for different aspect ratios within the same project, useful for mixed-format projects.
For vertical short videos (9:16), a common resolution is 1080x1920.
Mismatched Resolution Settings
Within the "Create New Timeline" settings, the "Mismatched Resolution" option in the "Format" tab is crucial. This setting determines how DaVinci Resolve handles clips whose resolution doesn't match the timeline's resolution:
- Center Crop with No Resizing: Maintains the original clip size without scaling.
- Scale Full Frame with Crop: Scales the clip proportionally based on the shorter edge to match the project resolution's shorter edge, then crops any excess.
- Scale Entire Image to Fit (Default): Scales the clip proportionally based on the longer edge, aligning it with the timeline resolution's longer edge. This preserves the aspect ratio but may result in black bars if the aspect ratios don't match.
- Stretch Frame to All Corners: Non-proportionally stretches the clip to fill the entire timeline resolution. This can distort the image.
The Cut Page for Quick Aspect Ratio Changes
A more streamlined approach for changing aspect ratios is available on the Cut Page.
- Switch to the Cut Page: Navigate to the Cut Page.
- Dropdown Menu: Click the arrow next to the timeline resolution indicator to reveal a dropdown menu with presets like 3840x2160, 1920x1080, 1080x1920, and 1080x1080. Selecting one of these presets instantly changes the timeline's aspect ratio.
For users employing hardware controllers like TourBox, macros can be programmed to simulate these manual aspect ratio changes with a single click, further streamlining the workflow.
Resizing Individual Clips
When you need to adjust the size or position of a specific clip within the timeline:
- Select the Clip: Choose the clip in the timeline.
- Inspector Panel: Open the Inspector Panel (top right corner).
- Transform Section: Under the "Transform" section, you can adjust "Zoom X" and "Zoom Y" to enlarge or shrink the clip. "Position" controls its placement within the frame.
For precise resizing without quality loss, especially when dealing with different aspect ratios, consider using the Fusion Page.
Resizing with Fusion
In the Fusion Page:
- Add a Transform Node: Add a Transform node to your clip.
- Adjust Size: Use the "Size" parameter in the Inspector to scale the clip.
- Reposition: Use "Center X/Y" to adjust its position.
- Animation: Keyframes can be added to the "Size" parameter for animated resizing effects.
Maintaining Quality During Resizing
To ensure quality when resizing:
- Use High-Resolution Footage: Start with the highest resolution source material possible.
- Project Settings - Resize Filter: In Project Settings > Image Scaling, set the "Resize Filter" to "Smoother."
- Avoid Excessive Zooming: Excessive zooming on low-resolution clips will inevitably lead to pixelation and blurriness.
- Fusion Page: For critical resizing tasks, the Fusion Page offers more control and can help minimize quality degradation.
Resizing Multiple Clips
To resize multiple clips simultaneously:
- Resize One Clip: Adjust one clip in the Inspector Panel as desired.
- Copy and Paste Attributes: Right-click the adjusted clip, select "Copy," then select the other clips you want to modify. Right-click on the selected clips and choose "Paste Attributes." You can then select which attributes (like Zoom and Position) to paste.
Troubleshooting Sizing and Stretching Issues
- Video Looks Stretched: If your video appears distorted, check Project Settings > Image Scaling and ensure you're using "Scale entire image to fit" rather than "Stretch to fill" if you want to maintain the original aspect ratio.
- Black Bars: Black bars (letterboxing or pillarboxing) appear when the clip's aspect ratio doesn't match the timeline's aspect ratio. You can manually reframe by adjusting Zoom and Position in the Inspector, or use the "Stretch Frame to Fill" or "Crop" options in Project Settings > Image Scaling.
- Blurry Resized Video: This is often due to low-resolution source files or improper scaling. Use high-resolution sources, the "Smoother" resize filter, and avoid excessive zooming.
Output Sizing in DaVinci Resolve
Output sizing refers to the configuration of your final video export. This is managed on the "Deliver" page.
- Navigate to the Deliver Page: Go to the Deliver page after completing your edit.
- Video Settings: In the "Video" section, you can select presets or manually input desired parameters like resolution, frame rate, codec, and quality.
- Customization: Tools for cropping, scaling, and repositioning are available to ensure the final output meets specific platform requirements.
Output Sizing Not Working?
If your output sizing isn't behaving as expected:
- Project Settings vs. Export Settings: Ensure your timeline resolution aligns with your desired output resolution. If they differ, DaVinci Resolve's scaling settings come into play.
- Export Settings: Double-check your output resolution and format settings on the Deliver page.
- Sizing Information: In the export settings, ensure "Sizing Information" is set appropriately (e.g., "Scale full frame with crop" to maintain aspect ratio).
- Software Glitch: As with any software, restarting DaVinci Resolve or your computer can resolve temporary glitches.
Changing Output Sizing After Editing
Yes, you can change the output sizing on the Deliver page even after editing. However, be mindful that increasing the output size significantly from lower-resolution source material will involve interpolation and can lead to a loss of detail. Conversely, decreasing the size might crop or lose some original detail. It's generally best practice to establish your intended output size early in the project.
My MUST CHANGE DaVinci Resolve Settings (Pro Tips)
Conclusion: Empowering Your Workflow
Mastering conforming and understanding video sizing and aspect ratios are essential skills for any DaVinci Resolve user. By effectively utilizing the tools within DaVinci Resolve, from the meticulous process of conforming to the flexible options for managing aspect ratios and output settings, you can ensure your projects are delivered with the highest quality and are perfectly tailored for their intended audience and platforms. Consistent communication, careful preparation, and a solid understanding of these technical aspects will elevate your post-production workflow and the final polished look of your videos.