DaVinci Resolve, a powerful video editing software, offers robust tools for subtitle creation and management. However, users sometimes encounter issues where subtitles do not render as expected. This guide delves into the intricacies of adding and exporting subtitles in DaVinci Resolve, addressing common problems and providing solutions for both automatic and manual subtitle generation. We will explore the workflow from initial project setup to final export, ensuring your subtitles are visible, accurate, and professionally presented.
Importing and Preparing Your Video for Subtitles
The first step in any DaVinci Resolve project involving subtitles is to properly import and prepare your media. This foundational step ensures that the subsequent subtitle creation process is smooth and accurate.
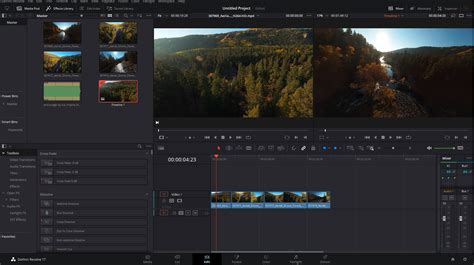
- Importing Video: Begin by importing your video file into DaVinci Resolve. This is typically done through the Media Pool, where you can drag and drop your footage or use the import function.
- Timeline Placement: Once imported, drag the video clip onto the Timeline in the Edit tab. This creates the canvas upon which you will build your edited sequence, including the addition of subtitles. Ensuring the clip is correctly placed and trimmed is crucial before proceeding to subtitle work.
Generating Automatic Subtitles with DaVinci Resolve Studio
DaVinci Resolve Studio, the paid version of the software, offers a significant advantage for subtitle creation: an AI-powered speech-to-text tool. This feature automates a considerable portion of the subtitling process, making it faster and more efficient.
- Accessing the Fairlight Page: To leverage the automatic subtitle generation, navigate to the Fairlight page, which is dedicated to audio post-production. This page is accessible via the bottom menu bar.
- Creating Subtitles from Audio: Within the Fairlight page, select the "Timeline" menu and then choose "Create Subtitles from Audio." This action initiates the AI transcription process.
- Language Selection and Generation: You will be prompted to select the language spoken in your audio track. Once the language is chosen, click "Generate Subtitles." DaVinci Resolve will then analyze the audio and automatically create a subtitle track populated with transcribed text.
- Subtitle Track Creation: The software automatically generates a dedicated subtitle track on your timeline. This track will contain the transcribed text, with each segment corresponding to a portion of the audio.
Pro Tip: Fine-Tuning Auto-Generated Subtitles
While the AI is remarkably accurate, it's not infallible. If the automatically generated subtitles do not perfectly match the spoken dialogue or require timing adjustments, you can refine them directly within the Subtitle track editor. This allows for precise control over when each subtitle appears and disappears, ensuring perfect synchronization with the audio.
Editing and Styling Auto-Generated Subtitles
Once the automatic subtitles are generated, the next crucial step is to review and edit them for accuracy and readability. DaVinci Resolve provides comprehensive tools to customize the appearance and timing of your subtitles.
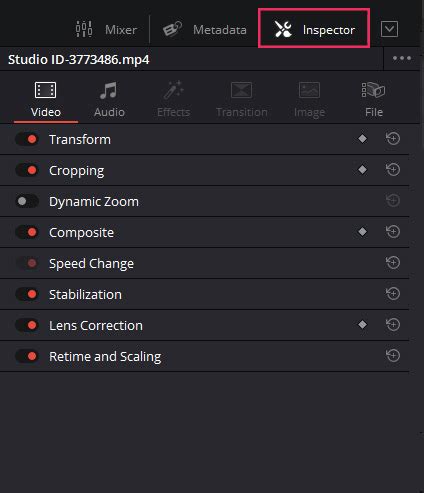
- Opening the Inspector Panel: To access the editing options, open the Inspector Panel. This is typically located in the top-right corner of the DaVinci Resolve interface.
- Text, Font, Position, and Size Adjustments: Select an individual subtitle clip on the timeline. In the Inspector Panel, you can then edit the text itself, correcting any transcription errors. Furthermore, you have complete control over the font style, size, and position on the screen. This allows you to ensure the subtitles are legible and aesthetically pleasing.
- Readability and Duration: Adjusting the length of each subtitle clip is vital for readability. A subtitle should remain on screen long enough for viewers to read it comfortably, but not so long that it becomes distracting or out of sync with the dialogue.
Pro Tip: Optimizing Subtitle Presentation
For enhanced readability, consider using two-line subtitles, which can break up longer phrases and make them easier to digest. A general guideline is to keep the text under 42 characters per line. This prevents lines from becoming too long and potentially obscuring important visual information on the screen.
For more in-depth guidance on text elements within DaVinci Resolve, including titles and other text overlays, consult our guide on how to add text in DaVinci Resolve.
Exporting Your Video with Subtitles
The final stage of the subtitle workflow is exporting your video. DaVinci Resolve offers flexibility in how you embed or export your subtitles, catering to different platform requirements.
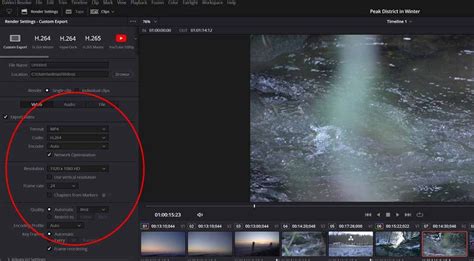
- Navigating to the Deliver Page: To export your video with subtitles, go to the "Deliver" page, which is where you finalize and render your project.
- Subtitle Settings: Within the Deliver page, locate the "Subtitle Settings" section. Here, you have two primary options:
- Burn into Video: Selecting this option will "hardcode" the subtitles directly into the video stream. This means the subtitles will always be visible and cannot be turned off by the viewer. This is often referred to as "burned-in" subtitles.
- Export as SRT File: Choosing this option will export your subtitles as a separate SRT (SubRip Text) file. SRT files are widely compatible with online platforms like YouTube and other social media services, allowing them to display captions dynamically. Viewers can typically choose to turn these captions on or off.
- Rendering the Video: Once you have configured your subtitle export settings, click "Render" to begin the export process.
Pro Tip: Understanding Export Options
It's important to understand the implications of each export method. Hardcoded subtitles are permanently part of the video, offering guaranteed visibility but no user control. SRT files, on the other hand, provide flexibility for viewers and are the standard for online platforms, enabling features like translation and automatic captioning by the platform itself.
How To EXPORT Subtitle CAPTIONS In Davinci Resolve
Manual Subtitle Creation in DaVinci Resolve
While automatic subtitle generation is a powerful tool, manual entry provides the highest level of precision and control. This method is ideal for situations requiring specific formatting, translations, or when working with DaVinci Resolve's free version, which lacks the AI transcription feature.
- Adding a Subtitle Track: In the Edit tab, go to the Timeline menu and select "Add Subtitle Track." This creates a new, empty track dedicated to subtitles.
- Importing Subtitle Clips: You can then drag subtitle clips directly into this track. These clips can be created manually or imported from external subtitle files.
- Manual Text Entry and Timing: Use the Inspector panel to manually enter the text for each subtitle. You can also precisely adjust the timing of each subtitle's appearance and disappearance, ensuring perfect synchronization with your video content.
Regardless of whether you choose the AI-driven automatic method or the precise manual approach, DaVinci Resolve equips you with the tools necessary to achieve professional-quality subtitles.
Frequently Asked Questions About Subtitles in DaVinci Resolve
This section addresses common queries regarding subtitle implementation in DaVinci Resolve, providing concise answers to clarify potential points of confusion.
How do I add subtitles in DaVinci Resolve?
To add subtitles, navigate to the Edit tab. Click on "Timeline" in the menu bar, then select "Add Subtitle Track." After adding the track, you can drag subtitle clips into it. Use the Inspector panel to manually enter text and adjust the timing. For automated subtitles, DaVinci Resolve Studio offers AI-based speech-to-text tools.
Can DaVinci Resolve generate automatic subtitles?
Yes, DaVinci Resolve Studio, the paid version, includes AI-powered speech-to-text features that can automatically generate subtitles. To utilize this, go to the Fairlight page, select "Timeline" > "Create Subtitles from Audio," and choose the appropriate language. Once generated, the text and timing can be edited for accuracy.
How do I manually add subtitles in DaVinci Resolve?
To add subtitles manually, go to the Edit tab. In the Effects Library, find "Titles" and then select "Subtitles." Drag a subtitle clip onto your subtitle track. You can then enter text and adjust font, position, and duration using the Inspector panel.
What is the difference between automatic and manual subtitles in DaVinci Resolve?
Automatic subtitles leverage AI speech recognition to create text automatically, which saves time but typically requires manual correction for accuracy. Manual subtitles offer complete control over accuracy, timing, and formatting, making them suitable for precise placement and translations.
Can I export subtitles as an SRT file in DaVinci Resolve?
Yes, you can export subtitles as an SRT file. Go to the Deliver page, select "Subtitle Settings," and choose "Export Subtitle File (SRT)." This allows for dynamic caption display on platforms that support SRT files.
Why are my subtitles not appearing in DaVinci Resolve?
If subtitles are not showing, first ensure that subtitle tracks are enabled. You can do this by right-clicking on the timeline and selecting "Enable Subtitle Track." Also, verify that the subtitle clips are correctly positioned within the timeline and not hidden or placed off-screen.
How do I adjust subtitle timing in DaVinci Resolve?
To adjust subtitle timing, select the subtitle clip on the timeline. You can then drag the edges of the clip to extend or shorten its duration. For more precise adjustments, use the Inspector panel to fine-tune the subtitle's start and end times.
How do I customize subtitle fonts and styles in DaVinci Resolve?
To customize the appearance of subtitles, select a subtitle clip. In the Inspector panel, you can adjust the font, size, color, position, and background opacity. If you need multiple subtitle languages, create a new track for each by going to "Timeline" > "Add Subtitle Track" and then export separate SRT files or burn them into different video versions.
How do I remove black background behind subtitles in DaVinci Resolve?
To adjust or remove the black background behind subtitles, select the subtitle clip. Open the Inspector panel and modify the background transparency settings. This allows you to control the opacity of the background box behind the text.
How do I automatically sync subtitles to audio in DaVinci Resolve?
For automatic synchronization, use DaVinci Resolve Studio's AI-generated subtitles by selecting "Timeline" > "Create Subtitles from Audio." If you are syncing manually, align the subtitle clips with the audio waveform displayed in the timeline for visual guidance.
How long should each subtitle stay on screen?
Each subtitle should ideally remain on screen for at least 2 seconds but no longer than 6 seconds, depending on the length of the sentence. Keeping text under 42 characters per line also significantly improves readability.
Can I animate subtitles in DaVinci Resolve?
Yes, you can animate subtitles. This can be achieved using the Fusion page for more complex animations or by applying keyframes to properties like position, opacity, and scaling within the Inspector panel. This allows for smooth and engaging subtitle transitions.
Why should I use subtitles in my videos?
Subtitles are essential for increasing video engagement, improving SEO rankings, and enhancing accessibility for a wider audience. For better contrast and readability, always consider using a black outline or shadow around your subtitle text.
Does adding subtitles improve video SEO?
Yes, subtitles significantly improve video SEO. Search engines can index the text within subtitles, making your videos more discoverable in search results and thereby increasing their ranking.