Knowing how to mirror in Procreate is a very useful bit of knowledge to have. Mirroring reflects your design on the opposite side, a fundamental technique for creating symmetrical artwork, duplicating elements, and enhancing visual balance. This can be done with purchased images or your own drawings. In this tutorial, we are going to show you how to mirror using two distinct techniques, each offering unique advantages for different creative workflows.
Method 1: Flipping Your Design in Procreate
The first method is the quickest and easiest way to mirror an existing design or a completed element within your artwork. This approach works best with purchased or already finished designs that you wish to replicate or use in a mirrored orientation.
Step 1: Create or Import Your Design
For this step, we will be importing a ready-made design. If you prefer to create your own design from scratch, begin by opening Procreate and creating a new canvas. For this demonstration, our canvas dimensions are 2300 x 3000 pixels.
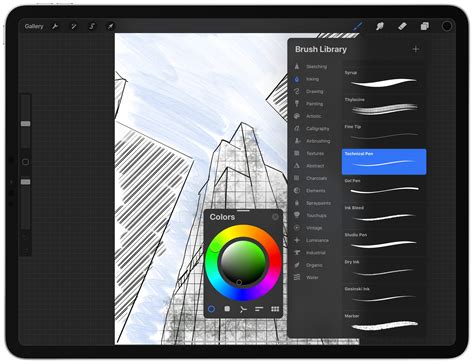
To import your design, tap on the wrench tool, which is also known as the Actions menu. From the 'Add' tab, select 'Insert a File'. Navigate through your device's storage to locate your desired file and tap on it to open it within your Procreate canvas.
Once the image is open, you will notice that the Selection tool, represented by an arrow icon at the top of the interface, automatically becomes active. With the 'Uniform' option selected within the Selection tool, you can tap and drag one of the corner nodes inward to scale the image down. In our example, we shifted our imported image over to the right because the unicorn in the design was initially facing left, and we wanted to prepare it for mirroring.
Step 2: Mirror the Image in Procreate
With your design in place, navigate to the Layers Panel. Swipe the layer containing your image to the left. From the options that appear, tap on 'Duplicate' to create an exact copy of your design on a new layer.
Now, using the Selection tool again, ensure that 'Uniform' is selected. Tap on the 'Flip Vertical' option. Procreate offers both vertical and horizontal flipping capabilities, allowing you to mirror your design along either axis. For our unicorn example, we will proceed with a vertical flip to create a symmetrical pairing.
Next, tap on the Snapping icon, typically found near the Selection tool, and make sure 'Snapping' is turned on. This feature is invaluable as it provides visual guidelines that help with precise positioning, ensuring your mirrored element aligns perfectly with the original.
With snapping enabled, move this newly flipped image to the left side of your canvas. As you move it, you will see intelligent guidelines appear, assisting you in placing the mirrored image accurately. You can reposition the image however you desire or follow our visual example for guidance.
Once you are satisfied with the placement, tap anywhere on the canvas or on the Selection menu to deselect the tool. At this point, if you wish to combine your original and mirrored designs into a single layer, this is a good time to merge them. You can do this by pinching two layers together in the Layers Panel.
From here on, you can add and edit text, incorporate other design elements, or refine your composition further. You can also easily change the color of your design elements using the Color Palette, allowing for extensive customization.
Method 2: Mirroring with the Symmetry Tool
The second method is a powerful and dynamic approach, particularly well-suited for work in progress or when you want to create intricate symmetrical patterns from the ground up. The Symmetry tool in Procreate mirrors your strokes in real-time as you draw, using predefined axes. This is especially helpful in creating complex designs like mandalas, intricate patterns, or drawing faces with perfect balance. For this method, we chose a square canvas size of 2500 x 2500 pixels to facilitate symmetrical composition.
Step 1: Set Up the Symmetry Guide
To activate the Symmetry Guide, tap on the Actions icon (the wrench tool). Navigate to the 'Canvas' tab and toggle the 'Drawing Guide' slider so that it turns blue, indicating it's active. Then, tap on 'Edit Drawing Guide'.
The Drawing Guide menu will appear at the bottom of your screen, offering various grid and guide options. Tap on 'Symmetry'. You will immediately see a single vertical line appear through the middle of your canvas, dividing it into two equal halves.
Within this menu, you can customize the appearance of the symmetry line. The color of the guideline can be adjusted by moving the circular slider located at the top of the menu. Additionally, the 'Opacity' and 'Thickness' of the guide lines can be edited to your preference, ensuring optimal visibility without obscuring your artwork. Once you have made your adjustments, tap 'Done' in the top-right corner.
Step 2: Draw Your Design Using Symmetry
With the Symmetry Guide activated, choose a side of the canvas to begin drawing. In this example, we chose to start on the right side. As you draw, Procreate will automatically mirror your strokes onto the opposite side of the vertical axis. This live mirroring effect allows you to see the symmetrical outcome of your actions instantly, making the drawing process intuitive and efficient.
Once your symmetrical drawing is complete, you can proceed to fill it with color or add further details and shading. The Symmetry tool ensures that any additions or modifications you make on one side are perfectly replicated on the other, maintaining the integrity of your symmetrical design.
Exploring Advanced Symmetry Options
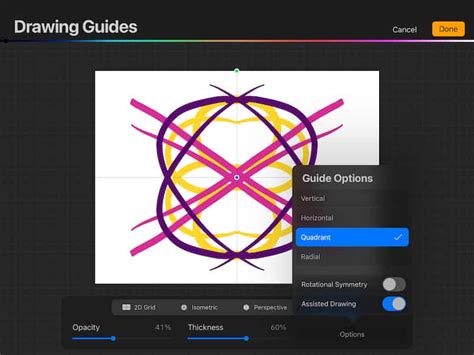
Procreate's Symmetry tool offers more than just a simple vertical flip. You can access these advanced options by navigating to Actions > Canvas > Edit Drawing Guide and then tapping the 'Options' button.
Vertical Symmetry: This is the default setting, mirroring your strokes across a central vertical line. It's ideal for many symmetrical illustrations and character designs.
Horizontal Symmetry: By selecting 'Horizontal' in the Options menu, your drawing will be mirrored across a central horizontal line. This is excellent for designs that require symmetry from top to bottom. Make sure 'Assisted Drawing' is active; everything you draw on the bottom of the canvas will reflect on top, and vice versa. You could try to draw a beetle with this Procreate mirror tool.
Quadrant Symmetry: This mode divides your canvas into four equal quadrants using both a vertical and a horizontal guideline. When you draw in one quadrant, your stroke is mirrored into the other three. The Quadrant Symmetry Tool is a great way to learn how to do symmetry in Procreate. Now, if you draw on one-quarter of the canvas, your drawing will be mirrored in the other three-quarters.
Radial Symmetry: This powerful option splits your canvas into eight segments, using vertical, horizontal, and diagonal guidelines. It's the best way to draw a mandala. You draw on ⅛ of the canvas, and your drawing mirrors on the other ⅞ of the canvas. This Procreate mirror tool works like magic! When Radial Symmetry is active, your strokes are reflected and rotated around the center point.
Rotational Symmetry: This advanced setting can be combined with other symmetry modes. In Rotational Symmetry mode, your stroke is reflected and rotated, creating intricate, spiraling patterns. Once again, go to the Actions tool > Canvas > Edit Drawing Guide. Click the Options button. Everything stays as before (Radial, Assisted Drawing), but just switch on Rotational Symmetry additionally. Experiment to see the difference in effect.

Assisted Drawing and Layer Indicators
When you activate a drawing guide and choose a symmetry option, Procreate automatically enables 'Assisted Drawing' for that layer. You'll notice a small inscription 'Assisted' under the layer's name in the Layers Panel. This means that Procreate will automatically adjust your strokes to match the direction of the guide lines, ensuring perfect mirroring and alignment.
Disabling Mirroring and Drawing Guides
Once you have finished your symmetrical drawing and no longer need the mirroring functionality, you may want to disable the Drawing Guide. This can be a little tricky. To disable the guide, navigate back to Actions > Canvas and toggle the 'Drawing Guide' slider off. At this point, mirroring should no longer work, but you may still have the guide lines visible on your canvas. To remove the guide lines entirely, you need to go back to Actions > Canvas > Edit Drawing Guide and tap 'Done' without any symmetry options selected, or simply toggle the Drawing Guide off.
Conclusion: Embracing Symmetry in Your Art
As quick as that, you have learned two effective ways to mirror in Procreate. Each method has its own particular use in specific designs, offering flexibility and power to your digital art workflow. The flipping method is ideal for quick duplication and reflection of existing artwork, while the Symmetry tool provides an intuitive and dynamic way to create perfectly balanced compositions from scratch.
We hope that this tutorial has inspired you to learn and create more in Procreate. Knowing how to mirror in Procreate is only half the battle. You now know how to use the Procreate Symmetry Tool and how to mirror draw in Procreate. We have walked through all the options of the Procreate mirror tool: Vertical, Horizontal, Quadrant, and Radial. You can use this knowledge of Procreate symmetry in your future projects, whether you are designing logos, creating intricate illustrations, or exploring abstract art. Procreate makes drawing with a tablet and stylus pen a breeze, and its robust symmetry and mirroring tools are a testament to its user-friendly design. Gain a complete understanding of your favorite design apps with my comprehensive collection of video courses.