Embarking on the journey of creating comics, cartoons, and webtoons necessitates a firm understanding of digital art tools. Among these, pen and pencil tools play a pivotal role in defining the visual language of these mediums. While pencils are invaluable for their imprecision, allowing for the freeform exploration of rough shapes and shading, it is the pen tools that typically define the crisp, deliberate line art that characterizes comics, manga, and webtoons. The default G-pen in Clip Studio Paint stands out as a popular choice, artfully mimicking the nuanced stroke of traditional dip-pens with their characteristic slightly rougher lines, a texture many traditional comic artists faithfully employ when inking on paper.
The expressiveness of line art extends beyond mere outlines. In traditional American comics, for instance, the direction of the light source and the representation of texture are often conveyed through variations in line thickness, a technique known as line weight. A prime example of this is seen in how the left side of a character’s head might be rendered with thicker lines, subtly implying a light source emanating from the right. This deliberate manipulation of line weight adds depth and a sense of volume to characters and environments, guiding the viewer's eye and enhancing the overall narrative impact.
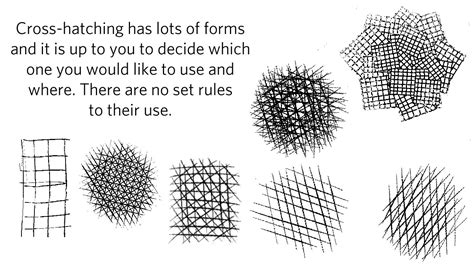
Beyond line weight, the art of hatching with a pen offers a rich vocabulary for rendering shadows and form. Hatching involves the strategic placement of short lines adjacent to each other in various patterns to define shaded areas. The intensity of a shadow can be precisely controlled by the density of these lines; a tighter, more concentrated pattern signifies a deeper shadow, while sparser lines indicate a lighter shade. Cross-hatching takes this technique a step further by layering lines in multiple directions, creating a more profound sense of darkness and volume.
Harnessing Pen Pressure for Dynamic Line Work
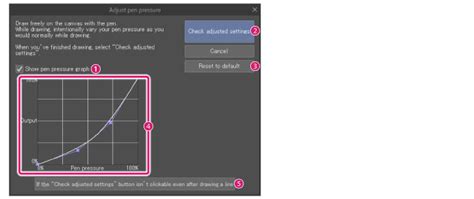
A significant advantage of digital art, particularly within Clip Studio Paint, is the ability to fine-tune the responsiveness of your digital tools to your stylus. Pen pressure sensitivity, a core feature, can be meticulously adjusted after connecting your digital pen or pen tablet. This is achieved through the intuitive Pen Pressure Wizard, which allows artists to calibrate how their pen strokes translate onto the digital canvas. If you find yourself applying too much pressure with a particular brush, leading to overly thick or dark lines, you can recalibrate the pressure curve. This adjustment ensures that the brush requires less physical pressure to achieve the desired line thickness or color opacity, empowering artists to achieve greater control and nuance in their linework.
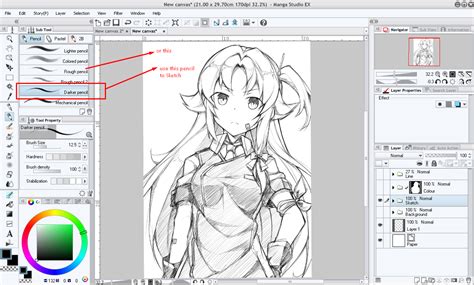
The figure below demonstrates an example of modifying the shape of the Round watercolor brush within the Brush tool's settings. This level of customization extends to virtually every brush in Clip Studio Paint, allowing for a tailored artistic experience. For those who may feel less confident in their ability to customize brushes from scratch, Clip Studio Paint offers a vibrant Assets library, a treasure trove of user-created brushes that can be downloaded and integrated into your workflow, often for free.
The Crucial Role of Light and Shadow in Storytelling
Light and shadow are not merely aesthetic elements; they are fundamental components that breathe life into a story on the page. Beyond adding dimension and realism, the interplay of light and shadow serves as a powerful tool for expressing a character's emotions and the overall mood of a scene. Unlike the intricate detail often found in full illustrations or paintings, comic panels do not always necessitate highly detailed shadow rendering. The following page, for instance, is effectively rendered with simple shadows and highlights, strategically placed to correspond with the campfire's flame as the primary light source, demonstrating how even basic applications can be highly effective.

For those striving for greater realism, a meticulous consideration of the light source is paramount when introducing light and shadow. Artists should contemplate how light interacts with the various elements within a scene, thereby adding depth, clarity, and a tangible sense of form to their compositions. In certain instances, an artist might choose to exaggerate light or shadow for heightened dramatic or emotional effect. However, it is crucial to maintain a grounding in the fundamentals of lighting to ensure that the depicted panels remain believable and visually coherent, even when employing stylistic exaggerations.
In a practical application, consider how shadows can be used to delineate different areas within a room. Shadows added to a staircase or cast upon a character on the left can effectively separate these elements from the foreground. Similarly, shadows cast behind a character, perhaps in a contrasting color like pink, can further enhance their presence and the depth of the scene. A light source positioned on the left can be clearly indicated through the subtle highlights that are then applied to the characters, suggesting form and volume.
Leveraging References for Realistic Lighting
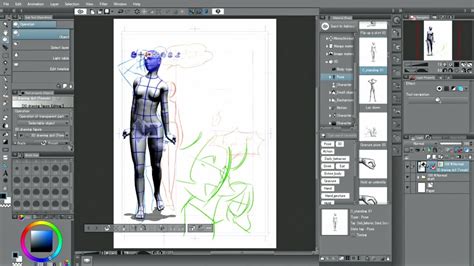
Photographs serve as an invaluable resource for understanding the complex behavior of light and shadow in real-world scenarios. By studying photographic references, artists can gain a deeper insight into how light falls on different surfaces, creating highlights, mid-tones, and shadows. Another highly effective method for acquiring shadow references is by utilizing 3D models. Clip Studio Paint allows users to import 3D character models or other 3D objects directly onto their canvas. By then adjusting the position of a virtual light source, artists can observe in real-time how light and shadow play across these three-dimensional forms, providing a dynamic and interactive learning experience.
Clip Studio Paint also features a "Shading Assist" function, a remarkable tool that can automatically generate shadows by analyzing the existing line art and projecting these shadows onto the flat colors of the artwork. This feature can significantly expedite the shading process, especially for artists who are new to digital shading or those looking to streamline their workflow.
Effortlessly create shading with Shading Assist! by Vampbyte | Clip Studio Paint Recommended Feature
Efficient Coloring Techniques in Digital Art
One of the significant advantages of digital coloring is the ability to efficiently fill large areas with flat colors without inadvertently altering the existing line art. This is achieved with remarkable ease using the Fill tool. By simply tapping within enclosed line art, artists can quickly block in colors with uniformity and evenness, laying a solid foundation for subsequent shading and detail work.
Another indispensable tool for creating smooth and visually appealing color transitions is the Gradient tool. Within Clip Studio Paint, this tool allows artists to generate even and gradual color blends by simply dragging the tool across the desired area. This is particularly useful for rendering skies, smooth surfaces, or creating atmospheric effects that require subtle color shifts.
Enhancing Panels with Texture and Pattern
Texture and pattern are potent tools for adding dimension and visual interest to comic panels without demanding an excessive amount of drawing time. In the examples provided, different texture images have been seamlessly integrated into the character’s hair, clothing, and the background elements. When employing image materials, it is crucial to ensure that they blend harmoniously with the artist's original drawings, preventing them from appearing out of place or jarring to the viewer. This integration often involves adjusting the opacity, blending modes, or even painting over parts of the texture to make it feel like an organic part of the illustration.

Understanding and Applying Perspective
To create truly believable and immersive scenes, a fundamental understanding of perspective is essential. This is particularly true when depicting environments or complex spatial arrangements. In the second example provided, the perspective aligns with the character’s eye level, effectively creating a point-of-view effect. This technique allows the reader to experience the scene as if they were seeing it through the character’s own eyes, fostering a deeper connection with the narrative.
Photo references and 3D models are invaluable resources for grasping how to draw scenes with accurate perspectives. By observing real-world photographs or manipulating 3D environments, artists can internalize the principles of converging lines and vanishing points. Clip Studio Paint further aids this process with tools like the perspective ruler. This feature allows artists to establish vanishing points and generate guidelines directly on their canvas, providing a robust framework for drawing objects and environments that adhere to the rules of perspective, thereby enhancing the believability and depth of their artwork.
Expanding Your Artistic Toolkit with Custom Brushes and Assets
The realm of digital art is characterized by an almost limitless array of tools and techniques to explore. Artists are encouraged to experiment with various approaches, including the utilization of 3D character models and backgrounds. These can be instrumental in arranging complex scenes or accurately depicting challenging poses, offering a solid foundation upon which to build detailed illustrations. Furthermore, working with vector layers in Clip Studio Paint offers a distinct advantage: it preserves the quality of your line art even when scaling the image, and it allows for much easier adjustments to line weight and shape at a later stage. This non-destructive workflow is a cornerstone of efficient digital art production.
When first venturing into digital art, the sheer volume of available brushes can be overwhelming. Choosing the perfect brush for sketching, for inking, or for coloring can feel like a daunting task. Fortunately, a wealth of digital brushes can be discovered on online marketplaces, creator blogs, and, importantly, within official asset libraries such as Clip Studio Assets. This article aims to introduce some of the most popular and effective brushes for sketching and painting in Clip Studio Paint. Many of these can be downloaded directly to the application for free from Clip Studio Assets, alongside valuable tips for importing or creating your own custom brushes.
Clip Studio Paint comes pre-loaded with a diverse selection of default brushes, encompassing everything from precise pens and versatile pencils to rich oil brushes and expressive watercolor brushes. For sketching, the SU Cream Pencil is a highly favored option, boasting over 700,000 downloads. Its subtle texture becomes more pronounced as the brush size increases, offering a pleasing tactile quality to the digital sketch.
For those seeking to emulate traditional drawing media, a set of pencils that mimic real B sketching pencils and charcoal is available. These brushes provide a familiar feel and a range of tonal possibilities. The Nong Pen is another noteworthy brush, described as a soft, buttery tool that can be employed for both linework and painting, its application varying with brush size. When drawing with light pressure, the stroke becomes fainter, yielding a gentle, nuanced effect. The Pen Pen brush offers a textured stroke that dynamically responds to stylus pressure, allowing for the creation of thinner or thicker lines with ease, making it ideal for sketches imbued with a sense of energy and dynamism.
For inking, a dedicated inking pen is recommended, suitable for bold lines and intricate hatching. This brush possesses a dense texture that renders beautifully in pure black, providing a strong visual impact. The Thick Paints brush set is designed for artists who desire a heavier, textured painting feel. These brushes introduce subtle color jitter with each stroke, resulting in natural color variations that mimic the organic inconsistencies of traditional paint. Complementing this is a set of 30 textured brushes designed for dry and wet oil paint, pastels, and rough hatching. This collection also includes brushes specifically for adding final, detailed touches to paintings, offering a comprehensive suite for textured artwork.
For artists unsure of where to begin their brush exploration, the ARTIST21 pack is a comprehensive solution. It includes a variety of sketching pencils, watercolor brushes, and markers, alongside custom blending brushes and erasers, enabling artists to achieve a cohesive and polished look across their work.
To discover more brushes on Clip Studio Assets, users can leverage keywords to filter their search results and pinpoint the exact brushes they are looking for. Clip Studio Paint also supports the importation of brushes in .sut or .abr formats from external sources. Native brushes typically use the .sut format, but Photoshop brushes (.abr) can also be imported, significantly expanding the available brush options.
The process of creating your own custom brushes is also remarkably accessible. By editing the settings of an existing brush, artists can tailor tools to their specific needs. The recommended workflow involves making a copy of a brush from the Sub Tool palette menu, then adjusting its settings within the Tool Properties panel. As you customize, you can continuously test the brush on the canvas, refining its behavior until it perfectly matches your desired outcome. The provided link offers a detailed example of this custom brush creation process.
Beyond sketching and painting brushes, one of the most significant benefits of digital art is the access to an extensive library of pattern brushes and stamp brushes. These specialized tools are invaluable for quickly adding intricate detail, repetitive elements, or unique textures to comic panels and illustrations, further enriching the visual narrative.