Halftone effects, with their iconic dot patterns, are a powerful tool for adding unique texture, depth, and a distinct retro aesthetic to digital designs. Whether you're aiming for the bold impact of pop art, the gritty charm of comic book illustrations, or the sophisticated subtlety of modern graphic design, understanding and implementing halftones can significantly elevate your artwork. This tutorial delves into the creation and manipulation of halftone dots, exploring various methods within Adobe Illustrator and touching upon their historical context and printing applications.
The Genesis of Halftone: From Printing Press to Digital Canvas
Halftone is a 20th-century printing technique where patterns of dots were used to create images. At a time when printing processes were limited, particularly in their ability to reproduce continuous tones and a wide spectrum of colors, halftone was the ingenious method used to create the appearance of shades and hues. Early color presses primarily utilized only four ink colors: cyan, magenta, yellow, and black (CMYK). Printers developed the halftone process as a way to print a wider spectrum of colors and tones by using fields of tiny dots of these four colors, positioned closely together. When viewed from a distance, these dots appear to blend, creating the illusion of continuous tones and a broader range of colors. This principle remains fundamental to how many modern printing processes, including offset and screen printing, still function today. The dot pattern mimics the way colors are built up in CMYK printing, making halftones not only an artistic choice but also a technique deeply rooted in the practicalities of print production.
Halftone images are a staple of pop art, screen printing, and graphic design, often referencing printing styles of a bygone era. They are incredibly useful for making the most of lower resolution or less detailed underlying images, as the dot pattern itself can introduce a level of detail and texture that compensates for any inherent image limitations. Whether you're working on a vibrant pop art piece or a comic book illustration, halftones can bring a playful, retro feel that instantly grabs attention. The best part? Digital tools like Adobe Illustrator make it simple to create various halftone styles-from circular and linear patterns to fading dots that gradually disappear, offering endless possibilities for creative expression.
Creating Halftone Effects in Adobe Illustrator: The Native Color Halftone
Adobe Illustrator offers a straightforward, built-in method for generating halftone effects using its "Color Halftone" filter. This process is ideal for quickly applying a dot pattern to existing artwork, whether it's a simple shape, a complex illustration, or even text.
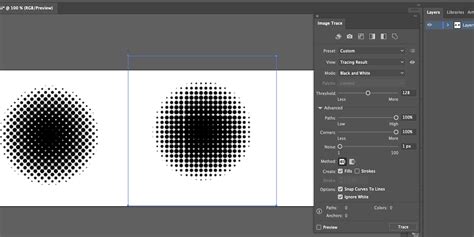
To begin, create or select the object or artwork that you want to apply the halftone effect to. Once your object is selected, navigate to Effect > Pixelate > Color Halftone.... This action will open the "Color Halftone" dialog box, presenting you with several key settings to adjust:
- Max. Radius: This parameter controls the size of the halftone dots. Increasing the "Max. Radius" value will result in larger dots and more pronounced spacing between them, leading to a bolder, more graphic effect. Conversely, decreasing this value will create finer dots and a denser pattern, suitable for more subtle textures or gradients.
- Screen Angles: These settings determine the angles at which the halftone screens (dots) will be applied for each of the four CMYK color channels: Cyan, Magenta, Yellow, and Black. You can set different angles for each channel to create complex overlapping patterns. For a single-channel halftone, you might use the same angle for all channels or focus on just one.
It's important to note that the "Color Halftone" dialog box, by default, may not provide a live preview of the changes. Therefore, you will typically need to click "OK" to confirm your settings and apply the effect. If you wish to make further edits or adjustments after applying the effect, you can do so by opening the "Appearance" panel (accessible via Window > Appearance). With your object still selected, you will see "Color Halftone" listed as an applied effect, allowing you to double-click and re-open the dialog box to tweak the settings.
Tip for Dynamic Halftones: To achieve a more dynamic and nuanced halftone effect, consider applying a black and white gradient to your object before applying the Color Halftone filter. By mapping the gradient to your object, the dots will scale according to the tone of the underlying artwork. You can then further refine the dot placement and density by editing the gradient itself. This technique allows for a more integrated and sophisticated integration of the halftone pattern with your artwork's tonal variations.
Understanding Rasterization and Document Raster Effect Settings
When you apply a live effect like "Color Halftone" in Illustrator, the result is a raster-based effect. This means that the appearance of the effect is dependent on the resolution settings of your document. The "Document Raster Effect Settings" dialog (found at Effect > Document Raster Effect Settings...) dictates the resolution at which these raster effects are rendered.
By default, Illustrator's template documents often have differing resolutions: screen-based templates are typically set to 72 ppi (pixels per inch), which is suitable for web and digital displays, resulting in less detail and quicker rendering but a more pixelated appearance. Print-based templates, on the other hand, are usually set to a more detailed 300 ppi, which is ideal for high-quality printing but requires more processing power and can lead to slower rendering times.
If you need to finalize a raster-based effect, such as a halftone, you have a couple of options:
- Expanding the Appearance: To rasterize a single object with the native halftone effect applied, ensure it's still selected and then choose
Object > Expand Appearance. This converts the live effect into a raster image. - Rasterizing a Grouped Selection: If your artwork is a grouped selection of various elements, including those with applied halftone effects, you'll need to rasterize them as a group. Before proceeding, ensure that the "Document Raster Effect Settings" are already set to your desired resolution (e.g., 300 ppi for print work). With the group selected, navigate to
Object > Rasterize.... In the "Rasterize" dialog box, choose a resolution (ppi) that preferably matches your "Document Raster Effect Settings."
Advanced Vector Halftones with Phantasm Plugin
For designers who primarily work with vector graphics and require scalable vector halftones, third-party plugins offer more advanced and flexible solutions. The Phantasm plugin by Astute Graphics is a popular choice for creating sophisticated halftone effects directly within Adobe Illustrator that can be expanded into pure, scalable vector artwork.
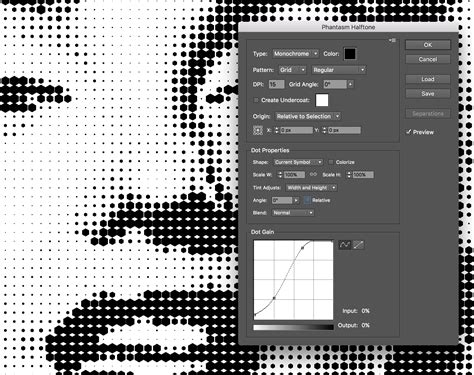
To use the Phantasm Halftone live effect, ensure you have the plugin installed. Select the image or vector object to which you want to apply the halftone. Open the Phantasm Halftone dialog box to access a range of settings:
- Type: This option allows you to choose the color mode for your halftone. You can select "Monochrome" for a single-color effect, "RGB/CMYK" (depending on your document's color mode) for full-color halftones, or "Sampled" to use colors directly from your original object.
- Pattern: Phantasm offers various pattern styles, including "Regular" or "Alternating" grids, and "FM" (Frequency Modulation) or "Radial" patterns. Each pattern type produces a distinct visual feel.
- DPI (Dots Per Inch) / Frequency: This setting controls the density and scale of the halftone dots. A higher DPI or frequency will result in smaller dots and a more detailed, finely textured effect, while a lower DPI will produce larger, more spaced-out dots, creating a bolder, more open look.
- Angle: Adjust the angle of the halftone pattern to complement your design. Common angles like 45° or 30° are often used, but you can customize this value to achieve specific visual outcomes.
- Clip to Object: Enabling this option will crop the halftone pattern precisely to the geometry of your original path. If disabled, the halftone pattern will extend to form a complete shape, irrespective of the original object's boundaries.
- Dot Properties: Within this section, you can fine-tune the scale and shape of your halftone dots. Tint adjustments offer further control over the scale and density of the dots, allowing for precise manipulation of the overall effect.
Once you are satisfied with your settings, click "OK." The Phantasm Halftone effect will be applied to your selected artwork. If you need to make further adjustments, you can revisit the Phantasm Halftone dialog box at any time. For subscribers, the Phantasm panel can be accessed via Window > Astute Graphics > Phantasm.
Halftones in Printing and Design Applications
The versatility of halftones extends beyond mere aesthetic appeal; they are fundamental to various printing and design applications.
- Screen and Offset Printing: Halftones are widely used in these traditional printing methods because they directly translate to how inks are laid down. The dot patterns are essential for building up colors and shades, especially in CMYK printing.
- Bold Stencil Designs: The distinct dot patterns lend themselves exceptionally well to creating strong, graphic stencil-like effects, popular in street art and merchandise.
- Adding Texture to Digital Art: Halftones can introduce a tactile quality to digital illustrations, giving them a more physical and engaging feel, reminiscent of print media.
- Transparent Effects: In modern design, halftones are often employed to create subtle transparency and layering effects, where the density of the dots dictates the perceived opacity.
- Versatile Art Styles: From posters and T-shirts to digital illustrations and branding, halftones work across a diverse range of art styles. Whether aiming for sharp contrast or subtle gradients, halftone patterns offer a flexible way to experiment with textures and effects that can elevate any design.
3 Comic-Style Shading Tricks in Illustrator (Halftones & More)
By mastering the creation and application of halftone dots, designers gain a powerful technique to imbue their work with a distinctive character, bridging the gap between historical printing methods and contemporary digital design. The ability to control dot size, angle, and pattern allows for a vast spectrum of creative possibilities, making halftones an indispensable tool in any digital artist's arsenal.