The efficiency of any creative workflow is significantly amplified by the strategic use of keyboard shortcuts. This principle holds unequivocally true for DaVinci Resolve, a powerful software suite where the sheer volume of functions can render manual navigation through dropdown menus a time-consuming endeavor. While a dedicated grading panel might offer a tactile advantage with its plethora of buttons, the reality for many, including Digital Imaging Technicians (DITs) on set or those working with limited space, necessitates a deep understanding and utilization of keybindings. This article delves into the essential node management shortcuts and concepts within DaVinci Resolve, empowering users to streamline their color grading process.
Navigating and Managing Nodes: The Foundation of Your Grade
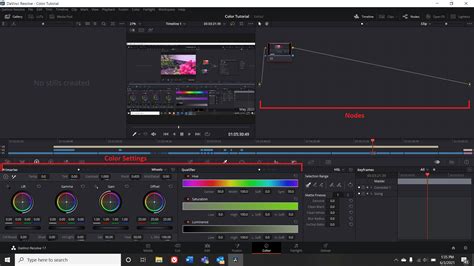
At the heart of DaVinci Resolve's color grading lies its node-based compositing system. Nodes are the fundamental building blocks, each representing a distinct idea or adjustment applied to the image. Understanding how to manipulate these nodes efficiently is paramount to achieving a polished and professional look.
Toggling Nodes: Instant Visual Feedback
One of the most crucial aspects of node-based grading is the ability to quickly assess the impact of individual adjustments. This is where node toggling becomes indispensable.
Deactivate the Current Node - Ctrl + D (Command + D on Mac)
When meticulously crafting a grade, you'll frequently want to isolate and evaluate the contribution of a specific node. For instance, you might be experimenting with the intensity of desaturation in the shadows. By pressing Ctrl + D, you instantly disable the currently selected node, allowing you to see the clip as it would appear without that particular modification. This provides immediate visual feedback, acting as a powerful tool for making informed decisions about your adjustments. It's a quick and effective way to "hear" what each node is saying to the overall image.
Deactivate All Nodes - Alt + D (Option + D on Mac)
Beyond individual node assessment, it's often necessary to gauge the overall impact of your entire node tree. The Alt + D shortcut serves this purpose by deactivating all nodes within the current layer (pre-group, clip, post-clip, or timeline layer). This allows you to compare the graded image against the original, raw footage, offering a holistic view of your work. This is invaluable for checking if the entire grade feels seamless and cohesive, and if you are truly happy with the cumulative effect of your efforts.

Adding Nodes: Expanding Your Creative Canvas
As your grading progresses, you'll invariably need to introduce new nodes to implement further adjustments or explore different creative directions. DaVinci Resolve offers intuitive shortcuts for this as well.
Append a Serial Node - Alt + S (Option + S on Mac)
When building a look, the ability to quickly add another node to the node graph is incredibly useful. Alt + S appends a standard serial node directly after the node you are currently working on. This is the most common method for adding sequential adjustments, where each node's output becomes the input for the next.
Prepend a Serial Node - Shift + S
Conversely, Shift + S adds a new serial node before the currently selected node. This is particularly beneficial when you realize, mid-grade, that a particular adjustment would be more logically placed earlier in the node tree. For example, you might decide you need to correct the white balance before applying a complex selection or keying effect to your current node. This preemptive addition ensures a more organized and logical node structure.
The process of building sensible node graphs can initially seem daunting. However, with practice, it becomes second nature. Many colorists improve their node-tree construction by studying the graphs of others, gradually deciphering their logic and workflow. A common approach to mastering node-based compositing is to make a conscious effort to utilize every type of node available on a project, thereby gaining hands-on experience with their unique functionalities.
Enhancing Your Viewing Experience: Clarity and Focus
The DaVinci Resolve color tab can present a wealth of information, from timelines and clip lists to the node graph itself. To maintain focus on the most critical element - the image - several shortcuts are available to declutter the interface.
Cleaning the UI - Alt + F (Option + F on Mac)
The default DaVinci Resolve color tab can feel rather cluttered, with various panels vying for attention. The Alt + F shortcut effectively minimizes much of this visual noise, allowing the image to occupy a larger portion of the screen. This focused view is crucial for making nuanced grading decisions.
Going Full Screen - Ctrl + F (Command + F on Mac)
For those working without multiple displays, a full-screen view of the image can be highly beneficial. Ctrl + F activates this mode, maximizing the viewing area. While redundant for users with dedicated full-screen monitors, it's an essential tool for single-display setups.
Fullscreen Plus Goodies - Shift + F
The standard full-screen mode (Ctrl + F) often restricts the ability to edit Power Windows. However, Shift + F offers a compelling alternative: an almost full-screen view that retains the functionality for editing windows. This blend of immersive viewing and editing control is incredibly practical.
Fitting After Zooming - Shift + Z
When zooming into an image to meticulously adjust fine details, such as the edges of a selection or the nuances of noise reduction, returning to a standard view can be cumbersome. Shift + Z is a lifesaver, instantly fitting the clip back into the window after any zoom operations. This saves considerable time and effort when refining intricate aspects of your grade.
Streamlining Playback and Keyframing: Efficiency in Motion
Color grading is an iterative process, and efficient playback and keyframing are essential for a smooth workflow.
Skipping Between Clips - Arrow Keys Up / Down
Navigating through your timeline is made simple with the up and down arrow keys. These keys allow you to skip between clips in a horizontal fashion, moving to the next or previous clip. This is incredibly useful for quickly assessing the consistency of your grade across adjacent shots, ensuring a seamless flow within your project.
Loop Playback - Ctrl + / (Command + / on Mac)
Continuous evaluation of your grade during playback is non-negotiable. The Ctrl + / shortcut activates loop playback for a single clip, allowing you to observe your adjustments in motion repeatedly. This is the easiest way to immerse yourself in the grade and identify any subtle issues that might not be apparent in still frames.
Skipping to the Beginning of the Current Clip - ; (Semicolon)
Within a clip, the semicolon key provides a direct shortcut to its beginning. This is useful for quickly resetting your playback position to re-evaluate the grade from the start of a particular shot.
Adding Keyframes - Ctrl + [ (Command + [ on Mac)
Long takes with significant movement often necessitate extensive keyframing to modify various parameters over time. This is where color correction and grading truly come into play. Color correction involves adjusting source footage to accurately reflect real-world colors, while color grading applies a consistent "look" and "feel" across multiple clips, often to enhance the emotional narrative of a video.
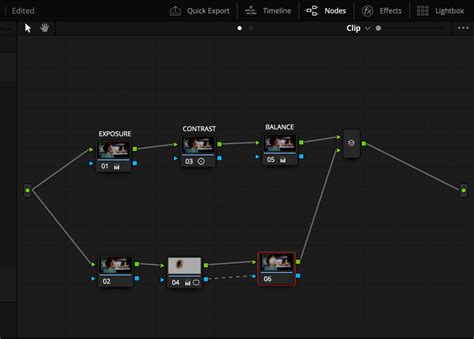
Understanding Node Logic: One Idea, One Node
A fundamental principle for effective node-based grading in DaVinci Resolve is the concept of "one purpose per node." While the software offers immense flexibility, attempting to cram multiple disparate adjustments into a single node can lead to a convoluted and unmanageable node graph.
The Principle of Single Purpose
The core idea is that each node should encapsulate a single, distinct adjustment or creative idea. For example, your first node might be dedicated solely to adjusting exposure. The next node could focus exclusively on contrast. A third might be for color balance. By adhering to this principle, you create a clear and logical progression of adjustments.
Meaningful Node Labels
To reinforce the "one idea, one node" philosophy, meaningful labels are crucial. Renaming your nodes by right-clicking and selecting "Node Label" is highly recommended. If you can articulate the node's function in a concise name, you're likely on the right track. If you struggle to find a suitable label, it's a strong indicator that the node might be trying to do too much. This practice ensures that your node graph remains understandable, even when revisited after a significant period.
Organizing Your Node Graph
As your node graph grows, maintaining order becomes essential. Right-clicking within the node editor provides options like "Cleanup Node Graph," which can automatically arrange nodes in a more aesthetically pleasing and logical layout. This helps in visualizing the flow of your grade and identifying potential redundancies or inefficiencies.
Primaries vs. Secondaries: Tailoring Your Adjustments
DaVinci Resolve's node system allows for two primary types of corrections: primaries and secondaries. Understanding their distinctions and optimal placement within your node tree is key to efficient and targeted grading.
Primary Corrections: Global Adjustments
Primary corrections are adjustments that affect the entire image uniformly. This includes fundamental parameters like exposure, color balance, saturation, contrast, and tint. The advantage of relying heavily on primaries is their inherent simplicity and ease of application across multiple clips. A grade built primarily on these global adjustments can be readily copied and pasted, ensuring consistency throughout your project. In fact, many professional films are graded using primarily serial nodes for these global adjustments.
Secondary Corrections: Targeted Refinements
Secondary corrections, in contrast, are applied to specific portions of the image. These targeted adjustments are achieved through various masking techniques, including HSL (Hue, Saturation, Luminance) masks, power windows drawn directly onto the image, or a combination of both. Secondaries are invaluable for making precise corrections, such as isolating and adjusting the color of a specific object or correcting localized exposure issues in a dimly lit area. While powerful, secondaries can make copying and pasting grades more complex, as the masks and keys often need to be re-adjusted for each individual clip.
The MOST IMPORTANT Concept in Colour Grading
The Node Order: Where and Why to Place Your Adjustments
The sequence in which you apply your nodes significantly impacts the final outcome of your grade. Establishing a logical order is crucial for both technical accuracy and creative control.
The Role of LUTs and CSTs
LUTs (Look-Up Tables): LUTs are often used to convert footage from a camera's native LOG profile (which appears desaturated and flat) to a standard color space like Rec.709. While they provide a starting point, it's generally recommended to apply custom modifications before a LUT that defines a "look," and to place creative LUTs towards the end of your node tree. This ensures that your custom adjustments are made with the full range of image data available from the LOG file, and that the final "look" is applied as a unifying filter.
CSTs (Color Space Transforms): CSTs are a more modern and flexible alternative to LUTs. They offer greater control over color space conversions and are often preferred for their precision. Similar to LUTs, the placement of CSTs in your node tree depends on whether they are being used for technical conversion or creative transformation.
Building Your Node Tree: A Funnel Approach
A widely adopted and effective approach to node tree construction is the "funnel" methodology. This involves creating a structure where broad, global adjustments are made early on, and more specific, creative, or effect-based adjustments are applied later.
Standard Approach: Many tutorials advocate for starting with a few serial nodes for primary corrections like exposure and white balance, followed by a series of parallel nodes for secondaries. This is a robust and recommended method, especially for beginners.
Funnel Variant: An alternative, favored by some professionals, begins with a series of parallel nodes for secondaries. This is followed by primary corrections such as exposure and white balance. Nodes for contrast and saturation come next, followed by modifications to the color scheme. This approach prioritizes isolation of secondary adjustments, ensuring they are not overly influenced by later primary corrections.
Strategic Placement of Effects
The order in which you apply specific effects within your node tree can dramatically alter their appearance and interaction.
Film Grain: This should almost always be the very last node in your tree. Grain reacts to luminosity, and if luminosity changes, the grain should ideally adapt. Placing it last ensures it's applied to the final image as it will be rendered.
Glows and Halations: These effects manipulate luminosity and are best placed before film grain. They should also generally precede any blurs, as a blur applied after a glow can diminish its impact.
Vignettes: These are often placed after the primary "look" LUT but before glows and halations. This allows for more realistic interaction, where a bright object might appear to glow over the vignette.
Blurs: Typically applied after vignettes but before glows and film grain. Applying a blur after film grain will simply erase the grain, negating its effect. Blurs are generally best implemented in serial nodes, as they can introduce artifacts when used in parallel.
Noise Reduction: This is often one of the first nodes, placed before any CST or LUT, or it can be applied as a secondary correction to specific areas if the noise is localized. If used as a secondary, it should be in a serial node to avoid affecting other parts of the image.
Final "OUT" Node: A dedicated "OUT" node can serve as a final control point for subtle adjustments to blacks, whites, or saturation capping, ensuring the image is perfectly polished before export.
Beyond the Basics: Advanced Node Techniques
DaVinci Resolve offers a variety of node types and connectors to facilitate complex grading workflows.
Node Types and Connectors
Nodes in the Color tab feature two dots on their sides: the left is the input, and the right is the output. Each node has two inputs and two outputs. Green connectors transmit RGB channels, while blue connectors handle the Alpha channel (transparency masks). Dotted lines typically indicate keys.
Serial Node: These nodes process in sequence, with each node receiving the output of the previous one. They are created using
ALT + S(append) orSHIFT + S(prepend).Parallel Node: These nodes are created in parallel to a selected node, receiving the same source input. Their effects are then mixed together. A Parallel Mixer node is automatically generated. There are also Layer Mixers (for composite modes) and Key Mixers (for mixing keys). Parallel nodes are ideal for secondary adjustments that need to be isolated from primary corrections.
Useful Shortcuts Recap
- Disable a Node:
CTRL + D(Command + D on Mac) - Bypass All Color Grading:
SHIFT + D - Shift Node Positions: Hold
CTRL/Commandand drag one node on top of another. - Duplicate Node Tree:
CTRL + Y(Command + Y on Mac) - Navigate Node Versions:
CTRL + N(next),CTRL + B(previous).
Mastering Node Graphs: Organization and Efficiency
The node graph in DaVinci Resolve is the visual representation of your color grading process. A well-organized node graph is not just aesthetically pleasing; it's a critical component of an efficient and maintainable workflow.
The "One Purpose, One Node" Philosophy in Practice
As previously emphasized, the principle of assigning a single, distinct purpose to each node is fundamental. This clarity extends to the very definition of a node: a visual representation of an idea or adjustment. Therefore, a new idea logically equates to a new node. While this might suggest a proliferation of nodes, it's crucial to balance this with the need for distillation. An overly complex node graph often indicates that ideas have not yet been refined to their most essential form. The goal is to create a node graph that is as small as possible while still effectively achieving your creative objectives and those of your clients.
Rearranging and Cleaning Your Node Graph
DaVinci Resolve offers tools to help manage the visual complexity of your node graphs. The "Cleanup Node Graph" option, accessible via a right-click, can automatically organize your nodes into a more structured layout. This visual tidiness is not merely cosmetic; it aids in understanding the flow of your grade and identifying areas for potential optimization.
Creating New Versions for Experimentation
When exploring drastically different grading approaches without wanting to lose your existing work, DaVinci Resolve's versioning system is invaluable. By right-clicking on a clip thumbnail and selecting "Local Versions -> Create New Version," you essentially create a duplicate of your current node structure. This allows you to experiment freely on the new version, knowing that you can always revert to your previous grade by switching back to the original version. The name of the active version is displayed beneath the clip thumbnail, providing clear indication of your current workspace.
Advanced Node Types: Parallel and Outside Nodes
While serial nodes form the backbone of most grading workflows, parallel and outside nodes offer specialized functionalities for more nuanced control.
Parallel Nodes: Branching Out Your Adjustments
Parallel nodes are created alongside a selected node, allowing for the introduction of secondary adjustments that can be blended with the primary grade. This is achieved through a Parallel Mixer node.
Use Cases for Parallel Nodes:
Secondary Adjustments: Parallel nodes are ideal for making adjustments to specific parts of the image. For instance, you might use a Hue vs. Hue curve within a parallel node to subtly shift the color of certain elements without affecting the overall image.
Independent Branches: By connecting a parallel node to the beginning of the node graph, you create a separate branch that receives the original image signal. This allows for secondary adjustments to be made independently of any primary corrections applied in other branches. This independence is crucial because it means that changes made to primary adjustments later in the node tree will not affect your secondary work, preventing unintended consequences and ensuring consistency.
Client Revisions: If a client requests a change to the contrast, for example, and you have your secondary adjustments in a parallel branch, those secondaries will remain unaffected. This provides a stable foundation for revisions and avoids the need to re-do complex secondary work.
Outside Nodes: Inverting Your Masks
The Outside node is a specialized type of node that effectively inverts the alpha channel (mask) of the preceding node. This allows you to apply adjustments to the area outside of a defined mask.
How Outside Nodes Work:
- Create a Masked Node: First, you create a node with a power window or HSL key to isolate a specific area of the image (e.g., a person's face).
- Add an Outside Node: Then, you add an Outside node (
ALT + OorOption + Oon Mac) after the masked node. - Apply Adjustments: Any adjustments made in the Outside node will now affect everything except the area defined by the mask in the preceding node.
Benefits of Outside Nodes:
- Efficient Masking: If you need to make an adjustment to the area outside a mask, an Outside node saves you from having to create and invert a new mask.
- Dynamic Linking: The Outside node is dynamically linked to the alpha channel of the previous node. If you reposition or modify the mask in the original node, the adjustments in the Outside node will update automatically. This is incredibly powerful for maintaining consistency and making iterative changes. For example, if you soften a subject's skin using a power window in one node, you can then use an Outside node to subtly darken the background around them without needing to create a separate background mask.
The Art of Node Count: Quality Over Quantity
A question that frequently arises in node-based grading is: "How many nodes should I use?" While there's no definitive numerical answer, the guiding principle remains the same: quality and clarity over sheer quantity.
The "New Idea = New Node" Rule: As a fundamental guideline, each distinct creative idea or adjustment should ideally reside in its own node. This promotes a logical and organized workflow.
Avoiding Unnecessary Complexity: However, an excessive number of nodes can indicate a lack of distillation. When a node graph becomes overly dense, it suggests that the underlying ideas might not have been refined to their simplest and most essential form. The goal is to achieve your creative vision with the most streamlined and efficient node structure possible. The ideal node graph is one that is as compact as it can be while still allowing for the accomplishment of all necessary grading tasks and client requirements.
By mastering these node management techniques and understanding the strategic placement of adjustments, you can transform your DaVinci Resolve grading workflow from a tedious task into a precise and powerful creative process.