Embarking on your journey into digital art and photo manipulation can feel daunting, but with some fundamental knowledge of Photoshop, you can begin creating impressive digital artwork using photos, textures, shapes, and line drawings. This tutorial is designed as the perfect place to start if you’ve never used Photoshop before, aiming to get you up to speed with Photoshop basics and working in Photoshop.
Understanding the Core Concept: Layers
At the heart of Photoshop's power lies the concept of layers. Think of layers as transparent sheets that you can stack on top of each other. You can lay these sheets over background layers or existing images. This ability to work in layers is crucial because it allows you to add and adjust different elements, such as portions of photos or text, independently. You can add images, textures, colors, and text to one layer without affecting the content in the layers below it. This means you have the freedom to undo or adjust any moves you make that you’re not happy with, providing a non-destructive workflow.
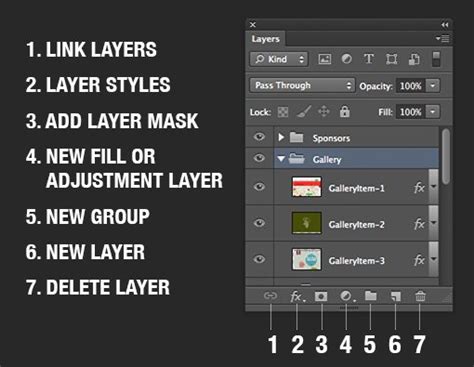
To create a new layer, you can simply click the "Create a New Layer" button, typically found in the Layers panel, or navigate to the "Layer" menu in the top bar and select "New" followed by "Layer."
Importing and Manipulating Your First Image
Let's say you're creating a postcard from a perfect beach photo you captured. The first step to adding your photo is to import it into your Photoshop project. A simple and effective way to do this is by dragging and dropping a JPEG or PNG photo file directly from your desktop into your Photoshop project window.
Once your photo is in Photoshop, you'll likely want to reposition and resize it to fit your vision. You can easily do this by clicking and dragging the corners or edges of the photo's bounding box. To make it larger, drag outwards; to make it smaller, drag inwards. After you've made your adjustments, press "Enter" or "Return" on your keyboard to confirm the transformations. When you perform transformations like resizing or rotating, Photoshop will often automatically convert the layer into a "Smart Object" layer. Smart Objects are special layers that preserve the original image data, allowing for non-destructive scaling and editing.
Mastering Layer Masks: Revealing and Concealing
A layer mask is an indispensable tool that allows you to control precisely what parts of a layer are visible and what parts are hidden. Imagine you want to add someone who wasn't originally in your beach postcard photo. This is where layer masks shine.
To begin, set up your photo by dragging and dropping the photo of the person (or pet) you want to add onto your existing project.
Next, you need to make a selection of your subject. In the Layers panel, click on the layer that contains your subject - this is the layer you want to mask. Once that layer is active, look for the "Select Subject" option in the options bar, usually located at the top of the Photoshop window. Photoshop's advanced algorithms will then automatically select the most prominent subjects in the image.
After Photoshop makes its selection, a layer mask thumbnail will appear next to the image thumbnail in the Layers panel. The selected area will typically appear white against a black background on the mask, indicating what is visible.
Refining your selection is often necessary for a seamless composite. You can use the "Add" or "Subtract" buttons within the mask properties to either add to or take away pixels from your selection. For tricky areas like hair, Photoshop offers a "Refine Hair" option that automatically attempts to find and refine difficult hair selections, making the process much smoother.

Effortless Object Removal with the Spot Healing Brush
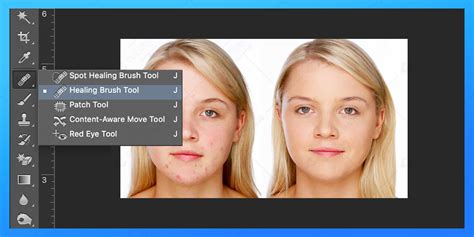
One of the most satisfying and easy ways to use Photoshop is to remove unwanted elements from your pictures. This could be anything from unsightly garbage bins and power lines to distracting photobombers. The Spot Healing Brush tool is your go-to for this task.
To access it, click the "Spot Healing Brush tool" in the Tools panel, or simply press the "J" key on your keyboard. In the options bar at the top, you can adjust the size and hardness of the brush edge. A harder brush edge creates more clearly defined edges, while a softer brush blends more subtly.
Once your brush is set up, simply click on the image where you want to remove an object. Photoshop will analyze the surrounding pixels and intelligently fill in the area, making the unwanted object disappear. This tool is incredibly effective for small blemishes and imperfections.
Adding Text and Creative Flourishes
Photoshop isn't just for photo manipulation; it's also a powerful tool for graphic design. Adding text is straightforward. Select the Type Tool (often represented by a "T" icon) from the Tools panel. Then, click on the image where you want to place the type. A text cursor will appear, allowing you to start typing.
Once you've entered your text, you can highlight it to make style changes. This includes altering the font, size, color, and alignment. The Character and Paragraph panels offer extensive control over your typography.
Beyond text, you can also "paint a picture on your picture." Maybe you want to add a whimsical cartoon umbrella to your beach photo, or perhaps your beach photo looks a little too perfect, and you want to inject some humor by drawing a shark fin in the water to playfully hint at danger. The Brush Tool (B) allows you to paint, draw, or play with shapes directly onto your image, adding a unique artistic touch.
Saving and Exporting Your Masterpiece
When you're satisfied with your creation, it's time to save your file. Go to the "File" menu and select any of the "Save" commands: "Save," "Save As," or "Save a Copy." You have the option to save your work as a "cloud document," which allows for easy access across devices, or save it directly to your computer.
Furthermore, you can export your Photoshop Document (PSD) file to other common file types like JPEG, PNG, or PDF, depending on your intended use. JPEGs are great for photographs, PNGs are ideal for graphics with transparency, and PDFs are suitable for documents and print.
Exploring Neural Filters: AI-Powered Edits
Photoshop's Neural Filters are a game-changer, leveraging the power of Adobe Sensei AI technology to make quick, automatic, and often remarkable edits to your images. To explore these filters, click "Filter" in the top menu, then navigate to "Neural Filters."
Adobe Photoshop - AI features 2024 - Neural Filters
Here, you'll find a variety of intelligent filters. You can select a filter of your choice and, if it's not already installed, you'll be prompted to download it. Once installed, you can adjust its settings to achieve stunning results with minimal effort. Some popular Neural Filters include:
- Colorize: Automatically adds color to black and white photos.
- Smart Portrait: Allows you to adjust facial features, expressions, and even age.
- Style Transfer: Applies the artistic style of one image to another.
- Super Zoom: Intelligently zooms into an image while preserving detail.
- Depth Blur: Creates a natural-looking depth-of-field effect.
- JPEG Artifacts Removal: Cleans up compression artifacts in JPEG images.
- Colorize: Adds color to black and white photos.
- Skin Smoothing: Reduces skin blemishes and imperfections for a polished look.
- Accented Edges: Enhances the edges of objects in an image.
- Color Replacement: Allows you to change the color of specific objects.
Advanced Techniques for Continued Learning
While this tutorial covers the basics to get you started, the world of Photoshop is vast and offers endless possibilities for creative exploration. Here are some areas you might want to explore as you advance:
- Color Grading: Learn how to achieve professional-looking color adjustments in just a click, transforming the mood and feel of your images.
- Skin Retouching: Discover secrets to removing acne and smoothing skin for portrait photography.
- Selections: Master different ways to select transparent objects, a crucial skill for complex compositing.
- Color Correction: Understand the fundamental principles of color correction to ensure your images look their best.
- Object Removal: Beyond the Spot Healing Brush, learn quicker ways to remove specific objects like number plates from photos.
- Perspective Correction: Fix warped perspectives in your photos, making buildings stand straight and horizons level.
- Conceptual Artwork: Dive into creating conceptual artwork, mastering subject cutouts, harmonizing color and lighting across multiple images, and even crafting animations.
- Compositing: Learn to create breathtaking composites, such as a Northern Lights scene, by blending different images, matching colors and light, and utilizing tools like Levels, Clipping Masks, Smart Objects, and Custom Photoshop Brushes.
- Artistic Effects: Combine portraits with splatter effects or blend graphics and photos to create unique visual styles.
- Background Removal: Accurately and professionally remove backgrounds from graphics and illustrations.
- Realistic Shadows: Create realistic shadows for compositing, product mock-ups, e-commerce, and graphic layouts.
- Lighting Effects: Learn to create stunning and realistic lighting effects, including light rays, using tools like Levels, Radial Blur, and Layer Masks.
- Nature Composites: Discover how to build stunning nature scenes using free stock image assets.
- Lightroom Controls: Explore how Lightroom controls can be integrated within Photoshop for enhanced photo editing.

Topcreativity.io is a free resource for learning Photoshop, offering a wealth of tutorials and guides for all skill levels. As you become more comfortable with working in Photoshop, you can then move on to these other tutorial sections and continue to expand your creative horizons.
The Dodge Tool (O) is another useful tool for lightening specific areas of an image, while the Brush Tool (B) remains your primary instrument for adding color and texture. Remember that fundamental operations often involve selections, and holding Ctrl/Cmd while clicking on a thumbnail is a quick way to make a selection based on that layer's content.
Photoshop's power lies in its ability to allow you to work without directly interacting and mixing the pixels of your original images, especially when using layers and masks. This non-destructive workflow is key to efficient and effective digital art creation.