Digital painting has revolutionized the art world, offering unparalleled flexibility and efficiency for creators. At the forefront of this digital art revolution is Adobe Photoshop, a powerhouse software that provides artists with an expansive toolkit to bring their visions to life. This article delves into the intricate techniques and thoughtful approaches used in digital painting with Photoshop, drawing from the experiences and insights of seasoned artists. Whether you are a beginner looking to grasp the fundamentals or a professional seeking to refine your workflow, understanding these techniques will elevate your digital art.
The Foundation: Sketching and Design Principles
The journey of a digital painting often begins with a simple sketch, a foundational step that dictates the composition and dynamism of the final piece. This initial stage is crucial for establishing a clear understanding of perspective and shape design, particularly when creating complex subjects like mechanical figures.
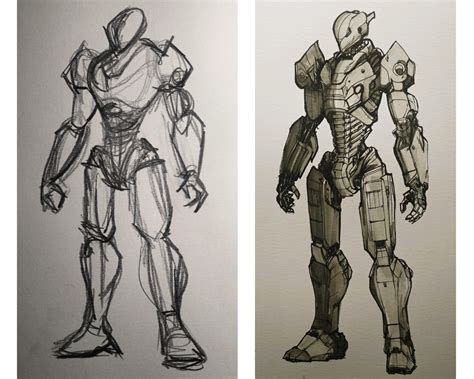
The process described for creating a large robot character exemplifies this. It started as an "unpretentious sketch" with "interesting composition" and a desired "dynamism and initial look, which included both very large and very small elements." The artist's intention was to "explore [their] ability to conceive an illustration further while creating a functional, well-thought-out design rather than painting for the sake of it without a focus." This pragmatic approach involves "pragmatically drawing everything beforehand to help me get a good understanding of the perspective and shape design, especially the robot." The goal was to achieve a "Transformers"-esque feel, which involved extensive research into real-world machinery like "cars, engines, planes, and so on - anything that could help me create a less sophisticated robot."
A key design principle employed is the creation of contrast in scale. For instance, "creating contrast by having the vehicle in the foreground look bigger than the robot figure in the background." Simultaneously, "matching shapes present in both the vehicle and the robot to form a relationship" is vital for visual coherence. This initial line sketch and brushwork often incorporates texture brushes for elements like "rocks or trees," laying the groundwork for a rich visual environment.
Building Complex Forms: Research and Iteration
Creating intricate and believable subjects, especially large mechanical entities, requires dedicated research and a willingness to iterate. The process for designing the "big robot" involved a deep dive into the functionality of real-world heavy machinery. The artist "used a lot of references from excavators and other big mechanical objects to understand how they function, and then make a combination of them in a somewhat human appearance - the collarbone, neck muscles, and so on." This method of combining functional references with anatomical understanding allows for the creation of designs that are both visually compelling and conceptually grounded, resulting in a "look that I hadn’t considered beforehand." This highlights the iterative nature of digital art: "I’ve always struggled with this, but good research and persistence certainly brings good results."
The importance of not being afraid to revise is also stressed. In one instance, an artist identified a weakness in their work: "Looking at the vehicle, I noticed that this part of the engine, where the spokes and turbo jets come out, didn’t have any interesting design elements despite being quite large. I needed more information about how that object interacts with the lighting, interestingly." The solution involved a "basic redesign with cubes and cylinders, then painted over it for a good result." The advice given is unequivocal: "Never be afraid to redo parts of your image you don’t feel are right. They all contribute to the final scene, and you won’t have any regrets if you’ve done your best."
Harnessing Photoshop's Tools for Dynamic Effects
Photoshop offers a vast array of tools that enable artists to achieve sophisticated visual effects, from atmospheric elements to energetic discharges. Understanding how to leverage these tools is key to enhancing the impact and realism of digital paintings.
Clouds and Smoke: Adding Atmosphere and Depth
Clouds and smoke are powerful elements for conveying atmosphere, mood, and scale. Artists often "keep an eye out for references and good smoke or cloud brushes." The Smudge tool is particularly effective for "creating smooth transitions for these elements," allowing for seamless blending of tones and forms. For clouds, an Outer Glow effect can be applied to "provide an interesting, artistic look," adding a subtle luminosity that enhances their ethereal quality.
Electrical Exhaust and Sci-Fi Effects
Creating dynamic effects like electrical exhausts or magical auras benefits greatly from specific Photoshop techniques. The process involves thinking about the "direction of the design and creating a sense of thick to thin for interest." The Outer Glow technique is again highlighted as being "great for lightning, magic and sci-fi style effects." This tool allows artists to simulate the radiant energy emanating from such phenomena, adding a crucial layer of visual excitement.
Contrast and Luminosity: The Play of Light and Shadow
As a digital painting nears completion, the focus shifts to values and the creation of "obvious contrast between light and shadow." These are described as "distinct" and are essential for achieving desired "luminosity." A common technique is to incorporate "bluish colour in the shadow that’s taken from the sky in order to contribute to the depth and remove a little contrast." Conversely, "the hard edges and most emphatic details are in light." This careful manipulation of light and shadow not only defines form but also guides the viewer's eye through the composition.
The use of atmospheric perspective is crucial for establishing a sense of scale. For instance, the robot in the example had "no details in the shadows, mainly due to the atmospheric perspective and use of smoke." This lack of detail in shadowed areas, combined with the softening effect of atmospheric haze and smoke, amplifies the perceived size of the subject.
Light and Shadow Effects in Photoshop Tutorial
Color Theory and Compositional Harmony
The strategic use of color is fundamental to creating visually appealing and impactful digital art. Understanding color relationships and their psychological effects can significantly enhance a painting.
Complementary Colors for Strong Contrast
To achieve "strong contrast" in a composition, artists often turn to complementary color schemes. In the example provided, the choice was "complementary yellows with blue-greens, as the blue works well for dark values and the yellow for lighter values such as the vehicle." This deliberate pairing of colors creates visual tension and vibrancy, making the artwork more engaging. The interplay between warm and cool tones, and light and dark values, is a cornerstone of effective visual design.
Essential Photoshop Tools and Techniques for Digital Painting
Photoshop's strength lies in its diverse set of tools that can be adapted for a wide range of artistic styles and effects. Mastering these tools is paramount for any digital painter.
The Brush Tool and Its Versatility
The Brush Tool is the most fundamental instrument in digital painting. It functions much like traditional drawing tools, applying color with brush strokes. The options bar for the Brush Tool allows for extensive customization, including setting the "method for blending the color you paint with the underlying existing pixels," similar to layer blending modes.
- Opacity: This setting controls "the transparency of color you apply." Even with repeated strokes, the opacity won't exceed the set level until the mouse button is released. Subsequent strokes build upon this, effectively applying additional color.
- Flow: This determines "the rate at which color is applied as you move the pointer over an area." As you paint, color builds up based on the flow rate, up to the opacity setting. For instance, with 33% opacity and 33% flow, each pass over an area adds 33% of the brush color, up to the maximum opacity.
- Keyboard Shortcuts for Opacity: A highly efficient tip is to use number keys to set opacity: a single number key sets it in 10% increments (e.g., '1' for 10%, '0' for 100%), while two number keys allow for a specific percentage.
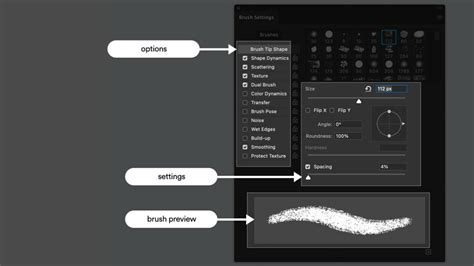
The Brush Settings panel offers even deeper control, allowing artists to modify "brush tip options" such as "soft edges, large brush strokes, various brush dynamics, different blending properties, and brushes of different shapes." Textures can be applied to simulate painting on canvas or art papers, and airbrush effects can be achieved. For artists using drawing tablets, pressure sensitivity, angle, rotation, and stylus wheels can be integrated to control how color is applied, mimicking a more organic painting experience.
The Pencil Tool
The Pencil Tool, while similar to the Brush Tool, is primarily used for creating hard-edged lines. A specific function for the Pencil Tool is its ability to paint the background color over areas containing the foreground color, effectively acting as a targeted eraser, useful for precise color adjustments.
Modifying Existing Pixels: Eraser, Blur, and Smudge Tools
Beyond applying color, Photoshop provides tools to alter existing pixels:
- Eraser Tool: This tool removes pixels, allowing for major changes or subtle blending depending on its opacity and flow settings. A "little known Photoshop tip" is the use of the tilde (~) key as a temporary eraser, which uses the same stroke as the current brush. This is particularly useful for quick corrections without switching tools. If the brush is set to a lower opacity or flow, the tilde key will erase at that lower amount, aiding in blending.
- Blur Tool: This tool softens edges and details, creating a smoother appearance.
- Smudge Tool: This tool is invaluable for blending colors and creating soft transitions, particularly effective for atmospheric effects like smoke and clouds. The effectiveness of the Smudge Tool can be significantly enhanced by adjusting brush settings. For instance, turning off "Spacing" in the Brush Settings panel can yield interesting results. When combined with specific brush dynamics like "Angle Jitter set to 3%, and Angle Jitter Control set to Direction," and "Transfer checked with 0 Strength," it can create painterly strokes. The "Finger Painting" option, activated by holding the ALT key while smudging, uses the foreground color at the start of each stroke, allowing for the addition of color while blending. This is particularly useful when the smudge brush needs more pigment to achieve the desired effect.
Beyond Basic Strokes: Advanced Techniques
- Fade Command: For the Mixer Brush, where direct stroke opacity control is limited, the Fade Command can be used immediately after a stroke to reduce its intensity. This command can be assigned a shortcut for efficiency.
- Brush Tip Outline: To improve visibility when painting with small brush sizes, the Brush Tip Outline can be set to "Extra Bold" in the Preferences menu.
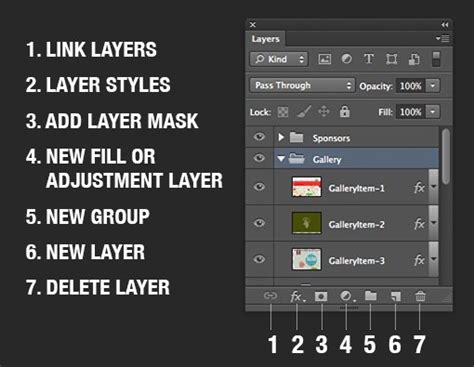
- Layer Management: The use of layers is fundamental to digital painting, allowing for non-destructive editing and complex compositions. Techniques like using separate layers for sketches, line art, base colors, and rendering are standard practice.
- Smart Objects: These are crucial for transforming elements without losing quality. Dave Neale's professional tip of using "Smart Objects to transform while retaining multi-layered folders" is a testament to their utility for maintaining flexibility.
- Actions: Creating multi-part Actions can automate repetitive tasks, significantly boosting productivity.
Workflow Optimization and Efficiency
Beyond mastering individual tools, optimizing the overall workflow is crucial for productivity and creative flow.
Workspace Setup and Preferences
A well-configured workspace is essential. This includes setting up preferred Wacom settings (or equivalent tablet), adjusting preferences, and establishing useful shortcuts. For example, assigning the Fade Command to a shortcut key (like F4) or utilizing the tilde key for quick erasing streamlines the process.
Utilizing Custom Brushes and Presets
Discovering and creating custom brushes can dramatically enhance an artist's unique style. Finding brushes used by professional digital painters, such as those by Kyle T. Webster or Eric Elwell, can provide inspiration and new possibilities. Experimenting with brush settings, like disabling spacing or adjusting jitter, can lead to novel stroke effects. Saving customized brush characteristics, along with options bar settings like opacity and flow, as tool presets allows for quick access to frequently used brush configurations.
Efficient Shape Creation
For creating basic geometric shapes like circles or ovals, a non-traditional approach can be highly effective. This involves creating a new layer, selecting the desired brush, then using the Elliptical Marquee Tool to draw the shape. This selection can then be stroked with the brush color via the "Edit -> Stroke" command. Free Transform (Ctrl+T or Cmd+T) can further refine the shape.
Color Removal Techniques
Removing a specific color from a layer or all layers can be achieved efficiently using the Bucket Tool (or Gradient Tool) with the Mode set to "Clear." By adjusting the Tolerance and the "Contiguous" option, artists can precisely target and remove unwanted colors, a process that is described as "so fast!" It's crucial to remember to reset the Mode back to "Normal" after use.
The Digital Painting Ecosystem
Digital painting is more than just using software; it's part of a broader ecosystem of tools and a viable career path.
Hardware: Tablets and Styluses
The primary hardware for digital painting is a drawing tablet and stylus. Several types exist:
- Graphic Tablet: A touchpad connected to a computer, used with a stylus.
- Display Tablet: Functions as a separate screen, though can be prone to dead pixels.
- All-in-One Tablet: Essentially a computer integrated into a tablet, offering the most comprehensive experience but also the highest cost.
These tools are essential for serious digital painting, with costs ranging from affordable options to professional-grade devices.
Software: Beyond Photoshop
While Photoshop is a leading choice, other software exists, each with its strengths. However, Photoshop's extensive toolset, including over "60 inbuilt tools," makes it a versatile platform for a wide range of artistic endeavors. The integration of AI tools like Generative Fill is further revolutionizing the creation process, allowing for rapid element addition and editing.
Career Opportunities
Digital painting skills open doors to numerous career paths in the creative industries. Popular choices include:
- 3D Modeler
- Storyboard Artist
- Video Game Concept Artist
- Cartoon Animator
These roles leverage the ability to create compelling visuals and designs in a digital format.
The Advantages of Digital Painting
The shift from traditional to digital painting is driven by several compelling advantages:
- Convenience: Digital painting eliminates the time-consuming setup required for traditional media, such as preparing materials or varnishing canvases.
- Editability: Programs like Photoshop allow for instant undoing of mistakes, offering a forgiving and iterative creative process.
- Productivity: Digital tools can significantly save time and effort. AI advancements further accelerate creation, turning hours of work into moments.
- Cost-Effectiveness: Unlike physical media, where new materials are needed for each project, digital painting allows for endless canvas creation (Ctrl+N/Cmd+N) without material waste.
- Shareability: Digital artwork is easily exported and shared online, facilitating quick dissemination across various platforms.
Conclusion: A Journey of Continuous Learning
Digital painting in Photoshop is a dynamic field that offers immense creative potential. From the initial sketch and design considerations to the intricate application of tools for dynamic effects and color harmony, each step is a learning opportunity. The advice provided-to research thoroughly, embrace iteration, master the tools, and optimize workflow-forms a solid foundation for artists at all levels. As the software and techniques continue to evolve, a commitment to continuous learning and experimentation will ensure artists can harness the full power of digital painting to create truly remarkable artwork.