Motion blur can be a frustrating photographic artifact, turning an otherwise perfect shot into a less-than-ideal image. This blur can manifest in various ways, from the subtle softening of details to a pronounced streaking effect that obscures the subject. Understanding the root causes of motion blur is the first step towards effectively correcting it. Primarily, motion blur arises from two distinct phenomena: camera shake and subject movement.
Camera shake, a particularly common issue for novice photographers, occurs when the camera is not held steady during the exposure. Even the slightest tremor can translate into a blurred image, especially when using slower shutter speeds or longer focal lengths. The second major contributor to motion blur is the movement of the subject itself. If your subject is in motion and the shutter speed isn't fast enough to freeze that action, the resulting image will exhibit a blur that reflects the subject's trajectory. While prevention is always the best strategy - ensuring a stable camera and an appropriate shutter speed are paramount - there are powerful tools within Adobe Photoshop that can help salvage images affected by motion blur.
Understanding the Causes of Motion Blur
To effectively combat motion blur, it's crucial to delve deeper into its origins. The phenomenon occurs when there is relative movement between the camera and the subject during the time the camera's shutter is open. This relative movement is captured as a streak or smudge on the sensor, resulting in a blurred image.
Camera Shake: The Unsteady Hand
Camera shake is perhaps the most frequently encountered cause of motion blur, especially for those new to the world of photography. The human body, even with the best intentions, is not perfectly still. Holding a camera, particularly for extended exposure times, requires a stable base. If this stability is not provided, any minuscule movement of the photographer's hands, arms, or body will be transferred to the camera. This is why using a tripod or other stabilizing support is often recommended for shots requiring longer exposures. The introduction of even a slight vibration during a 10-second exposure, for instance, can drastically alter the sharpness of the final image. This was a key realization for one photographer who, after taking a 10-second exposure on a tripod, found their image significantly blurred, suspecting a bump to the camera or tripod during the capture.
Subject Movement: Capturing the Action (or Lack Thereof)
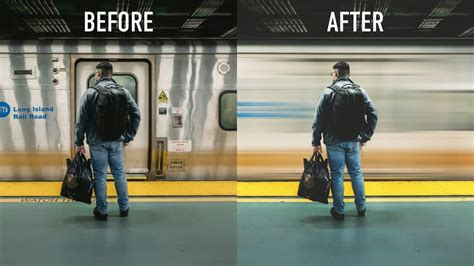
The second primary cause of motion blur stems from the subject itself being in motion. When a subject moves across the frame during the exposure, and the shutter speed is insufficient to freeze that movement, the resulting image will show a blur that follows the path of the subject. This is particularly evident in action photography, sports, or any scenario where the subjects are dynamic. In such cases, a faster shutter speed is essential to "stop" the motion and render the subject sharp. Conversely, if the intention is to convey a sense of speed or movement, a controlled amount of motion blur can be intentionally introduced.
Environmental Factors: Light and Shutter Speed
Beyond camera shake and subject movement, environmental factors play a significant role. Poor light conditions often necessitate the use of slower shutter speeds to gather enough light for a properly exposed image. This reduction in shutter speed directly increases the susceptibility to motion blur, as the sensor is exposed to light for a longer duration, making it more sensitive to any movement. Therefore, a delicate balance must be struck between achieving adequate exposure and maintaining a fast enough shutter speed to minimize blur. The interplay between available light and the required shutter speed is a fundamental concept in photography that directly impacts the potential for motion blur.
The Art of Prevention: Getting it Right In-Camera
While Photoshop offers powerful tools for fixing motion blur, the adage "prevention is better than cure" holds particularly true in photography. Addressing motion blur at the source, during the capture process, will always yield superior results and reduce the need for post-processing.
Mastering Camera Stability
If you frequently struggle with motion blur, dedicating time to research and practice techniques for holding your camera steady is a worthwhile endeavor. This includes understanding proper hand-holding techniques, utilizing camera straps effectively, and, for critical shots, employing a tripod or monopod. The stability of your camera directly correlates to the sharpness of your images.
The Crucial Role of Shutter Speed
A fundamental principle for preventing motion blur related to camera shake is understanding and utilizing appropriate shutter speeds. For handheld shots, there's a general guideline that your shutter speed should be at least the reciprocal of your lens's focal length to avoid camera shake. For instance, if you're using a 50mm lens, a shutter speed of 1/50th of a second or faster is a good starting point. However, this rule is a guideline and can vary based on individual stability and lens type.
Furthermore, if you are using longer lenses, the minimum shutter speed requirement increases significantly. A longer lens magnifies not only the subject but also any camera movement. Therefore, for telephoto lenses, you will need to employ much faster shutter speeds than for wider-angle lenses to achieve sharp results. If you are consistently experiencing blur, a critical review of your current shutter speed settings is essential. It's highly probable that your minimum shutter speed needs to be faster than what you are currently using.
Fix Your Out of Focus Photos!!! #photography #lightroom
Photoshop's Arsenal: Tools for Motion Blur Correction
Despite the best preventative measures, sometimes motion blur creeps into our images. Fortunately, Adobe Photoshop provides a suite of tools designed to combat this issue, allowing you to salvage and enhance your photographs.
The Shake Reduction Filter: An Automated Approach
Photoshop's "Shake Reduction" filter is designed to automatically analyze and correct motion blur caused by camera shake. This tool attempts to detect the direction and magnitude of the blur and then applies a counter-effect to sharpen the image.
Steps to Utilize Shake Reduction:
- Open your image: Launch Adobe Photoshop and open the image file that contains motion blur.
- Duplicate the layer: To preserve your original image, it's best practice to work on a duplicate layer. Press
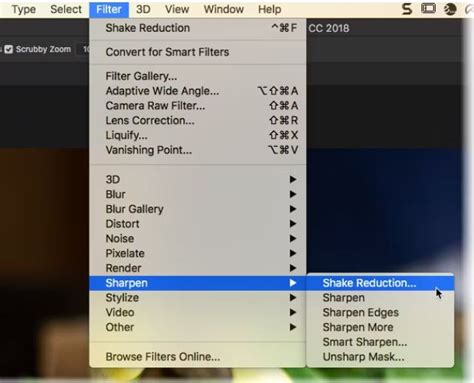
Ctrl + J(Windows) orCommand + J(Mac) to create a copy of your background layer. - Access the Filter: Navigate to the "Filter" menu, then select "Sharpen," and finally choose "Shake Reduction."
- Automatic Analysis: Photoshop will then automatically analyze the image to detect the blur.
- Advanced Settings: Once the initial analysis is complete, you can access advanced settings. Here, you can manually adjust parameters to fine-tune the correction. The "Blur Trace Bounds" slider controls the area Photoshop analyzes for blur, and "Smoothing" helps to reduce any artifacts introduced by the sharpening process. You can also manually draw a rectangle around a blurry area to help Photoshop better understand the blur's characteristics.
- Fine-tuning: Experiment with the various sliders in the "Advanced" tab, such as "Blur Trace Bounds" and "Smoothing," to achieve the best results. The goal is to reduce the blur without introducing excessive noise or unnatural sharpness.
- Apply the Filter: Once satisfied with the preview, click "OK" to apply the Shake Reduction filter.
It's important to note that the Shake Reduction filter is most effective when the blur is consistent throughout the image and primarily caused by camera shake. It may struggle with complex motion blur patterns or blur caused by subject movement.
Smart Sharpen: A More Controlled Correction
The "Smart Sharpen" filter in Photoshop offers a more manual and often more effective approach to correcting motion blur, especially when you can identify the direction and extent of the blur. This tool allows for precise control over the sharpening process.
Steps to Utilize Smart Sharpen:
- Open and Duplicate: As with Shake Reduction, open your image in Photoshop and duplicate the background layer (
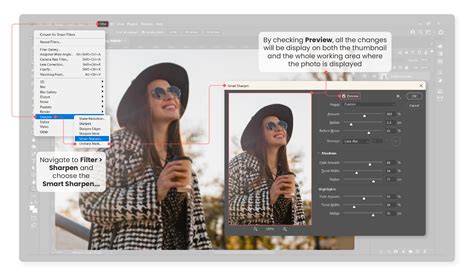
Ctrl + JorCommand + J). - Access Smart Sharpen: Go to "Filter" > "Sharpen" > "Smart Sharpen."
- Select the Blur Type: In the Smart Sharpen dialog box, you'll see a "Remove" dropdown menu. For motion blur, you'll typically want to select "Motion Blur."
- Measure the Blur (Optional but Recommended): To get the most out of Smart Sharpen for motion blur, it's beneficial to understand the angle and distance of the blur. Unmesh Dinda of PiXimperfect suggests using the Ruler Tool for this. After selecting the Ruler Tool, click and drag along the direction of the blur. Note the angle and the length displayed in the Info panel. This information can then be used to manually set the "Angle" and "Radius" (which corresponds to the distance) in the Smart Sharpen filter.
- Adjust Settings:
- Radius: This controls the amount of sharpening applied. Start with a small value and gradually increase it.
- Angle: This specifies the direction of the motion blur. You can set this manually based on your measurements.
- Reduce Noise: This slider helps to minimize any noise that may be amplified during the sharpening process.
- Preview and Refine: Use the preview checkbox to see the effect of your adjustments. Fine-tune the "Radius," "Angle," and "Reduce Noise" sliders until you achieve a satisfactory result. The goal is to sharpen the image without introducing halos or artifacts.
- Apply: Click "OK" to apply the Smart Sharpen filter.
Smart Sharpen provides greater control and can often yield better results for specific types of motion blur, especially when you have a good understanding of the blur's characteristics.
The Ruler Tool and Manual Measurement
For advanced users seeking the most precise motion blur correction, measuring the blur's characteristics manually can be incredibly beneficial. The Ruler Tool in Photoshop is invaluable for this.
How to Use the Ruler Tool:
- Select the Ruler Tool: Find the Ruler Tool in the Photoshop toolbar (it might be nested under the Eyedropper Tool).
- Measure the Blur: Click at one end of a blurred line or streak and drag to the other end, following the direction of the motion blur.
- Note the Information: Observe the "Angle" and "Length" values displayed in the Info panel (Window > Info). The Angle indicates the direction of the blur, and the Length gives you an idea of the distance the blur has spread.
- Apply to Smart Sharpen: Use these measured values to set the "Angle" and "Radius" parameters within the Smart Sharpen filter for a more accurate correction.
This methodical approach, combining measurement with a powerful sharpening tool, allows for a high degree of control and often leads to the most natural-looking results when fixing motion blur.
Advanced Techniques and Alternative Solutions
While Photoshop's built-in filters are powerful, sometimes they may not provide the desired results, or the user interface can feel intimidating. In such cases, exploring alternative methods and tools can be beneficial.
Layer Blending and Cloning for Targeted Fixes
In specific scenarios, especially when the motion blur affects only a particular area or object, a combination of layer masking, cloning, and healing tools can be employed.
- Duplicate Layer: Create a duplicate of your image layer.
- Apply Sharpening: Apply a strong sharpening filter (like Smart Sharpen) to this duplicated layer.
- Masking: Use a layer mask to reveal only the sharpened areas that need correction, blending them with the original layer.
- Cloning/Healing: For finer details or to remove specific blur artifacts, use the Clone Stamp Tool or Healing Brush Tool to sample sharp areas and paint over the blurry regions.
This technique offers granular control, allowing you to selectively apply sharpening where it's needed most.
Online AI-Powered Tools for Effortless Deblurring
The advent of Artificial Intelligence has brought forth a new generation of image editing tools, many of which offer automated solutions for common problems like motion blur. These online platforms often leverage advanced algorithms to deblur images with minimal user input.
- IMAGamigo Deblurring Tool: This online tool provides an automatic "Deblurring" feature. Users simply upload their image, and the tool analyzes and attempts to remove the blur without requiring extensive manual adjustments. This can be a quick and effective solution for those who find Photoshop's interface challenging.
- VanceAI AI Image Sharpener: VanceAI is a suite of AI-powered image enhancement tools. Their "AI Image Sharpener" is designed to eliminate motion blur and improve overall image sharpness. It supports various file formats and allows for some adjustment of sharpening settings. The process typically involves uploading the image, selecting the desired sharpening mode, and initiating the processing.
- AKVIS Refocus AI: AKVIS offers a range of powerful image editing software, including an offline tool with an AI-powered "Refocus AI" feature. This tool is known for its high-end results and fast processing speeds, making it suitable for users who prefer desktop applications and require efficient blur correction.
These AI-powered solutions can be particularly useful for users who are not as familiar with advanced image editing software or who need a quick and automated way to fix blurry images.
The Art of Intentionally Adding Motion Blur
While this guide focuses on removing motion blur, it's worth noting that motion blur can also be an artistic choice. Photographers sometimes intentionally introduce motion blur to convey a sense of speed, dynamism, or to create abstract compositions. For those interested in exploring this creative aspect, software like Wondershare Filmora offers dedicated effects for adding motion blur to images and videos, allowing for artistic manipulation rather than correction.
Conclusion: A Blend of Prevention and Correction
Fixing motion blur in Photoshop, or any image editing software, is a process that benefits greatly from a thorough understanding of its causes. While the best approach is always to strive for sharp, in-focus images directly from the camera by mastering camera stability and appropriate shutter speeds, Photoshop provides powerful tools to rectify less-than-perfect captures.
From the automated "Shake Reduction" filter to the more controlled "Smart Sharpen" and manual measurement techniques with the Ruler Tool, Photoshop offers a range of options. For those seeking simpler or faster solutions, AI-powered online tools present compelling alternatives. By combining preventative measures with the effective use of post-processing tools, photographers can significantly improve the quality of images affected by motion blur, ensuring that their captured moments are as sharp and impactful as intended.