Creating compelling reflections in Photoshop can elevate ordinary images into extraordinary visual narratives. Whether you aim to craft epic, surreal landscapes or add a touch of polished realism to product shots, understanding how to manipulate light and form to simulate reflective surfaces is a key skill. This guide will walk you through the essential techniques, from basic mirroring to advanced displacement mapping, enabling you to place subjects in seemingly impossible scenarios and achieve believably reflective environments.
The Foundation: Subject and Reflective Surface
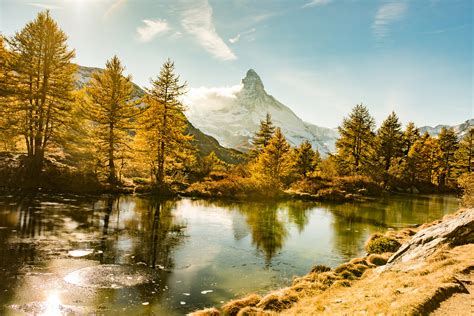
At its core, creating a reflection requires two fundamental elements: a background image that possesses a reflective surface and a subject or object that you wish to mirror within that surface. Our example involves a striking mountain landscape featuring a serene lake in the foreground, serving as our reflective canvas. The subject we will introduce is a photograph of a man, already expertly isolated from his original background. The objective is to seamlessly integrate this man into the landscape, creating the illusion that he is levitating above the lake, with his mirrored image precisely positioned below in the water.
Positioning and Initial Reflection Creation
Once your chosen subject is appropriately positioned within the background image, the next crucial step is to prepare for the reflection. Begin by duplicating the layer containing your subject. This duplicate layer will serve as the basis for the reflection. Utilize Photoshop's Transform Tool to vertically flip this copied subject. After flipping, carefully position the mirrored subject below the original. Precision in spacing is paramount; accurately estimate the distance between the original subject and the water's surface, and then replicate that distance between the water's surface and the newly positioned reflection. This meticulous attention to detail ensures a naturalistic visual flow.
Harmonizing Colors for Believability
Before delving into the intricacies of matching the water's texture, it's essential to harmonize the colors of the reflection with its surroundings. To achieve this, create a new layer positioned directly above the reflection layer. Sample a color from the water in your background image using the Eyedropper Tool. Subsequently, employ the Brush Tool to completely paint over the reflection layer with this sampled color. To constrain this color fill to only affect the reflected subject, right-click on the newly created paint layer and select "Create Clipping Mask." This action ensures the painted color only appears over the reflected subject.
Next, change the Blending Mode of this paint layer to "Color." Adjust the Opacity of this layer until the colors of the reflection blend seamlessly with the water. If your background image contains other reflections, such as the mountains in our example, use these existing color variations as a guide to refine your adjustments. This color matching process is vital for creating a cohesive and believable scene.
Implementing the Displacement Filter for Realistic Texture
With the reflection positioned and its colors harmonized, the stage is set to introduce realistic shape and texture using Photoshop's powerful Displacement Filter. To prepare for this, hide all layers except for the background layer. Navigate to "File," then "Save As," and save this background layer as a separate PSD file. This saved PSD will act as a reference for the Displacement Filter, allowing it to analyze the textures within your background and apply them to other layers.

It's also important to fill in any transparent pixels surrounding your reflection layer. This step enhances the accuracy of the Displacement Filter when it compares the background PSD with your cut-out reflection layer. Create a "Solid Color Fill" layer and position it behind the reflection layer. You may wish to lower its opacity slightly to allow visibility of the rest of your image.
Now, select both the "Solid Color Fill" layer and the reflection layer within the Layers Panel. Right-click and choose "Convert to Smart Object." This conversion is crucial as it allows the Displacement Filter to recognize these two layers as a single entity without permanently merging them, preserving their individual editability.
You are now ready to apply the displacement effect. Select the newly created reflection Smart Object and go to "Filter," then "Distort," and finally select "Displacement." The Displacement Filter will analyze the PSD file you saved earlier, extract its textural information, and apply a corresponding texture effect to your selected layer - in this case, the reflection layer. You will likely need to experiment with the filter's settings to achieve the most realistic outcome. For our example, the goal is to match the reflection's texture to the existing ripples in the water. By adjusting the Horizontal and Vertical Scale values, you can control the intensity and direction of the displacement. If you are following along, you should observe a ripple effect on the reflection that closely mimics the ripples present in the background.
Refining the Reflection: Motion Blur and Noise
To further enhance the photorealism of your reflection, consider adding subtle Motion Blur and Noise. Applying a touch of Motion Blur can soften the reflection, making it appear more natural and less static, as if it were a true capture of movement on a water surface.
Additionally, adding Noise that matches the grain or texture of your original background image will help integrate the reflection seamlessly, making it appear as if it was all captured in a single camera shot. This final touch ensures that the fabricated element integrates flawlessly with the original photographic data.
A Simpler Approach: Layer Masks and Blend Modes
While the Displacement Filter offers advanced control, there are more accessible methods for creating reflections, particularly for simpler scenarios or when speed is a priority. This technique is often employed in graphic design for logos, text, and modern layouts.
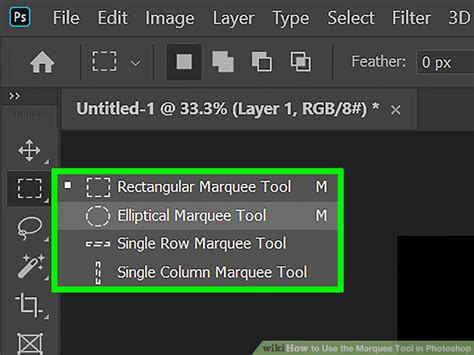
The process begins with a base image. You can select an area of your image that will serve as the reflection using the Marquee Tool (M). Copy this selection as a new layer. Then, using the Transform Tool, flip this new layer vertically. Position it below the original, ensuring the spacing is accurate.
The next step involves blending modes. Explore the "Lighten" blend modes, such as "Lighten," "Screen," "Color Dodge," "Linear Dodge," and "Lighter Color." These modes affect how the selected layer interacts with the layer below. By choosing a Lighten mode, only areas of the top layer that are lighter than the layer beneath will become visible, effectively hiding darker areas and creating a more subtle reflection. "Lighten" or "Screen" are often good starting points, but experimentation is key to finding what works best for your specific image.
To achieve a gradual fade, a Layer Mask is indispensable. Apply a Layer Mask to your reflection layer. Then, using the Gradient Tool (G), create a gradient from black to white across the mask. Black on the mask conceals the layer, while white reveals it. A black-to-white gradient applied from the bottom of the reflection upwards will cause the reflection to gradually fade, mimicking the way reflections naturally diminish in intensity. You can further refine the fade by adjusting the layer's opacity or by painting with a low-opacity black brush on the mask to selectively hide areas.
Advanced Techniques for Water Reflections
Creating a convincing water reflection involves additional steps to simulate the dynamic nature of water. After setting up your canvas and creating the initial reflection, the next phase involves generating a water texture that can be used to distort the reflection.
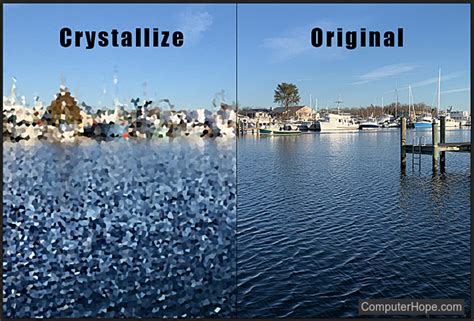
A new layer, named "Displacement," can be filled with white. Applying "Filter > Noise > Add Noise" with a high value, followed by "Filter > Pixelate > Crystallize," creates a granular texture. This texture can then be further manipulated with "Filter > Blur > Motion Blur" to resemble water ripples.
This "Displacement" layer then needs to be transformed to match the perspective of your scene. Using "Edit > Transform > Perspective" and "Edit > Transform > Distort," you can shape the texture to align with the water's surface. Once this displacement map is saved as a PSD, it can be applied to the reflection layer using "Filter > Distort > Displace." This filter uses the saved map to warp the reflection, introducing realistic ripples and distortions.
To add depth and further enhance the water effect, the "Displacement" layer can be placed below the reflection layer and its blend mode set to "Overlay" or "Soft Light." Adjusting the opacity of this layer allows you to control the intensity of the water's influence on the reflection, creating a more immersive and believable scene.
Considerations for Product Photography
For product photography, creating reflections can significantly enhance the perceived quality and realism of the product. When aiming to add a reflection, it's beneficial to use an image where the product is photographed at eye-level and its base rests close to the horizon line. This head-on perspective simplifies the reflection creation process compared to angled objects. Products shot against a plain background, especially white, also make the isolation and reflection process more straightforward.
The essential steps involve enlarging the canvas to accommodate the reflection, selecting the product precisely, duplicating and flipping it vertically, and then aligning it to create symmetry. Layer masks are then used to fade the reflection, and opacity adjustments fine-tune its visibility. Finally, cleaning up any extraneous shadows from the original image ensures that the reflection appears solely as a result of the object interacting with the reflective surface.
Conclusion: Mastering the Illusion
Creating realistic reflections in Photoshop, while initially appearing complex, is an achievable skill with practice. Whether you employ the sophisticated Displacement Filter for intricate water textures or leverage layer masks and blend modes for simpler fades, the core principles remain consistent: accurate positioning, color harmony, and careful integration with the surrounding environment. By mastering these techniques, you can imbue your images with a heightened sense of depth, realism, and artistic flair, transforming ordinary scenes into captivating visual stories. The ability to make a subject appear to levitate over water or sit on a polished surface is a testament to the power of digital manipulation when guided by an understanding of light, form, and perspective.
tags: #reflective #texture #photoshop