Photography, a medium that captures fleeting moments and transforms them into enduring memories, has undergone a profound evolution. From its nascent stages in the 1820s with Joseph Nicéphore Niépce, the first permanent photograph, to the sophisticated digital manipulation possible today, the journey has been remarkable. In this digital age, images saturate our daily lives, appearing on social media, in family albums, news articles, books, and advertisements. The industry of photography, in particular, has seen immense growth, with digital cameras and smartphones making image capture accessible to almost everyone. While photos related to TV and film production often fall outside the traditional photography industry for research purposes, the core practice of capturing and enhancing visual narratives remains central.
Adobe Photoshop has long been the industry-standard software for photographers, offering a vast array of tools and capabilities that range from subtle photo retouching to the creation of elaborate, surreal photo art. It's an essential component of a modern photographer's workflow, enabling them to refine their vision and elevate their images to professional standards.
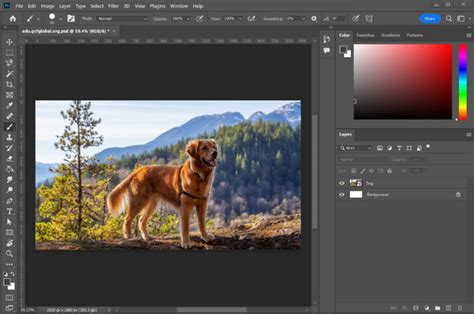
Importing and Initial Adjustments: Laying the Foundation
The first step in any Photoshop editing process is importing the photograph. Once the image is open, it's crucial to ensure its foundational integrity. A crooked horizon or a slightly tilted image can detract from an otherwise excellent shot. The Straightening tool is invaluable for leveling out these imperfections, ensuring a visually stable composition.
Following this, the Crop tool becomes essential for refining the composition. If distracting elements are present at the edges of the image, or if the initial framing can be improved, cropping is the solution. It's important to note the "Delete Cropped Pixels" option in the Crop menu; ensuring this is turned off allows for non-destructive cropping, meaning the cropped-out areas can be recovered if needed later.
The Power of Layers and Non-Destructive Editing
A fundamental concept in Photoshop, and one that underpins its immense power, is the use of layers. Layers can be thought of as translucent sheets stacked on top of one another, each containing a different element or adjustment of the image. The benefit of working with layers is manifold.
Firstly, it enables non-destructive editing. This means that any changes made to a layer can be undone or modified at any time without affecting the original image data or other layers. This provides immense flexibility and allows for experimentation without fear of permanent damage. For instance, if you duplicate your original image into multiple layers, each duplicate can serve as the basis for an individual edit.
Secondly, layers facilitate targeted edits. By separating elements of an image into distinct layers, you can focus on refining specific components in isolation. For example, if you have a layer dedicated to the sky, you can apply adjustments like increased brightness or a blur effect that only affect the sky, leaving the rest of the image untouched. This precise control is essential for achieving professional results.
To create a new layer, one can click the "Create a New Layer" button in the Layers panel or navigate to Layer › New › Layer from the top menu. When importing new images or elements, dragging and dropping a JPEG or PNG file into your Photoshop project will create a new layer. Resizing and repositioning these elements is straightforward, and pressing Enter or Return often automatically converts the layer into a Smart Object layer, further enhancing its non-destructive editing capabilities.

Mastering Selections and Masks for Precision
The ability to isolate specific areas of an image is paramount for targeted editing. Photoshop offers a suite of fast selection tools to quickly grab one area of an image. Once a selection is made, it can be used to create a layer mask. A layer mask controls the visibility of a layer; white areas reveal the layer's content, while black areas hide it. Gray values create partial transparency.
Refine Edges in Photoshop
To create a layer mask, one selects the layer they wish to mask and clicks the "Add Layer Mask" button in the Layers panel. For more complex selections, tools like the Quick Selection tool or the Pen tool are indispensable. The Pen Tool, in particular, offers unmatched precision for creating clean, accurate selections by placing anchor points and manipulating curves. Although it requires practice, the Pen Tool is a cornerstone for professional-level masking.
Quick Mask Mode provides a visual method for creating and refining selections. In this mode, painting with black adds to the selection, and painting with white removes from it. After fine-tuning, exiting Quick Mask Mode restores the marching ants selection.
Layer masks are particularly useful for photographers for various tasks, such as blending multiple exposures, creating smooth transitions between effects, or isolating specific parts of an image for targeted adjustments. Clipping masks are another advanced technique that allows one layer to affect only the pixels of the layer directly below it.
Retouching and Imperfection Removal
Even the most perfectly captured moments can have minor flaws. Photoshop's retouching tools are designed to address these with finesse. Tools like the Spot Healing Brush are excellent for covering up blemishes, irregularities, or small distracting elements. Simply clicking on an imperfection with the Spot Healing Brush can effectively remove it. The Clone Stamp tool offers a similar function, allowing you to sample pixels from one area of an image and paint them over another, making it ideal for covering up unnecessary background bits or repeating textures.
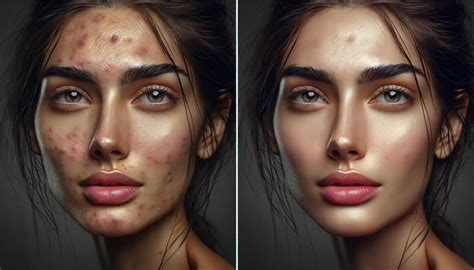
For portraits, advanced retouching skills are crucial. This includes skin smoothing to reduce blemishes and wrinkles, hair retouching to manage flyaways, and enhancing features like eyes and teeth. For product photography, cleaning up reflections and improving textures is often necessary. High-end retouching can also involve color grading and the subtle sculpting of light and shadow through dodging and burning.
Transforming Images: Composites, Artwork, and Art Prints
Photoshop's capabilities extend far beyond simple retouching. Photo composites are new images created by combining elements from multiple photographs. This feature is exceptionally useful for creating imaginative scenes and feats of fantasy. Adept users can extract any part of a photo, down to an individual pixel, and integrate it into a new creation. This process requires mastering selection tools, and paying close attention to lighting and color matching to ensure the final composite looks natural and believable. AI tools are increasingly assisting with these complex compositing tasks.
Beyond manipulation, Photoshop is also a powerful tool for creating original digital artwork and art prints. With its near-limitless customization options and the sophisticated layering system, artists can craft intricate pieces. Photographers familiar with Photoshop's nuances can leverage these capabilities to produce high-resolution images that can be sold as prints, potentially generating a passive income.
Color and Tone Control: Adjustment Layers and Beyond
Controlling the color and tone of an image is fundamental to achieving a desired mood and aesthetic. Adjustment Layers are a cornerstone of this process. While beginners might think of them as sophisticated filters, they offer far more precise control. Tonal adjustments modify aspects like hue, contrast, vibrance, and saturation, while color adjustments help manage the color palette of an image.
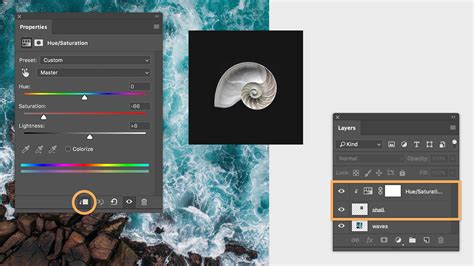
Curves are a particularly powerful adjustment tool, allowing photographers to target specific tonal ranges and make precise color and brightness adjustments. Hue/Saturation and Vibrance adjustments are also vital for fine-tuning the intensity and hue of colors. For more advanced color grading, techniques like using gradient maps or the Camera Raw filter are employed. Blending modes offer creative ways to interact layers and adjustments, adding unique color effects.
Dodging and burning, a technique borrowed from traditional film darkrooms, allows for selective lightening (dodging) and darkening (burning) of specific areas in an image. This helps to sculpt light and shadow, adding depth and dimension. While it can be done destructively, non-destructive methods using Curves adjustment layers with masks are preferred.
Enhancing Detail and Correcting Imperfections
While Photoshop is not a magic tool to recover lost detail, it excels at enhancing existing sharpness and correcting optical imperfections. Import sharpening is applied to counteract softness introduced by camera sensors or lenses. Lightroom and Adobe Camera Raw are excellent for this initial global sharpening pass. However, for further refinement and to pull out maximum detail, Photoshop offers more advanced sharpening techniques.
Most lenses introduce some form of distortion. The Lens Correction filter in Photoshop can automatically fix issues like barrel or pincushion distortion, chromatic aberration, and vignetting. Manually adjusting these settings provides further control. It's a good practice to apply lens corrections early in the editing workflow.
Streamlining Workflow with Actions and Smart Filters
For photographers who perform repetitive tasks, Photoshop Actions are a game-changer. Actions can record a series of steps and play them back on other images, saving significant time. Batch processing allows these actions to be applied to multiple files simultaneously, ensuring consistency across a project.
Smart Filters offer a non-destructive way to apply filters. When a filter is applied to a Smart Object layer, it becomes a Smart Filter, allowing its settings to be adjusted or removed at any time. This provides immense flexibility for experimentation without permanently altering the image.
The Synergy of Lightroom and Photoshop
While Photoshop offers unparalleled depth and control, it's often used in conjunction with Adobe Lightroom. Lightroom excels at image ingestion, organization, and initial global adjustments due to its user-friendly interface and efficient workflow. Many professional landscape photographers, for instance, utilize Lightroom for its robust cataloging features and then export images to Photoshop for more detailed retouching, compositing, or advanced color grading. This synergy allows photographers to leverage the strengths of both programs, creating a powerful and efficient post-processing pipeline.

Learning Photoshop is an ongoing journey, but its mastery opens up a world of creative possibilities. From essential retouching to complex compositing and digital artistry, Photoshop empowers photographers to not only capture moments but to craft them into compelling visual narratives. The industry's leading photo editing software seamlessly syncs with other Creative Cloud apps like Lightroom and Premiere, demonstrating its central role in the broader creative ecosystem. The images transformed in Photoshop can become graphic design elements, stills in video projects, or even parts of animations, underscoring its versatility and enduring importance in the visual arts.
tags: #do #photographers #use #photoshop