Mastering the art of high-end portrait retouching is a journey that transforms good photographs into captivating masterpieces. This comprehensive guide delves into the essential techniques and optimal workflows that professional retouchers employ to achieve flawless skin, stunning lighting, and a natural, polished look. Whether you are a seasoned professional looking to streamline your process or an aspiring artist eager to elevate your skills, this tutorial provides the knowledge and tools to unlock the secrets of professional portrait editing in Adobe Photoshop.
The Foundation of Excellence: Pre-Editing Best Practices
Before even opening Photoshop, the quality of the initial capture plays a pivotal role in the success of portrait retouching. To achieve the best results, it is imperative to start with a high-quality image. This involves careful consideration of several key factors during the shooting process.
Shooting in RAW Format
One of the most critical decisions for professional retouching is to shoot in RAW format. RAW files provide an uncompressed image with a significantly wider dynamic range than JPEGs. This extra data offers unparalleled control over your images during editing, giving you greater latitude to adjust shadows and highlights without sacrificing detail or introducing undesirable artifacts. Working with RAW files is the cornerstone of achieving stunning results, allowing for precise adjustments to exposure, white balance, contrast, and other fundamental settings. This tutorial guides you through the process of editing five high-quality RAW files, demonstrating the power and flexibility this format offers.
Mastering Lighting and Exposure
For sharp, crisp images that translate well into post-processing, ensuring ample light during the shoot is paramount. Balancing exposure correctly in-camera by avoiding both overexposure and underexposure will significantly improve your chances of capturing good portraits. Understanding your camera’s performance in low-light conditions is also important, as excessive noise can ruin fine details and overall sharpness. While Photoshop can enhance an image, it cannot fabricate detail that wasn't captured. Therefore, a well-exposed RAW file with minimal noise is the ideal starting point.
Composition and Framing
While cropping can be used to adjust framing later, it is far more beneficial to get the composition and framing right in camera. Cropping can reduce image size and compromise quality, so taking the time to line up your shot properly from the start is a crucial step. Experienced photographers understand that a strong composition is the bedrock upon which exceptional portraits are built.

The Retouching Toolkit and Optimal Workflow
Achieving high-end results efficiently is a hallmark of professional retouching. This involves a well-defined workflow and the use of specialized tools. This tutorial provides you with the perfect retouching toolkit: five high-quality RAW files, our exclusive Frequency Separation Action, and a versatile Retouching Brush. These resources are designed to help you get professional results quickly by performing the necessary steps in the best possible order.
Importing and Initial Adjustments in Lightroom
The optimal workflow for professional portrait retouching often begins outside of Photoshop, typically in Adobe Lightroom. Importing your RAW file into Lightroom is the first step to getting your image into a workable state before you start retouching. This initial stage is crucial for establishing a solid foundation for your edits.
- White Balance: Adjust the temperature to bring cooler or warmer tones into your image, or to correct any unwanted color casts. This ensures the colors in your image are accurate and pleasing.
- Exposure and Contrast: Tweak the highlights, shadows, and contrast to add depth and dimension to your image. This step helps to define the overall mood and feel of the portrait.
- Texture and Clarity: Enhance skin and fabric details, but use these adjustments sparingly. Overdoing them can create a harsh, unnatural look, so a delicate touch is essential.
- Color Grading (Optional): You can begin color grading at this stage, always keeping skin tones in mind. Alternatively, you might choose to save this for later in Photoshop for more granular control.
Once your base edits are complete in Lightroom, you can seamlessly open your image in Photoshop for the more detailed retouching process. This is typically done by right-clicking on your image in Lightroom, selecting "Edit," and then choosing "Edit in Adobe Photoshop."
Understanding Non-Destructive Editing
The key to maintaining flexibility and quality in your retouching workflow is non-destructive editing. This approach means you’ll learn to edit your images without permanently altering the original file. By using layers, masks, and adjustment layers, you can experiment with different effects and settings without damaging the underlying image. This allows for easy revisions and ensures you always have the original file to revert to.
Destructive editing, conversely, permanently alters the original image, meaning changes cannot be undone once the file is saved and closed. For example, applying edits directly to a JPEG and saving it repeatedly can degrade quality due to compression. To preserve your original, always work non-destructively. One simple way to do this is by duplicating the background layer before making any adjustments. Pressing Ctrl+J (Windows) or Cmd+J (Mac) creates a copy, ensuring you have an untouched layer to revert to if needed. For even more flexibility, consider using adjustment layers, smart objects, or layer masks.
Essential Retouching Techniques
With the foundational steps completed and a non-destructive workflow established, it's time to dive into the core techniques that define high-end portrait retouching.
Basic Skin Retouching: Imperfection Removal
Skin requires careful attention during editing. Removing too much detail can lead to an unnatural look. Often, subjects have varying skin tones on their face, hands, and body, which can create an unnatural appearance in photos if not handled with care. Photoshop offers several powerful tools for addressing these issues.
Photoshop’s Spot Healing Brush or the newer Remove Tool, which utilizes AI to identify and fix imperfections, are effective for removing blemishes like acne, small imperfections, or stray hairs from your model’s face. These tools are excellent for targeted removal of temporary or unwanted marks, ensuring a clean canvas for further refinement.
Smoothing Skin While Preserving Texture
Smoothing skin is a critical step, but it must be done with precision to avoid an artificial appearance. Removing all skin texture can make a person look like a mannequin. There are several methods to smooth skin in Photoshop:
- Spot Healing Brush: Good for minor touch-ups, but not ideal for smoothing an entire face as it can remove too much natural texture.
- Surface Blur: A quicker option than frequency separation, though it may not retain texture as well. It can be useful for subtle softening.
- Neural Filters: Photoshop’s latest AI-driven tools offer a simple and effective way to smooth skin while keeping natural detail intact.
- Navigate to Filter > Neural Filters.
- Select or download the "Skin Smoothing" filter.
- Adjust the blur and smoothness sliders to achieve a balance between smooth skin and preserved texture.
- Click OK to apply the effect.
- Frequency Separation: This is a more involved technique that truly excels at smoothing skin while meticulously preserving natural textures. It allows for precise control over color and texture independently.
Unlocking Frequency Separation
Frequency separation is a powerful technique that lets you separate texture and color, giving you precise control over your edits. In this tutorial, we not only teach you how frequency separation works but also provide our exclusive PHLEARN Frequency Separation Action to streamline the process and ensure flawless results. This technique is fundamental to achieving that coveted high-end, natural look.
The core idea behind frequency separation is to divide an image into two layers: a low-frequency layer (color and tone) and a high-frequency layer (texture and detail). By working on these layers independently, you can smooth out color variations and blemishes on the low-frequency layer without affecting the fine details like pores and skin texture on the high-frequency layer. This allows for incredibly realistic skin smoothing.
Enhancing Eyes, Lips, and Facial Features
Certain facial features should stand out in a portrait to draw the viewer's eye and add impact. It’s important to brighten the eyes, whiten the teeth, and enhance other details without overdoing it.
Brightening Eyes and Whitening Teeth
Use the Dodge Tool to selectively brighten areas. Choose either the "Highlights" or "Midtones" setting and apply sparingly. Be sure to avoid overdoing it, as unnaturally bright eyes or teeth can detract from the realism of the portrait.
Sharpening the Eyes
To make the irises pop and add a captivating sparkle, sharpening the eyes is a crucial step. This technique enhances the details that matter most while guiding the eyes of the viewer around the image.
- Duplicate the image layer (Ctrl+J/Cmd+J).
- Go to Filter > Other > High Pass.
- Set the radius to 1-3 pixels and click OK. This radius is crucial for isolating the edge detail.
- Double-click the layer and change the blending mode to "Soft Light." This blends the sharpened details with the underlying image.
- Add a layer mask by holding Alt (Windows) or Option (Mac) and clicking the layer mask button. This creates a black mask, hiding the sharpening effect.
- With a soft brush set to white, paint over the eyes to reveal the sharpening effect precisely where you want it.
Eyes are full of color and detail that sometimes get lost in a photograph, and this sharpening technique brings them back to life vividly.
Enhancing Lips
Use the saturation tool or adjustment layers to deepen lip color or add subtle enhancements. As with the eyes, it's best to apply a layer mask so you can precisely control where the effect appears, ensuring a natural and refined look.
Create INSANE Details in the Eyes with Photoshop!
Dodge and Burn: Sculpting Light and Shadow
Dodge and burn is a fundamental retouching technique that involves selectively lightening (dodging) and darkening (burning) areas of an image. This process is akin to traditional darkroom techniques and is essential for sculpting light and shadow, adding depth, dimension, and a three-dimensional feel to the portrait.
In the digital age, this is often achieved using Curves adjustment layers with inverted masks and a soft brush. A Curves layer making an aggressive curve downwards darkens the overall image, while another Curves layer making an aggressive curve upwards lightens it. By inverting both masks to black and setting each to a "Luminosity" blend mode, any edits painted onto these masks affect the luminance value of the pixels while preserving the hue value. This is where the magic happens: painting with a soft brush on these masks allows you to selectively bring back light and shadow, defining facial features, creating dramatic highlights, and adding subtle contours. The Wacom Tablet, with its pressure sensitivity, is particularly well-suited for this technique, allowing for nuanced and artistic application of light and shadow.
The amount of time spent darkening an image is often double that spent brightening it, as this contributes to moodier, more sculpted results. Building up the effect with light, low-flow brushstrokes is key to achieving a natural outcome.
Blending Modes for Creative Effects
Blending modes are essential for creating stunning visual effects in Photoshop. This tutorial will teach you how to efficiently use blending modes to combine layers, create depth, and achieve seamless transitions. Whether you're subtly enhancing skin tones or creating dramatic lighting effects, understanding blending modes is crucial for advanced retouching. For instance, using "Luminosity" blend mode for dodge and burn ensures that color information is not altered, preserving the natural hues of the skin.
Color Grading: Setting the Mood and Tone
By the time you reach the color grading stage, most of your retouching edits should be in place. Color grading is where you apply your final artistic touches to tie the whole image together and establish a specific mood or aesthetic. You can use various tools like tone curves, hue and saturation adjustments, and color balance.
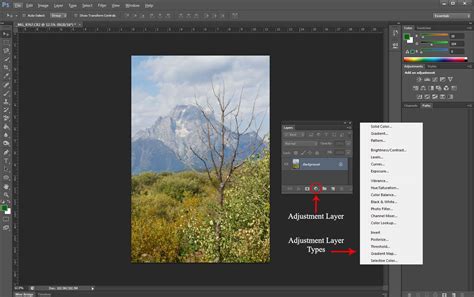
One particularly powerful tool for this is Selective Colour. To apply Selective Colour non-destructively:
- Go to Layer > New Adjustment Layer > Selective Colour.
- The adjustment will appear in the Adjustments panel.
This tool gives you full control over each color channel, allowing you to fine-tune the palette while being mindful of skin tones. The "Colors" flyout menu offers a selection of ranges for adjustment, each broken down into CMYK sliders. Subtracting a value essentially adds the color's inverse, offering nuanced control over the image's color balance.
Additional color tweaks can be achieved through Hue/Saturation and Curve Adjustment layers, allowing for precise control over specific color casts or to enhance certain tones. For example, a Hue/Saturation layer can be used to darken and desaturate a subject's shirt, or a Curve layer can correct a green cast on a hat. Two layers can even be dedicated to correcting skin tone, by shifting reds towards orange and desaturating slightly, and then fine-tuning the final skin tone by adjusting blue in the shadows and red in the highlights.
Sharpening: The Final Polish
Sharpening is one of the most important final steps in portrait retouching. It helps enhance the details that matter most, bringing clarity and definition to the image. Beyond just making things look "crisp," proper sharpening guides the eyes of the viewer around the image, emphasizing key elements.
For online sharing, after resizing your image to 1200 pixels at 72 dpi (or 1080 pixels wide for Instagram), using a method like bilinear interpolation for downscaling preserves sharp details without appearing crunchy. A "Smart Sharpen" filter with a radius of 0.4-1.1 pixels and an amount from 50-110 percent is often chosen for the final polish.
Beyond Photoshop: Alternatives and the Importance of Practice
While Photoshop is the industry standard, it's worth noting that alternatives exist. If you don’t have Photoshop or are looking for a different approach, consider Aperty, a portrait-specialist editing software that can offer a faster workflow for certain tasks.
However, regardless of the software used, the key to mastering portrait editing lies in practice. Perfecting these techniques may take time, but the journey is incredibly rewarding, setting professional photographers apart from amateurs. As experienced landscape photographers can attest, the ability to efficiently prepare an unedited RAW file for print or online sharing is a testament to consistent practice. The common denominator in achieving such proficiency? Practice.
The journey from understanding how individual tools work to knowing how to use them effectively to achieve a desired artistic vision is vital. Seeing other creators' processes is an invaluable way to discover and refine your own artistic style. Whether you're working with a portrait or a landscape, the principles of good exposure, contrast, and color manipulation remain consistent. While specific tools like the Liquify tool or frequency separation for skin smoothing might be unique to portraiture, the underlying understanding of image manipulation is transferable.
The Learning Path
For those seeking a structured and in-depth education, the comprehensive 44-hour Retouching Learning Path, designed for both amateurs and professionals, offers a deep dive into the world of retouching. Aaron Nace, photographer, Photoshop artist, and founder of PHLEARN, has dedicated extensive resources to help artists master these skills. A big thanks is also due to photographers like Ymke Myrte and Azzurra Piccardi for providing the high-quality RAW files that make tutorials like this possible, showcasing their passion for exploring light, shadows, and colors to create captivating images.
Conclusion
Portrait editing is an essential component of creating a polished final product in portrait photography. Mastering the techniques discussed - from non-destructive editing and frequency separation to dodge and burn and color grading - will not only elevate your images but also help you attract more clients. Whether you choose Photoshop with its wide array of powerful tools or an alternative software, the consistent thread is the dedication to practice and the enjoyment of the creative process. Once you master the basics of post-processing in your chosen genre of photography, you will find yourself able to execute edits with remarkable speed and confidence.