Adobe Photoshop, a powerhouse in digital imaging, offers a vast array of tools and techniques for manipulating and combining colors. Whether you're aiming to create seamless blends, achieve specific artistic effects, or precisely unify disparate elements, understanding Photoshop's color combination capabilities is crucial. This guide delves into various methods, from basic layer blending to sophisticated brushwork, empowering users to achieve their desired visual outcomes.
Unifying Shapes and Colors: Beyond Simple Layering
When the goal is to present multiple colored shapes as a single, unified entity, Photoshop offers several approaches, though some are more direct than others. A common, albeit sometimes cumbersome, method involves grouping layers. To unite two circles of different colors, for instance, you can add them to a layer group. This is achieved by selecting the two layers and clicking the folder icon at the bottom of the Layers window. Once grouped, a right-click on the group allows for merging, effectively combining them. However, this method can sometimes lead to a less-than-ideal outcome, particularly if precise control over the merged shape is required.
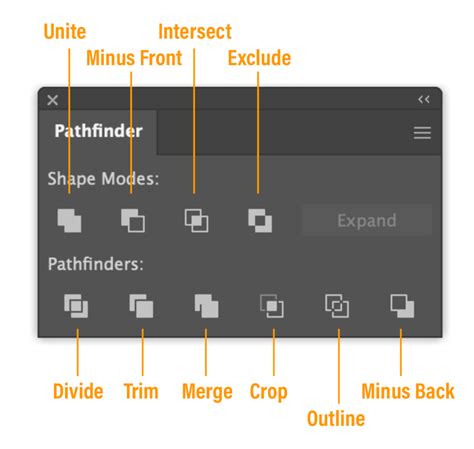
For more complex shapes or a desire for cleaner vector-based manipulation, integrating with Adobe Illustrator can be a strategic move. Shapes created in Illustrator can be placed into Photoshop. While this might still result in visually distinct shapes, it provides the illusion of a single, multi-colored form. For intricate paths, exporting them as an AI file and refining them in Illustrator before reintroducing them to Photoshop can streamline the process. Illustrator's Pathfinder tool is particularly adept at merging, dividing, and manipulating vector shapes, offering more direct control than some Photoshop-native methods for shape unification.
If the intention is to work solely within Photoshop but with complex shapes, the process involves manipulating paths after merging. This might require adding or removing paths to achieve the desired split within a single shape, a task that can be more involved than in Illustrator. The core idea is that while Photoshop excels at pixel-based manipulation, Illustrator often provides superior tools for precise vector path editing and merging.
Mastering Color Blending with Brush Tools
Photoshop's extensive toolkit includes brushes designed specifically for blending and mixing colors, offering a more organic and painterly approach. The Smudge tool is a prime example, allowing users to drag and blend colors as if they were wet paint. To activate it, select the Smudge tool from the toolbar; if it's not immediately visible, click and hold the Blur tool to reveal its related options.
When using the Smudge tool, several options in the options bar enhance its functionality. Selecting "Sample All Layers" enables the tool to smudge using colors from all visible layers, providing a richer source of color to blend. The "Finger Painting" option allows the smudge to use the foreground color at the beginning of each stroke, offering a controlled way to introduce a specific hue into the blend.

The Mixer Brush tool offers an even more sophisticated level of color mixing, simulating the behavior of traditional paintbrushes on a canvas. This tool features a "reservoir" for holding paint and a "pickup" mechanism that draws color from the canvas. The reservoir stores the color being applied, while the pickup samples and continuously mixes canvas colors with the reservoir's contents.
To load the Mixer Brush's reservoir, users can Alt-click (Windows) or Option-click (macOS) on the canvas. The brush tip will then reflect any color variations in the sampled area. For a uniform color in the brush tip, the "Load Solid Colors Only" option can be selected from the Current Brush Load pop-up menu in the Options bar. Further customization is available through brush options in the Options bar, allowing control over the amount of paint loaded and how much the brush picks up from the canvas (paint wetness).
Painting with the Mixer Brush involves dragging the brush across the image. For straight lines, a starting point can be clicked, Shift held down, and an ending point clicked. Attention to the surface qualities of the material being imitated is important, as different materials exhibit varying levels of reflection and transition smoothness. The type and color of light sources also influence the final blended appearance.
The Power of Blend Modes: Mathematical Harmony
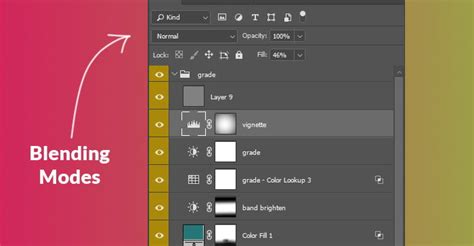
Photoshop's blend modes are the mathematical equations that dictate how pixels from a top layer (the blend layer) interact with pixels in a background layer (the base layer). These modes are fundamental for achieving precise color schemes, creating nuanced effects, and adjusting brightness and contrast. Blend modes can be applied to an entire layer or selectively used with a layer mask and the Brush tool.
To explore blend modes, a new layer can be created, often as a "Solid Color," "Gradient," or "Pattern" fill layer via Layer > New Fill Layer. The default blend mode is "Normal," but this can be changed by clicking the blend mode window, typically located near the top of the Layers panel. If a blend mode's effect is too subtle or overpowering, the Opacity slider can be adjusted to fine-tune the intensity.
Blending Modes - Photoshop for Beginners | Lesson 5
The blend modes are organized into six sections within the drop-down menu, each offering distinct ways of color interaction:
- Normal Mode: In this default mode, the blend color completely covers the base color. When using the Brush tool, the painted color will entirely replace the underlying pixels.
- Darken Mode: This mode compares the red, green, and blue (RGB) values of each pixel in the blend layer and the base layer, retaining the darker value for the resulting pixel. "Darker Color" is similar, comparing the overall pixel values rather than individual RGB channels.
- Lighten Mode: Conversely, this mode compares the RGB values and retains the lighter value for each pixel. "Lighter Color" works similarly but compares the overall pixel values.
- Multiply Mode: This mode multiplies the brightness values of the blend color and base color. It effectively darkens the image, and pure cyan, magenta, and yellow blend as expected. White areas are ignored, while darker colors produce darker results.
- Screen Mode: This is the inverse of Multiply. It screens the colors, effectively lightening the image. Black areas are ignored, and lighter colors produce lighter results.
- Overlay Mode: This mode preserves the highlights and shadows of the base layer while overlaying the colors. It darkens dark areas and lightens light areas, increasing contrast. It works by multiplying or screening colors depending on the base color.
- Soft Light & Hard Light: These modes mimic the effect of a diffused or harsh spotlight, respectively. Soft Light gently brightens or darkens based on the blend color, while Hard Light applies a more intense darkening or lightening effect.
- Color Burn & Linear Burn: These modes darken the image by increasing contrast (Color Burn) or decreasing brightness (Linear Burn), with Color Burn having a less pronounced effect on lighter colors.
- Color Dodge & Linear Dodge (Add): These modes lighten the image by decreasing contrast (Color Dodge) or increasing brightness (Linear Dodge). If either color is white, Linear Dodge will result in pure white.
- Add: This mode adds the RGB channel values of the blend color to the base color. If a channel value exceeds 255, it's capped at 255. This often results in pure white or pure black pixels.
- Difference: This mode subtracts the darker color value from the lighter color value for each channel. The effect is often abstract and used for special effects.
- Exclusion: Similar to Difference, but with lower contrast.
- Hue, Saturation, Color, and Luminosity: These are the composite modes, offering more specific control:
- Hue: Replaces the hue of the base layer with the hue of the blend layer, preserving saturation and luminosity.
- Saturation: Replaces the saturation of the base layer with the saturation of the blend layer, preserving hue and luminosity.
- Color: Replaces both the hue and saturation of the base layer with the blend layer's values, while retaining the base layer's luminosity. This is exceptionally useful for colorizing black and white images or changing the color of specific elements without altering their brightness. For instance, to make roses red in a black and white image, a new layer set to "Color" blend mode can be painted over the roses with red as the foreground color. The Color mode is also effective for altering eye color by selecting the eyes, adding a Hue/Saturation adjustment layer, and setting its blend mode to Color.
- Luminosity: This is the inverse of the Color mode. It replaces the luminosity (lightness) of the base layer with the luminosity of the blend layer, preserving hue and saturation.
It's important to note that for certain "pigment colors," like pure cyan, magenta, and yellow, the Multiply blend mode works as expected. However, for other color combinations, such as yellow and red, achieving a smooth blend might require adjustments. For instance, using "Normal" blend mode at 50% opacity can create transparency, but it affects the entire layer uniformly, which may not be ideal for all desired color blends. The common "blue + yellow = green" scenario can sometimes result in a muddy gray when certain blend modes are applied, highlighting the need to experiment.
Selective Blending and Color Application
Beyond global blend modes, Photoshop offers tools for more localized color manipulation.
Gradient Fills
The Bucket Fill tool, when set to "gradient," allows for the creation of smooth color transitions. By selecting an area with tools like the Lasso or Magic Wand and then applying a gradient by clicking and dragging, users can introduce blended colors to specific regions. Adjusting the hues and values within the gradient editor provides further control.
Opacity and Layer Masks
Adjusting the opacity of layers is a fundamental way to blend them. Copying a layer or area to a new layer above the original and then reducing its opacity allows for a subtle overlay. Layer masks provide even more granular control. By creating a new layer mask and applying a gradient (e.g., white to black), one can selectively reveal or hide parts of the layer, creating a smooth transition between layers.
Feathering and Blurring
For soft edges and gradual transitions, the Gaussian Blur filter (Filter > Blur > Gaussian Blur) can be applied to selected areas or entire layers. Adjusting the slider controls the intensity of the blur, creating a blended effect. In vector graphics, applying a feather radius to shapes can achieve a similar blurring and blending along their edges where they overlap.
Brush Settings for Blending
When using brush tools, specific settings can enhance blending. In the Brush Settings panel, enabling "Transfer" and setting the brush to adjust opacity based on pen pressure (if using a tablet) allows for more organic blending. For the Smudge tool, selecting a soft, round brush with scattering set to around 20% can create a more diffused blending effect.
Advanced Color Manipulation and Considerations
When aiming for photorealistic or specific artistic effects, understanding the nuances of light and material is key. The surface qualities of a material, its reflectivity, and the nature of the light sources (warm or cool) all influence how colors blend and appear.
For instance, when trying to achieve a specific color blend, picking the resultant color after an initial blend and then blending again with the Mixer Brush can lead to a more even transition. If a tool doesn't behave as expected, exploring the Tool Preset icon in the tool options bar can offer alternative settings or presets.
Ultimately, Photoshop provides a rich ecosystem of tools for color combination. From the mathematical precision of blend modes to the tactile control of the Mixer Brush and the selective power of layer masks, users are equipped to achieve virtually any desired color effect, from subtle adjustments to dramatic transformations. The key lies in understanding the function of each tool and experimenting to find the most effective approach for a given task.