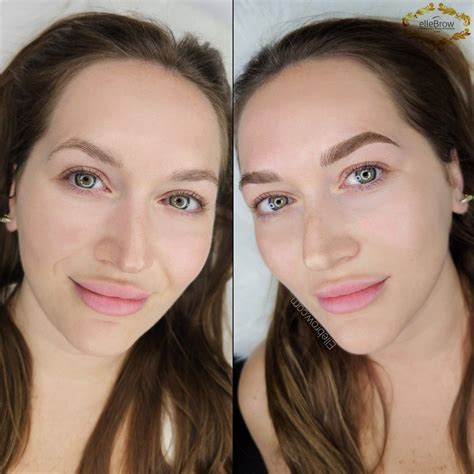
Eyebrows are often described as the "frames for prints" of the face, and for good reason. Their shape, fullness, and definition can dramatically alter a person's appearance, influencing their perceived expression and overall aesthetic. While makeup artists strive for perfection in application, certain adjustments and enhancements are often best achieved in post-production. Photoshop offers a powerful suite of tools that allow for precise manipulation of eyebrows, enabling photographers and retouchers to refine these crucial facial features with a level of detail and realism that can be challenging to attain through makeup alone. This tutorial delves into the techniques for reshaping, filling, and adding realistic hairs to eyebrows in Photoshop, transforming them from overlooked details into prominent elements that enhance portraits.
The Foundation: Understanding Eyebrow Anatomy and Placement
Before diving into Photoshop, it's essential to understand the fundamental guidelines that makeup artists and beauty professionals use to determine ideal eyebrow placement. These principles serve as a starting point for both in-person makeup application and digital retouching.
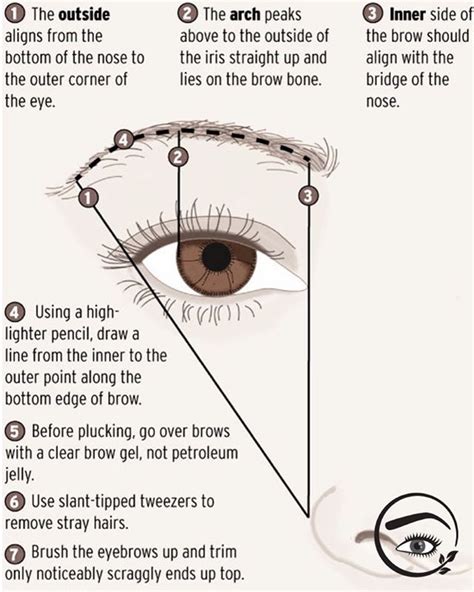
The starting point of the eyebrow is typically aligned with the outer edge of the nostril, a straight vertical line drawn upwards. However, this can be subtly adjusted. Aligning the eyebrow's start with the outer edge of the nostril, or even the border of the nose's bridge, can create the illusion of a slimmer nose. Caution is advised, as overdoing this can lead to an undesirable unibrow effect.
The arch, a critical element that influences expression, can be located by drawing a line from the outer part of the nostril through the center of the eye's globe. This provides an approximation of where the brow's apex should be. If the natural arch is not to your liking - perhaps too strong, not defined enough, or positioned too far inward - Photoshop's Puppet Warp tool becomes an invaluable asset. It allows for granular control, enabling individual points of the eyebrow to be manipulated to achieve the desired shape.
The tail or end of the eyebrow is generally determined by a line extending from the outer edge of the nostril through the outer corner of the eye. This line indicates where the eyebrow should ideally taper off.
Finally, a horizontal line drawn from the beginning of the eyebrow (its lower section) to its end can help assess the overall length and symmetry. Deviations from a perfectly horizontal line, as seen in images where a model naturally raises an eyebrow due to an expression, can be interpreted and adjusted accordingly. Understanding these foundational lines provides a robust framework for making informed decisions during the retouching process.
Strategic Shaping and Refinement in Photoshop
Once the foundational understanding of eyebrow anatomy is established, Photoshop's tools can be employed to sculpt and perfect their shape. The goal is often to create symmetry, enhance the natural arch, and remove any stray or unflattering hairs.
Utilizing Transformation and Liquify Tools
For significant reshaping, the Puppet Warp tool is exceptionally effective. It allows for the precise manipulation of individual anchor points along the eyebrow, offering a high degree of control over its curve and flow. This is particularly useful for correcting arches that are too high, too low, or uneven between the two brows.
The Transform tool (Ctrl+T or Cmd+T) offers broader adjustments, such as scaling, rotating, and skewing the entire eyebrow. While it can be used for basic modifications, it might require more time and iterative adjustments to achieve subtle, natural-looking changes compared to Puppet Warp.
For localized adjustments and fine-tuning, the Liquify tool is a powerful option. It's advisable to isolate the eyebrows onto a separate layer before applying Liquify. This ensures that the underlying eye area and other facial features are not inadvertently affected. The Forward Warp tool within Liquify can be used to subtly push or pull sections of the eyebrow to refine its shape or smooth out irregularities.
The Art of Filling and Adding Realistic Hair
When eyebrows lack fullness or have noticeable gaps, Photoshop provides several methods to create the illusion of denser, more natural-looking brows.
Dodging and Burning for Depth
A fundamental technique in digital retouching, dodging and burning, can be effectively applied to eyebrows. By creating separate layers set to a 'Multiply' blending mode for burning (darkening) and 'Screen' for dodging (lightening), you can build depth and definition.
Begin by using a soft brush on a 'burning' layer to gently fill in larger gaps with light, broad strokes. This establishes a base tone and fills sparse areas. Subsequently, switch to a thinner, harder brush on the same burning layer to meticulously draw individual hairs, defining the shape and adding texture. This process allows for a controlled build-up of color and form, mimicking the natural variation in eyebrow density.
Drawing Realistic Hairs with Custom Brushes
For achieving a truly realistic look, drawing individual hairs is often necessary, especially when working with high-resolution images or close-up portraits. This is where custom brushes and specific settings become crucial.
1. Creating a Custom Hair Brush:
- Selection: Use the Lasso Tool to make a rough selection around a single, well-defined hair strand from the original image.
- New Layer & Smart Object: Copy this selection to a new layer and convert it into a Smart Object. This preserves its quality and allows for non-destructive editing.
- Refinement: Use a soft-edged white brush to clean up any unwanted areas around the selected hair strand, ensuring a clean, isolated shape.
- Define Brush Preset: Go to Edit > Define Brush Preset. Name your brush appropriately (e.g., "Realistic Eyebrow Hair").
2. Applying the Custom Brush:
- New Layer: Create a new blank layer above your existing eyebrow layer.
- Brush Settings: Select your newly created hair brush. In the Brush Settings panel (Window > Brush), activate the 'Noise' option for added texture.
- Color Sampling: Use the Eyedropper Tool to sample colors from the surrounding eyebrow hairs. It's essential to resample frequently to capture the subtle variations in color that exist naturally.
- Brush Dynamics:
- Shape Dynamics: For a mouse user, adjust 'Size Jitter' and set 'Control' to 'Fade'. Input a number to dictate the length of the stroke, creating a tapered effect similar to a real hair. For tablet users, changing 'Control' to 'Pen Pressure' will allow for natural variation in thickness based on stylus pressure.
- Transfer: Adjust 'Opacity Jitter' and 'Flow Jitter' for more organic variation.
- Painting: Apply the brush with a light touch, following the natural direction and flow of the eyebrow hairs. Vary the brush size and color sampling as you go. Aim for a hardness of 100% initially for sharp lines, but consider a slight blur later.
- Blur and Noise: After drawing the hairs, apply a very subtle Gaussian Blur (Filter > Blur > Gaussian Blur) to soften the edges slightly and blend them with the existing texture. Adding a touch of noise (Filter > Noise > Add Noise) can further enhance realism.
Advanced Techniques for Flawless Brows
Beyond basic filling and drawing, advanced techniques can elevate eyebrow retouching to a professional level.
Pen Tool for Precise Paths
The Pen Tool is indispensable for creating perfectly defined eyebrow shapes or drawing individual hairs with absolute precision. You can create a path that mimics the curve of a single hair, then stroke that path with a custom brush. This method, especially when combined with the "Simulate Pressure" option when stroking the path, offers unparalleled control over the thickness and taper of each drawn hair.
Once a path is created, it can be converted into a selection, which can then be used to define a custom brush. By entering the Brush Settings, you can configure the brush to follow the direction of your cursor, making it more intuitive to draw hairs that conform to the eyebrow's natural flow.
Hue/Saturation and Blending Modes
For adjusting the color of the eyebrows or adding vibrancy, Hue/Saturation adjustment layers are highly effective. Creating a selection of the eyebrow area and applying a Hue/Saturation adjustment allows for targeted color changes. Experimenting with blending modes, such as 'Multiply', can create richer, more natural-looking tones. To soften the edges of these adjustments, feathering the layer mask is a useful technique.
Working with Layers for Non-Destructive Editing
Throughout the entire process, maintaining a non-destructive workflow is paramount. This means performing adjustments and additions on separate layers. For instance, a layer for reshaping, another for filling sparse areas with a soft brush, and a separate layer for drawing individual hairs. This allows for easy modifications, corrections, and experimentation without permanently altering the original image data. Duplicating the background layer (Ctrl+J or Cmd+J) at the start of the retouching process is a standard practice to ensure the original image remains intact.
Enhancing Eyebrows to Complement Eyes
Eyebrows and eyes are intrinsically linked, and enhancing one directly impacts the perception of the other. In portrait and model retouching, the eye area is a primary focal point. While often overlooked, minor elements like eyebrows and eyelashes play a significant role in making the eye area stand out.
Cleaning Up and Defining
During the initial cleanup phase, use tools like the Healing Brush Tool or the Clone Stamp Tool to remove stray hairs below or above the natural eyebrow line, effectively "trimming" them virtually. This tidies up the overall shape. For eyelashes, remove any hairs that are going against the natural flow or overlapping others. Cleaning up the spaces between lashes and healing any messy mascara smudges will make the lashes appear uniform and neat, contributing to a more polished look.
Creating Uniformity and Flow
When adding new hairs or refining existing ones, focus on replicating the natural direction and texture. For eyelashes, after cleaning them up, consider creating new hairs using a small, hard round brush with pressure sensitivity (if using a tablet) or by adjusting brush settings for fade. Rotate the image to a convenient angle (e.g., 50 degrees) and apply quick, slightly arced strokes in the direction of natural lash growth. This creates a uniform and appealing lash line. The same principle of following natural flow applies to eyebrows, ensuring that any added hairs integrate seamlessly with the existing ones.
The Impact of Eyebrow Retouching on Expression
It is crucial to be mindful that altering the shape of an eyebrow, particularly its arch, can significantly influence the model's expression. A subtle change in the arch's height or angle can shift a look from neutral to surprised, concerned, or even angry. Therefore, when retouching, it's essential to consider the intended mood and expression of the photograph. The goal is usually to enhance or correct the existing expression, not to fundamentally change it, unless that is a specific creative objective.
Conclusion: The Power of Subtle Refinements
In the realm of beauty retouching, meticulous attention to small details like eyebrows and eyelashes can make a substantial difference in the overall appearance of a subject. These elements, though often subtle, contribute significantly to the impact and polish of a photograph. By mastering the techniques for shaping, filling, and drawing realistic hairs in Photoshop, retouchers can elevate their work, ensuring that the eyes and their framing brows command attention and contribute to a compelling visual narrative. The ability to refine these features with precision and a natural touch is what distinguishes exceptional portraiture.