Navigating the world of digital art often involves resizing, rotating, and transforming your creations. In Procreate, these actions are governed by a crucial setting: interpolation. Understanding how interpolation works is key to maintaining the crispness and clarity of your artwork, especially when scaling or rotating. This guide delves into the intricacies of Procreate's interpolation methods, offering insights to help you achieve the best possible results for your unique artistic style.
The Challenge of Resizing and Rotating Artwork
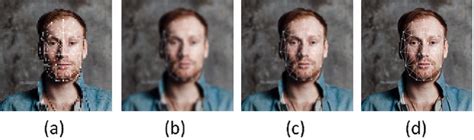
One of the common frustrations digital artists encounter is the degradation of image quality when resizing or rotating their work. Procreate is no exception. When you start by drawing something, for example, a cat's face, and then decide to resize it, you might notice it begins to pixelate and lose its resolution. Similarly, if you rotate the image, the same blurry and staircase-like pattern can appear, making the image quality seem low. For so long, many artists have struggled with blurry lines in Procreate, often hesitant to resize or rotate their drawings because it would create a jagged, pixelated edge. This phenomenon occurs because, by default, Procreate employs a specific interpolation method when transforming your artwork.
Understanding Procreate's Transform Tools
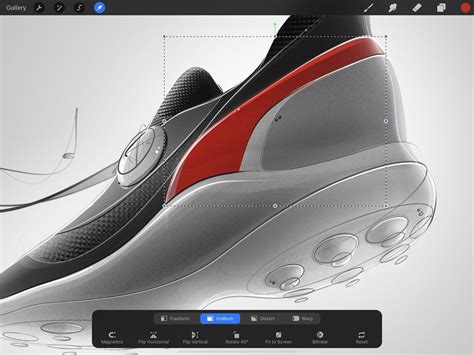
Before diving into interpolation, it's beneficial to understand the broader context of transformations in Procreate. When you activate the Transform tool, typically found via an arrow symbol in the top menu bar, a bounding box appears around your selected content. This bounding box is outlined with moving dashed lines and features transformation nodes - small blue handles.
- Scaling: Dragging a corner or midpoint node alters the scale of an object. Dragging a midpoint node allows you to stretch and squash the selection along a single axis. Dragging a corner node makes that part of the image larger or smaller. Pinching anywhere within the bounding box scales your content up or down uniformly. Holding the Transform button and pinching within the bounding box inverts this behavior, adjusting the scale or rotation of your canvas.
- Rotation: The yellow Bounding Box Adjust node at the top of the bounding box allows you to rotate the bounding box around your selected content. This node rotates around its own midpoint and automatically adjusts to best fit your selection. Dragging the Rotation node twists and turns your content around its own midpoint.
- Transform Modes: When you first activate Transform, it defaults to Freeform mode, which lets you stretch and squash your selection in any direction without maintaining the original ratio. Other modes include:
- Uniform: This mode preserves the original image ratio, ensuring that scaling or resizing maintains the proportions of your artwork.
- Distort: This mode makes it easy to create the appearance of perspective in an image.
- Mesh: This mode offers the most complex effects, applying a mesh to your selection. You can then move nodes on the outside or inside of the mesh to create three-dimensional effects.
- Snapping: Snapping helps keep your transformations aligned. When activated, blue guide-lines appear on-screen as you move or transform your content, indicating positional or scale points that might be helpful.
- Flipping: Procreate offers quick ways to flip your content horizontally or vertically.
- Fit to Screen: With Magnetics switched on, Fit to Screen transforms the content to fill the canvas with maximum coverage. Without Magnetics, it makes the content as large as possible without cropping.
The Core of Transformation: Interpolation Explained
Interpolation is the fundamental method used by Procreate to adjust the pixels when an image is scaled, rotated, or transformed. When you resize an image, Procreate needs to figure out how to fill in the gaps or compress the existing pixels to create the new dimensions. This process happens every time you make a transformation.
Imagine your image as a grid of pixels. When you make an image larger, Procreate needs to create new pixels to fill the expanded grid. When you make it smaller, it needs to decide which existing pixels to keep and how to represent them in the smaller grid. Interpolation is the algorithm that dictates how this pixel manipulation occurs.
110221
The Three Interpolation Methods in Procreate
Procreate offers three distinct interpolation methods, each with its own approach to calculating and rendering new pixel data:
Nearest Neighbor: This is the simplest and often the fastest method. Nearest Neighbor uses information from only the single closest pixel to the interpolated point. When scaling up, it essentially duplicates existing pixels. When scaling down, it discards pixels based on proximity. This method can sometimes lead to a jagged or "staircase" effect, especially on diagonal lines, but it excels at preserving sharp edges and textures.
Bilinear Interpolation: Bilinear interpolation considers a 2x2 area of pixels surrounding the interpolation point. It calculates a weighted average of these four pixels to determine the color of the new pixel. This method provides a smoother result than Nearest Neighbor by blending adjacent pixels, reducing the harshness of jagged edges.
Bicubic Interpolation: This is the most complex and computationally intensive method. Bicubic interpolation considers a larger 4x4 area of surrounding pixels (a total of 16 pixels). It gives more importance to pixels that are closer to the edge and calculates a more sophisticated weighted average. This generally offers the smoothest result of all, producing softened edges and gradients, which can be ideal for photographic images or smooth digital paintings.
The icon for interpolation is a circular icon located second from the right-hand side of the Transform bar. Tapping this icon reveals the choices: Nearest, Bilinear, and Bicubic. The label of this icon dynamically changes to reflect your currently selected interpolation mode.
Choosing the Right Interpolation Method for Your Artwork
The crucial question for many Procreate users is: which interpolation method should you use? The truth is, there is no single "best" answer that fits all situations. Procreate provides three options precisely because different methods yield different results, and the ideal choice depends heavily on your artistic style, the brushes you use, and the desired outcome.
When Nearest Neighbor Shines
While often perceived as the "blurry" option by default, Nearest Neighbor can be incredibly beneficial in specific scenarios. If you use textured brushes with "crunchy" or distinct outlines, Nearest Neighbor can help preserve that texture and sharpness when scaling down. For instance, when resizing tiles or motifs for patterns, this method can maintain the most definition. A side-by-side comparison often reveals that Nearest Neighbor, when reducing the size of an artwork created with textured brushes, does a better job of holding that crunchy texture compared to Bilinear or Bicubic, which can make the edges go "soft and fuzzy."
However, it's important to note that when you scale up an image with any interpolation option, you are still going to lose some quality because Procreate cannot invent new pixels; it can only work with the pixels that are already on your canvas.
When Bilinear and Bicubic Excel
If your artwork features smooth lines, gradients, or photographic elements, Bilinear or Bicubic interpolation will likely be your preferred choices.
- Bilinear offers a good balance between smoothness and detail preservation. It's a step up from Nearest Neighbor in terms of softening edges and can be a good general-purpose choice.
- Bicubic provides the smoothest results. This is ideal when you want to avoid any harshness or pixelation, making it suitable for smooth digital paintings, photorealistic artwork, or when you want to achieve a very refined, almost airbrushed look. For example, if you're transforming smooth stars, the Nearest Neighbor version might look the least like the original intention, while Bilinear or Bicubic will render them more smoothly.
The key takeaway is to experiment. Try transforming the same element using all three methods and compare the results on your specific artwork. What looks best for one artist's textured brushwork might not be ideal for another artist's clean vector-like linework.
Advanced Transformation Concepts in Procreate
Beyond basic scaling and rotation, Procreate offers advanced transformation features, some of which are shared between 2D and 3D painting environments.
2D Transform Enhancements
- Numeric Input: For pixel-perfect transformations, Procreate allows you to input precise values. You can tap any blue corner or side node of the bounding box to enter specific X and Y values for scaling. For precise rotation, tap the green Rotation Node at the top of the bounding box and enter the desired degrees.
- Simplified Undos: By default, Procreate compresses all transform actions into a single step once you leave Transform mode, allowing for a single undo. However, you can change this behavior in Settings by toggling ‘Simplified Undos’ off. This will make Procreate remember every step you take within Transform mode, offering more granular undo options.
3D Painting Transformations
While 3D painting shares some interpolation and transform options with 2D (like Flip Vertical, Flip Horizontal, Rotate 45º, and Reset), its transformation interface is distinct.
- Selection in 3D: In 3D painting, transformations often apply to the visible content directly in front of you. To transform specific elements, you might need to use the Selection tool to isolate them.
- Automatic vs. Advanced Transform:
- Automatic: This is a simpler method for scaling, moving, and rotating selected content, preserving the original ratio.
- Advanced: This method offers more complex manipulation in 3D space. The Advanced transform interface can be attached to or detached from the surface of the mesh. Within this interface, you can scale, rotate, and adjust the projection depth of your content.
- Projection Depth: This feature is unique to 3D transforms. It takes 2D content and stretches it across a third plane. This allows for more dynamic placement and interaction of textures and artwork on 3D models.

Best Practices and Avoiding Common Misconceptions
A common piece of advice is to avoid resizing "high-res/finished/important/final" artwork whenever possible. Because whatever method you use, you're always going to get some loss in quality and resolution. If you need to redraw something at a different size or angle for a final illustration, it's often best to simply redraw it. This ensures maximum clarity and avoids any potential degradation from multiple transformations.
However, there are occasions where resizing is practical, such as creating social media posts, onscreen graphics, or filling a canvas with a repeating pattern. In these cases, it's often acceptable to make things smaller, and Nearest Neighbor can be a surprisingly effective tool for maintaining sharpness, especially with textured work.
The misconception that there's a universally "correct" interpolation method can lead artists to suboptimal results. The true approach is to understand that each method serves a purpose. By experimenting and analyzing the outcomes on your own artwork, you can develop an intuitive understanding of when to employ Nearest Neighbor for preserving texture, or when Bilinear and Bicubic are necessary for achieving smooth, blended results.
Ultimately, Procreate's interpolation settings are powerful tools that, when understood and applied thoughtfully, can significantly enhance the quality and integrity of your digital artwork through all stages of transformation.