Creating a realistic shirt mockup in Adobe Photoshop is an invaluable skill for any designer. Whether you're participating in a design competition, preparing for an advertisement, or simply want to visualize your creations on apparel, a well-crafted mockup can provide a significant edge. This comprehensive tutorial will guide you through the essential steps, from preparing your base image to seamlessly integrating your unique design, offering techniques that can be applied to various clothing items and backgrounds.
The Foundation: Selecting and Preparing Your Base T-Shirt Image
The journey to a compelling shirt mockup begins with a strong foundation: a suitable base image of a t-shirt. For optimal results, it's often recommended to start with a plain white t-shirt. This provides a neutral canvas that makes it easier to manipulate colors and apply designs without interference from existing patterns or complex shading.
Once you have selected your t-shirt image, the first step is to enhance its inherent details. Press Ctrl+L on your keyboard to access the Levels adjustment. Carefully adjust the input level sliders. The goal here is not to drastically alter the image, but to bring out the subtle contours, wrinkles, and texture that give the shirt its form. You want to enhance these details just enough to make them visible without over-brightening or creating harsh contrasts.
Following this, a slight blur can be beneficial. Navigate to Filter > Blur > Gaussian Blur. Adjust the blur radius very cautiously. This step is designed to gently erase minor imperfections or overly sharp details that might detract from the realism of your final mockup. The aim is to create a smoother base that will accept your design more naturally, while still retaining the essential form of the t-shirt.
Defining the Canvas: Creating Selections and Masks
With the base image prepped, the next crucial phase involves defining the area where your design will be placed. This often starts with creating a path around the t-shirt itself. The Pen Tool is your best friend for this task, allowing for precise outlining. Once you have created a path, locate the Paths tab, typically found alongside the Layers tab in the right-hand toolbar.
After defining your path, you'll want to convert it into a selection. Right-click on the thumbnail of your t-shirt layer (often referred to as Layer 1 in initial stages) and select "Select Pixels." This action transforms your path into an active selection, essentially isolating the t-shirt from its background.
To further refine this selection and prepare for color manipulation, click the contrast icon located below the layer toolbar. This action generates a color fill based on your current selection. Ensure that your primary t-shirt layer (Layer 1) is positioned above this newly created color fill mask. This layering is fundamental for controlling how adjustments affect your t-shirt.
Integrating Your Design: Placement and Transformation
Now, it's time to bring your graphic into the project. You can either copy an image design from your local files or find one on the web. Paste this design into the Photoshop workspace. It is critical to position the layer of your imported design between the main t-shirt layer and the color fill layer you created earlier. This order is essential for the subsequent steps to function correctly.
The next step is to prepare your design to conform to the t-shirt's shape. Right-click on the graphic layer you just added and choose "Convert to Smart Object." This conversion is vital as it allows for non-destructive editing, meaning you can make changes later without permanently altering the original design pixels.
Once converted to a Smart Object, navigate to Edit > Transform > Warp. This powerful tool allows you to manipulate the handles of your design layer to precisely match the folds, curves, and natural movement of the t-shirt. Dragging these handles will distort your graphic, making it appear as if it's organically part of the fabric, rather than a flat image pasted on top.
Achieving Realism: Warping, Opacity, and Layer Masks
The Warp transformation is where the magic truly happens in creating a believable mockup. Take your time to meticulously adjust the handles, ensuring the design follows the contours of the t-shirt. Pay close attention to areas where the fabric bunches or stretches.
To enhance the illusion of depth and realism, you can adjust the opacity of your artwork layer. By clicking the drop-down menu directly underneath the "Layers" heading on the right of the image, you can subtly reduce the opacity. This allows some of the underlying t-shirt texture and color to show through, making the design feel more integrated.
Adding a layer mask to your graphic layer is another crucial step for achieving photo-realistic effects. Click the Layer Mask icon at the bottom of the Layers panel. With the mask thumbnail selected, choose a soft round black brush. Set a low opacity for the brush. You can then gently brush over areas of your design to create subtle shadows or highlights, mimicking how light would realistically fall on the fabric. This technique can dramatically increase the believability of your mockup.
Create a Realistic T-Shirt Mockup in Photoshop - Full Tutorial
Customizing Colors: The Power of the Color Fill Layer
One of the most significant advantages of this mockup process is the ability to easily change the t-shirt's color. Navigate back to the color fill layer you created earlier. Double-click on its thumbnail. This action will open the Color Picker window. From here, you can select any desired shirt color, shade, and hue. The entire t-shirt will instantly update to reflect your choice, allowing you to experiment with different colorways for your designs.
In the Backgrounds layer group, you may also find a color swatch. Double-clicking this swatch offers another avenue to experiment with different background colors, further customizing the overall presentation of your mockup.
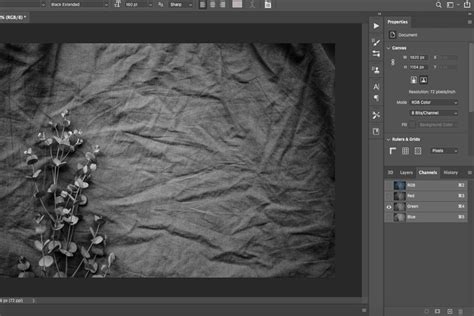
Advanced Techniques: Displacement Maps for Ultimate Realism
For those seeking the highest level of realism, Photoshop's Displacement Map feature offers an unparalleled method for making your design truly a part of the t-shirt. This technique allows you to distort your artwork so that it precisely conforms to the three-dimensional surface of the t-shirt, including its textures and wrinkles.
Preparing the Displacement Map:
- Load T-Shirt Image: Begin by loading your chosen t-shirt image into Photoshop.
- Access Channels Panel: Navigate to the Channels panel, usually located on the right side of your workspace.
- Identify Shadow Channel: Examine the available color channels (Red, Green, Blue) and identify the one where the shadows of the t-shirt stand out the most. This channel will best represent the surface contours.
- Duplicate Channel: Right-click on the chosen channel and select "Duplicate Channel." In the destination window, select "new" and rename the channel appropriately (e.g., "DisplacementMap").
- Soften the Map: To help your design blend with the fabric's texture, apply a Gaussian Blur to this duplicated channel (
Filter > Blur > Gaussian Blur). Adjust the radius until the map is softened but still retains enough detail to guide the distortion. - Save and Close: Save this Displacement Map to a preferred location on your computer and close it.
Applying the Displacement Map to Your Design:
- Import Your Graphic: Import your design into the main Photoshop project.
- Convert to Smart Object: Right-click the design layer and choose "Convert to Smart Object."
- Apply Displace Filter: Go to
Filter > Distort > Displace. In the dialog box, set the Horizontal and Vertical Scale values to a small number (e.g., 10 or 20). This controls the intensity of the distortion. Ensure "Stretch to Fit Media" and "Wrap Around" are checked. Click OK. - Load Displacement Map: Photoshop will prompt you to load a displacement map. Select the Displacement Map file you previously created and saved.
- Blend If Options: Double-click the Smart Object layer to open the Blending Options dialog box. Locate the "Blend If" section. You will see two sliders: one for black and one for white.
- Alt/Option + Click the Black Slider: Split the black slider and drag the split portion to the right (around the "100" position). This will make darker areas of the t-shirt (shadows) more prominent in affecting the design.
- Alt/Option + Click the White Slider: Split the white slider and drag the split portion to the left (around the "200" position). This will make lighter areas of the t-shirt (highlights) influence the design.These "Blend If" adjustments are crucial for making the design wrap around the contours of the shirt.
Fine-Tuning and Adjustments
After applying the Displacement Map, your design should now appear to conform to the t-shirt's shape. However, further adjustments can enhance the result:
- Curves Adjustment Layer: Add a Curves adjustment layer and clip it to your Smart Object artwork layer. Reduce the contrast of the artwork by boosting the black point (moving the bottom-left point upwards) and reducing the white point (moving the top-right point downwards). This helps the design integrate more naturally with the shirt's lighting.
- Selective Color Adjustment Layer: Apply a Selective Color adjustment layer. To create a saturation mask that helps the design color interact realistically with the shirt's fabric tones, reduce the black slider to -100% for each of the color channels (Cyan, Magenta, Yellow, Black) and then increase it to +100% for each of the tones. This step can be nuanced and may require experimentation based on your specific design and shirt color.
- Opacity Adjustments: Revisit the opacity of the artwork layer if needed. Sometimes a slight reduction can make the design feel less "stuck on" and more like part of the fabric.
- Layer Mask Refinements: If necessary, go back to the layer mask on your artwork layer and use your soft black brush with low opacity to refine areas where the design might appear too sharp or too faded, ensuring a consistent and realistic look.
Alternative Tools and Platforms
While Adobe Photoshop offers powerful and versatile tools for creating custom mockups, it's worth noting that other platforms and tools can also facilitate this process. For instance, Mockey is recognized as a robust tool for creating product mockups. On Mockey, you can typically navigate to "Mockups," select "Apparel," and then choose "T-shirt." From there, you can often find an "Upload Design" option, usually located in the top-left corner, to easily place your graphics onto pre-made templates. These platforms can be excellent for quick and efficient mockup creation, especially for those who may not have extensive Photoshop expertise.
Conclusion: Empowering Your Design Presentation
Learning how to create realistic shirt mockups in Photoshop empowers designers to present their work with professionalism and impact. By following these step-by-step processes, from basic preparation and selection to advanced techniques like Displacement Maps, you can transform a flat design into a compelling visual representation that resonates with clients and potential buyers. These techniques are not limited to t-shirts; they can be adapted for a wide array of apparel and other products, providing a versatile skill set for any creative professional.