The Adobe InDesign Eyedropper tool, often overlooked in the daily workflow, is a powerful multi-functional asset that can significantly speed up your design process. While it might seem like a simple color-sampling utility, its capabilities extend far beyond that, allowing for efficient transfer of text formatting, object attributes, and even the generation of sophisticated color themes. This tutorial delves into the nuances of the Eyedropper tool, revealing its full potential for both novice and experienced InDesign users.
Locating and Activating the Eyedropper Tool
To begin utilizing the Eyedropper tool, first locate it within the Tools panel. It is typically found towards the bottom of the panel, in the fourth section down, and is symbolized by a pipette icon. Click on the icon to activate the tool.
It's important to note that to switch to the Eyedropper tool, you should first press the Escape key to ensure your cursor is not active within a text frame. This prevents accidental text sampling when your intention is to sample object attributes.
Sampling and Applying Colors
The most common use of the Eyedropper tool is to pick up colors. You can sample any color visible on your InDesign screen.
- Direct Color Sampling: Activate the Eyedropper tool (I). Click on any color within an image, graphic, or even another object on your InDesign page. The sampled color will immediately populate the Fill or Stroke box in your Toolbox or Color panel, making it ready for application.
- Applying Sampled Color: Once a color is sampled, you can apply it to another object by simply clicking on that object. To apply color to text, highlight the desired text and then click on the object with the sampled color. Alternatively, you can drag the Eyedropper tool across multiple characters or paragraphs to apply the formatting.
- Stroke vs. Fill: When applying color, you can choose whether it affects the object's stroke (border) or fill (background). This can be controlled via the Eyedropper tool's options or by selecting the appropriate Fill or Stroke box in the Toolbox or Color panel before applying.
Understanding the Eyedropper's Unique Behavior
InDesign's Eyedropper tool operates differently from its Photoshop counterpart. It is not a pixel-based tool. This means that when sampling a gradient, for instance, it will not sample a single pixel's color like Photoshop would. Instead, it functions more like Adobe Illustrator's Eyedropper, sampling the overall color information or a representative color from the area. To prove this, try sampling a gradient; you will notice it captures a generalized color rather than a specific point.
Advanced Color Sampling and Theme Generation
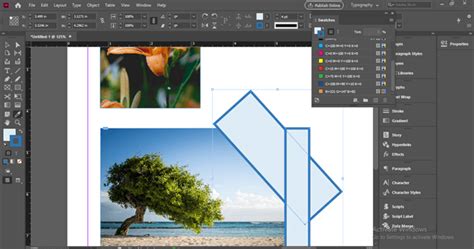
The Eyedropper tool's capabilities are greatly enhanced when used in conjunction with the Color Theme tool, which is often found nested beneath the Eyedropper tool in the Tools panel.
- Color Theme Tool Basics: The Color Theme tool allows you to extract color palettes from your InDesign document. Click anywhere on an image or graphic with this tool, and a small floating palette will appear, displaying a color theme based on the selected area.
- Generating Themes from Images: Simply click on a placed image with the Color Theme tool to generate a series of swatches based on the colors present in that image. These swatches appear in the theme panel instantly.
- Defining a Base Color: You can choose your own base color for the theme by holding down the Shift key while clicking on the image. This allows for more precise control over the generated color palette.
- Color Options: Within the Color Theme tool's options, you can refine the generated themes by selecting from various color moods such as "Colorful," "Bright," "Dark," "Deep," and "Muted."
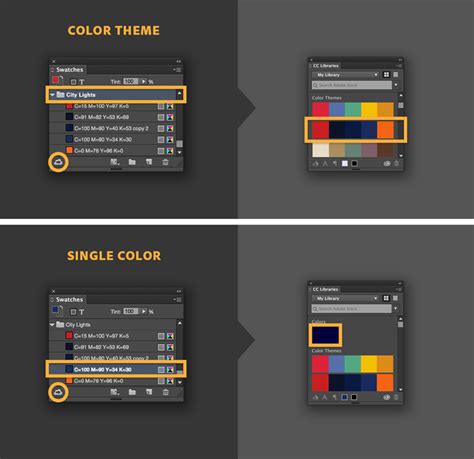
- Adding Themes to Swatches: The generated color themes can be easily added to your Swatches panel. Click the "Add current color theme to swatches" button to populate your Swatches panel with the extracted colors, which are then available for use throughout your document. Colors picked and added to swatches honor document intent and automatically convert to the appropriate color space before being added to swatches or dropped on other objects.
Sampling and Applying Text Formatting
Beyond color, the Eyedropper tool is exceptionally adept at copying and applying text formatting attributes. This is a feature that many users overlook but can drastically improve efficiency when dealing with consistent typography.
- Sampling Text Attributes: First, ensure the Eyedropper tool is active. Hover over text that has the desired formatting (font, size, weight, leading, color, etc.). Click once. The Eyedropper tool will now "load" with these text attributes.
- Applying Text Attributes: Select the text you wish to reformat. Then, click with the loaded Eyedropper tool. The selected text will instantly adopt the formatting of the text you originally sampled. This works for individual characters, entire paragraphs, or even text within frames.
Sampling Object Formatting
The Eyedropper tool's ability to copy attributes extends to object formatting as well. This includes things like fill and stroke colors, stroke weight, transparency effects, and more.
- Sampling Object Attributes: With the Eyedropper tool selected, hover over an object (shape, frame, etc.) whose attributes you want to replicate. Click once. The Eyedropper tool will load with these attributes.
- Applying Object Attributes: Select the target object(s) you want to modify. Click with the loaded Eyedropper tool. The selected objects will adopt the formatting of the source object. This is particularly useful for ensuring visual consistency across multiple elements in your design.
Customizing Eyedropper Tool Options
For even greater control, you can customize the Eyedropper tool's settings by double-clicking its icon in the Tools panel. This opens the Eyedropper tool's settings dialogue box.
Here, you can specify precisely which attributes the Eyedropper tool should sample and apply. Options include sampling text styling, object fill and stroke, transparency, and more. You can also define whether the tool should affect the object's fill or stroke by default.
Color Mode and Hexadecimal Values
Within the Eyedropper tool's options, you can set the color mode for sampling. If your image is a CMYK image, the Eyedropper will pick up a CMYK swatch. If it's an RGB image, it will pick up an RGB swatch. To change this, simply select CMYK or RGB from the Color Mode drop-down menu. The swatch will convert to the closest match in the selected color space.
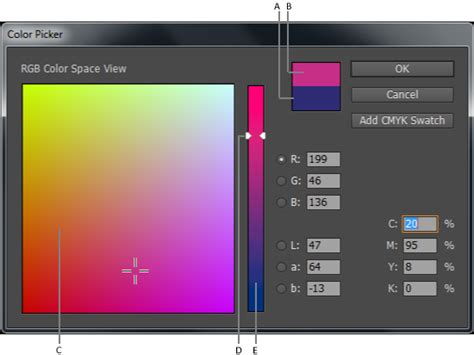
Furthermore, you can apply color values using hexadecimal RGB codes. This is possible in the Color Picker, New Swatch, and Edit Swatch workflows. When using the Color Picker in conjunction with a New Swatch, you can click the "screengrabber" and hold down the mouse button, clicking anywhere on the screen to view the hex color value from any source. This offers a precise way to match colors from external sources or specific digital references.
Working with Grayscale Images and PSDs
The Eyedropper tool can be used to apply color to grayscale or monochrome images, provided they do not contain alpha or spot channels. You can apply only two colors to a grayscale or monochrome image using this method.
When working with Photoshop (PSD) files, it's important to remember that while a PSD can contain multiple layers, the bottom layer must be opaque. You cannot apply color to a PSD image with a transparent background in InDesign using the Eyedropper tool.
How to Sample and Format InDesign Text with Eyedropper Tool
Organizing Colors with Color Groups
Color groups provide an excellent way to organize your color schemes within the Swatches panel and facilitate the exchange of frequently used color swatches across applications.
- Creating Color Groups: Click the Color Group icon on the Swatches panel. You can choose to move selected swatches into the group upon creation or add swatches from selected page items. Holding Ctrl (Win) or Option (Mac) allows you to select multiple swatches before creating the group.
- Managing Color Groups: Within the Swatches panel, you can filter to "Show Color Groups" to work with them extensively. Options include duplicating, ungrouping, renaming, and deleting color groups. You can also create color groups directly from the swatches present in selected page items.
- Importing and Exporting Swatches: ASE files are instrumental for importing and exporting color swatches between applications like Adobe Illustrator and InDesign. You can import .ase files to load color groups into your Swatches panel or save existing color groups as .ase files from the Swatches flyout menu.
The Eyedropper and Color Themes: A Synergistic Relationship
The Color Theme tool, often found alongside the Eyedropper, offers a sophisticated way to generate color palettes. When you click on an image or graphic with the Color Theme tool, InDesign automatically identifies potential color themes. Rolling your mouse over the page item highlights areas where InDesign can create a color theme, typically comprising five distinct colors.
If you wish to pick a single, precise color as the base for your theme, you can Shift+click on the desired color. This allows for more targeted theme generation. Once a theme is created, you can view all the generated themes by clicking the designated icon. Adding these themes to your Swatches panel as color groups can streamline your workflow significantly.
Eyedropper Tool Settings and Workflow Flexibility
The Eyedropper tool's settings can be changed on the fly as you work. For instance, you can sample text styling by selecting the text you want to affect, then clicking on the text that has the desired formatting. InDesign will then apply those characteristics to your selected text. This process is identical for changing the attributes of objects.
Remember that you can switch to the Eyedropper tool by hitting Escape to deselect any active text frames. The tool icon flips over once it has "loaded" a sample, indicating it's ready to apply its captured attributes. This visual cue is helpful for confirming that the tool has successfully sampled what you intended.
Addressing Common Misconceptions
A common misconception is that the Eyedropper tool is solely for picking up colors. As demonstrated, its ability to transfer text and object formatting is equally valuable. Another point of confusion can arise from its non-pixel-based sampling of gradients, which differs from raster-based image editors. Understanding these distinctions ensures users leverage the tool to its maximum potential.
Conclusion: Unlocking Workflow Efficiency
The Adobe InDesign Eyedropper tool, along with its companion Color Theme tool, is far more than a simple color picker. It is a versatile instrument capable of copying and applying a wide array of attributes, significantly streamlining repetitive tasks. By mastering its various functions â from sampling colors and text formatting to generating sophisticated color themes and organizing swatches with color groups â designers can unlock new levels of efficiency and creative control within their InDesign projects. Its integration into daily workflows, even for seemingly minor tasks, can lead to substantial time savings and a more cohesive design outcome.
tags: #eyedropper #tool #indesign