DaVinci Resolve, initially recognized for its professional color grading capabilities, has steadily evolved into a comprehensive, all-in-one video editing solution. This allows creators to manage projects from initial footage capture all the way through to final publication, all within the DaVinci Resolve studio. Among the essential transitions in any editor's repertoire, the fade to black stands out. This tutorial will guide you through applying this fundamental effect directly within DaVinci Resolve, bypassing the need for complex plugins or intricate effect applications.
The Fundamentals of Fading to Black
Fading to black is a cornerstone technique in filmmaking, widely employed for its ability to create smooth and impactful scene transitions. DaVinci Resolve simplifies the integration of this effect into your video clips. The process begins by opening your existing DaVinci Resolve project or initiating a new one. Subsequently, drag the initial clip(s) intended for a fade to black onto your timeline.
To access the editing environment, click on the "Edit" workspace icon located at the bottom of the screen. If your clip appears small on the timeline, you can magnize your view by utilizing the "+" button situated above the timeline.
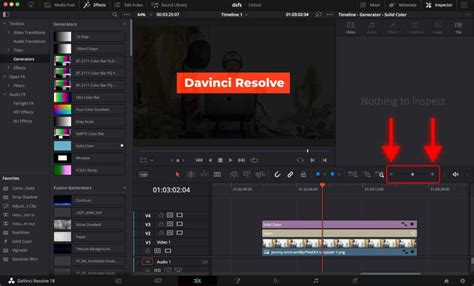
To implement the fade-out effect, position your mouse cursor over the video clip until a white or red handle becomes visible. The red handle signifies the beginning of the clip, controlling the fade-in, while the white handle, located at the end, manages the fade-out. To achieve a fade out to black, simply click and drag this white handle towards the left, adjusting its position to determine the desired duration of the fade. Conversely, for a fade in, reverse this action by grabbing the red handle and dragging it to the right. This straightforward manipulation is all that's required to apply the fade to black effect.
Advanced Fade Techniques and Customization
While the basic fade to black is easily achievable, DaVinci Resolve offers more advanced options for creating fades to colors other than black and for applying these transitions more broadly.
Fading to Colors Other Than Black
If your creative vision calls for a transition to a color other than black, such as white or any other hue, DaVinci Resolve provides a dedicated tool. From the "Edit" workspace, navigate to the "Effects Library" tab. Within this library, locate the "Toolbox" and then select "Video Transitions." Under the "Video Transitions" category, you will find the "Dissolve" section. Click on "Dip to Color Dissolve" and drag this transition onto the end of your selected clip.
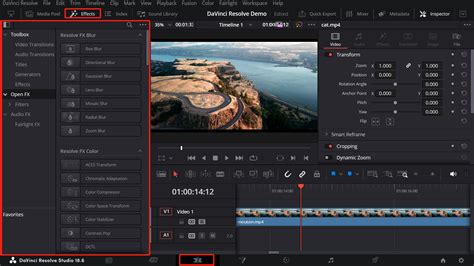
Once the "Dip to Color Dissolve" transition is applied to your clip, select it on the timeline. This action will bring up the "Inspector" panel. Within the Inspector, under the "Transition" tab, you will find the "Color" option. This allows you to use an eyedropper tool to select your desired transition color. To fine-tune the fade, adjust the "Start Ratio" value to 0 and the "End Ratio" value to 50. This process enables you to fade in or out from any color you prefer, offering greater creative flexibility.
Batch Fades and Efficient Workflow
For editors seeking to apply fades to multiple clips simultaneously, DaVinci Resolve's batch processing capabilities for fades are somewhat limited but achievable. The most efficient method for batch-adding a fade to black involves utilizing the "Dip to Color Dissolve" transition as described above. By setting the transition color to black, you can apply it to one clip, then copy and paste this transition to subsequent clips in your sequence. This technique offers the closest approximation to a true batch-add functionality for this specific transition within DaVinci Resolve.
The Art and Application of Fade to Black
The fade to black is more than just a visual effect; it's a narrative tool that can significantly influence the viewer's perception and emotional engagement. While its most common application is to signify the conclusion of a project, its utility extends far beyond this.
Strategic Uses of Fade to Black
- Crossfades Between Scenes: A fade to black can serve as a subtle yet effective intermediary between distinct scenes, providing a moment of visual rest before introducing new content.
- Transitions for Still Images: When presenting a series of still images, such as in a slideshow, a fade to black can offer a consistent and polished transition between each visual element.
- Mimicking "Blacking Out": In narrative filmmaking, a fade to black can be used to visually represent a character losing consciousness or experiencing a blackout.
- Introducing Title Cards or Credits: A fade to black is a classic method for smoothly transitioning from live-action footage to on-screen text, such as titles, lower thirds, or end credits.
Introduction to DaVinci Resolve - [Full Course] for Beginners (2026)
Understanding Keyframes for Fades
Keyframes are the underlying mechanism that drives many of DaVinci Resolve's dynamic effects, including fades. Though they may appear as small, red diamonds on your editing timeline, these elements are crucial for animating changes over time. Keyframes allow you to define specific points in time where an effect's parameters, such as opacity, should change. For a fade to black, you would typically set a keyframe at the beginning of the transition where the opacity is 100%, and another keyframe at the end where the opacity is 0%. DaVinci Resolve then interpolates the values between these keyframes, creating the smooth gradual fade. Understanding keyframes unlocks a deeper level of control over your edits, enabling you to create sophisticated animations and transitions.
Enhancing Transitions with Sound
The visual impact of a fade to black can be significantly amplified by complementary audio adjustments. Fading the audio in sync with the video creates a much more immersive and professional experience for the viewer. As the video gradually darkens, the accompanying audio should also diminish in volume, ideally reaching complete silence at the point of full black. This synchronized audio fade reinforces the visual transition and prevents any abrupt cutoff of sound, which can be jarring to the audience.
When to Use Fade to Black: Beyond the Ending
While the end of a film or video is the most common place to encounter a fade to black, its strategic application at other points can enhance storytelling and pacing. Consider using it to:
- Indicate a significant passage of time: A fade to black can visually suggest that a considerable amount of time has elapsed between scenes.
- Create a moment of reflection: The brief darkness can provide the audience with a moment to process what they've just seen before moving on to the next segment.
- Convey a sense of finality or closure within a sequence: Even if the project isn't over, a fade to black can signal a distinct break or conclusion to a particular narrative arc or segment.
The Evolution of Transitions in Video Editing
The concept of transitioning between shots has evolved dramatically since the early days of filmmaking. Initially, simple cuts were the primary method. As technology advanced, techniques like dissolves, wipes, and fades emerged, offering editors more nuanced ways to guide the viewer's eye and manage the flow of information. The fade to black, in particular, has remained a timeless technique due to its inherent simplicity and its powerful psychological impact. It’s a visual cue that audiences instinctively understand, signaling a shift in time, location, or narrative focus.
In the context of modern editing software like DaVinci Resolve, the implementation of these classic transitions is more accessible than ever. While the underlying principles remain the same, the digital environment allows for precise control over duration, easing, and even the color of the fade. This accessibility democratizes powerful cinematic techniques, enabling creators of all levels to achieve professional-looking results.
DaVinci Resolve: A Comprehensive Editing Suite
DaVinci Resolve's journey from a specialized color grading tool to a full-fledged editing suite means that many essential post-production tasks can be accomplished within a single application. This integrated approach streamlines the editing workflow, reducing the need to switch between multiple software programs. For editors, this means that essential transitions like the fade to black, along with more complex effects, are readily available and integrated seamlessly with other editing functions. The platform's continuous development ensures that it remains at the forefront of video editing technology, offering powerful tools for both beginners and seasoned professionals.
Considerations for Different Audiences
When employing a fade to black, it's important to consider the intended audience. For a general audience, a standard fade to black is universally understood. However, for more artistic or experimental projects, variations in the fade's duration or even its color can be used to evoke specific emotions or convey abstract concepts. For a younger audience, ensuring that fades are not too abrupt or lengthy can help maintain engagement. For professional filmmakers, the fade to black is a tool that can be manipulated with great subtlety to serve the narrative, often used in conjunction with other editing techniques to achieve a desired pace and tone.
Avoiding Common Misconceptions
A common misconception is that a fade to black is solely an ending. While it is frequently used to conclude a project, its application as a transitional device between scenes or to indicate time jumps is equally valid and often more narratively effective. Another misconception might be that it's a complex effect requiring specialized plugins. As this tutorial demonstrates, DaVinci Resolve makes this fundamental transition readily accessible through its built-in tools. The key is understanding when and why to use it, not just how to technically apply it.
The Long-Term Impact of Effective Transitions
Mastering essential transitions like the fade to black is a crucial step in developing strong editing skills. These seemingly simple effects, when used thoughtfully, contribute significantly to the overall polish and professionalism of a video. They guide the viewer's experience, enhance emotional resonance, and ensure a smooth narrative flow. In the competitive landscape of content creation, the ability to execute these fundamental techniques flawlessly can distinguish a good video from a great one. DaVinci Resolve, with its intuitive interface and powerful features, provides an excellent platform for honing these skills. As you continue to explore its capabilities, remember that consistent practice and experimentation are key to developing your unique editing style and maximizing the impact of every transition.