Photoshop's Clipping Mask tool is a fundamental yet powerful feature that allows for the straightforward creation of complex and professional-looking images. It’s an indispensable tool for artists, photo manipulators, retouchers, and designers alike, offering a streamlined way to artfully merge layers and achieve sleek, polished graphics. The core principle of a clipping mask is to use the transparency of one layer to control the visibility of the layer(s) above it. This creates an illusion of one image appearing within another, or within a specific shape or text.
At its simplest, a clipping mask combines two layers. The top layer, often referred to as the "clipped layer," will have its content constrained by the shape or transparency of the layer directly beneath it, known as the "base layer" or "masking layer." By selecting a portion of the bottom layer to use as the mask, you can make it appear as though one image is entirely contained within another. This capability extends to clipping multiple layers into a single mask. Once objects are clipped down into a desired shape, they can be individually moved or manipulated by selecting their respective layers, offering dynamic control and flexibility.
Understanding the Principles Behind Clipping Masks
Before diving into practical applications, it's essential to grasp the underlying principles of clipping masks. Unlike more permanent editing methods, clipping masks are non-destructive, meaning they don't alter the original pixel data of your layers. This is crucial for maintaining the integrity of your source images and allowing for future edits or revisions.
Think of a clipping mask as a stencil. The base layer acts as the stencil, defining the areas where the content of the layer above it will be visible. Where the base layer has content (pixels, shapes, or text), the clipped layer will show through. Conversely, any transparent areas in the base layer will cause the corresponding areas in the clipped layer to be hidden.
This is a significant advantage over other methods. For instance, using Photoshop's Eraser tool to fit one image within another results in a permanent alteration of the image. While a layer mask offers non-destructive editing, it often requires considerable brushwork, feathering, and meticulous attention to detail, demanding an intermediate artistic skill level and being time-consuming. Clipping masks, on the other hand, simplify this process, achieving a similar effect with greater ease and efficiency.
The content of both layers can be highly diverse. The base layer can contain an image, a texture, a vector shape, text, a part of a painting, or even an adjustment layer. Similarly, the clipped layer can be any of these elements. Both layers can also incorporate transparent areas, layer masks, and different blending modes, further expanding the creative possibilities.
Clipping Masks vs. Layer Masks: A Clear Distinction
It's common for users to confuse clipping masks with layer masks, but they serve distinct purposes and operate differently.
Layer Masks: These are added directly to a layer to control its transparency. They are "painted" onto the layer using grayscale values, where white reveals, black conceals, and shades of gray create partial transparency. Layer masks are ideal for blending layers with subtle, seamless transitions and require manual brushwork. They operate on a single layer to hide or reveal parts of it.
Clipping Masks: These utilize the transparency or content of a lower layer to mask the layer(s) above it. The bottom layer acts as a boundary for the layers attached to it. Clipping masks are perfect for fitting an image within a clearly defined shape, such as text or a custom vector path. They can mask multiple layers simultaneously, all conforming to the shape of the base layer.
| Feature | Clipping Masks | Layer Masks |
|---|---|---|
| Function | Masks layers above based on the content/transparency of the layer below | Controls transparency of a single layer via painting |
| Application | Fitting images into shapes, text, or other defined boundaries | Blending, creating soft edges, complex selections |
| Layer Interaction | Affects multiple layers above a single base layer | Affects only the layer it's applied to |
| Editing | Flexible; both base and clipped layers are independently editable | Requires brushwork (painting/erasing) to re-edit |
Practical Application: Creating a Recursive Image Effect
Let's explore a practical example to solidify your understanding of clipping masks: creating a recursive image effect. This involves placing an image within a specific fragment of itself.
Step 1: Prepare Your Workspace
Open the target image you wish to work with in Photoshop. This will be your base layer.
Step 2: Place Your Image and Isolate the Area of Interest
Go to File > Place Embedded and select the same image again, or a different image if you prefer a textural overlay. This new image will be your clipped layer. Position it above your base image.
Now, you need to define the area that will act as your mask. Using the base layer (the one that will define the shape), select the specific fragment you want to contain the clipped image. For instance, if your base image is a photograph of a screen, you would select the screen area. The Quick Selection Tool (W) is often effective for this.
Step 3: Duplicate and Create the Clipping Mask
Once you have your selection on the base layer, duplicate the contents of this selection onto a new layer. You can do this by pressing Cmd/Ctrl + J or by going to Edit > Copy and then Edit > Paste. This new layer, containing only the selected fragment, will be your mask.
Ensure that the image layer you want to clip is positioned directly above this new mask layer.
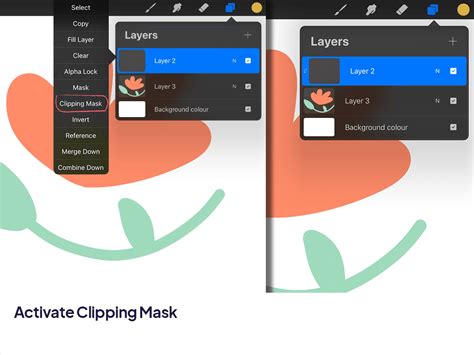
To create the clipping mask, you have a few options:
- Using the Menu: With the image layer selected, go to
Layer > Create Clipping Mask. - Using a Shortcut: With the image layer selected, press
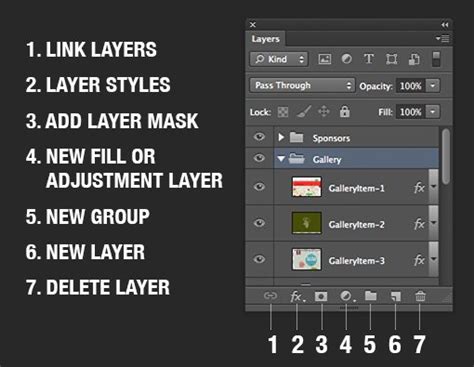
Alt + Ctrl + G(Windows) orOption + Cmd + G(Mac). - Using the Layers Panel: Hover your mouse cursor between the image layer and the mask layer in the Layers panel. Your cursor will change to a small box with a downward-pointing arrow. Click to create the clipping mask.
You will notice an arrow pointing downwards next to the clipped layer in the Layers panel, indicating that it is now clipped to the layer below. The image will now only be visible within the boundaries of the mask layer's content.
Step 4: Refine and Position
Use the Free Transform Tool (Cmd/Ctrl + T or Edit > Free Transform) on the clipped image layer to scale and position it within the mask. You can make the background image slightly larger than the cutout screen area to ensure it fills the space nicely.

Step 5: Applying Adjustment Layers as Clipping Masks
Clipping masks are incredibly useful for applying adjustments to specific areas without affecting other parts of your composition. For example, let's brighten the screen content.
Add a Brightness/Contrast adjustment layer (Layer > New Adjustment Layer > Brightness/Contrast). By default, this adjustment layer will affect all layers below it. To confine its effect solely to the clipped image within the screen, create a clipping mask for the adjustment layer. You can do this by Alt/Option-clicking between the adjustment layer and the clipped image layer, or by selecting the adjustment layer and going to Layer > Create Clipping Mask.
Now, the Brightness/Contrast adjustment will only impact the image visible within the screen area. You can repeat this process with multiple adjustment layers to achieve complex color grading or tonal modifications within your clipped shape.
Step 6: Creating Recursion
To enhance the recursive effect, you can duplicate the clipped layer and its associated adjustment layers multiple times, placing them within the screen area. Each duplicated layer can be slightly modified or adjusted to create a sense of depth and repetition. Grouping these layers (Shift + click to select them, then Cmd/Ctrl + G) can help keep your Layers panel organized.
How to create a Clipping Mask in Photoshop | Adobe Tutorial
Advanced Clipping Mask Techniques and Considerations
Clipping masks can be applied to various layer types, including regular pixel layers, smart layers, shape layers, and adjustment layers. However, you cannot clip a group to another group; it's always layers to layers or layers to a group.
When you have multiple layers clipped to a single base layer, they all share the same masking boundary. Non-clipping layers, positioned above the clipped group, will affect all layers below them in the layer stack according to their blending modes.
Working with Text and Shapes
One of the most popular uses of clipping masks is to place images within text or vector shapes.
- Create your text or shape: Use the Text Tool or Shape Tools to create your desired element. Ensure it's on its own layer.
- Place your image: Import the image you want to use as the fill. Place this image layer directly above your text or shape layer.
- Create the clipping mask: With the image layer selected, create a clipping mask (using any of the methods described above). The image will now be contained within the boundaries of your text or shape.
This technique is incredibly versatile for creating eye-catching headlines, unique graphic elements, or even custom photo frames.
Blending Modes and Clipping Masks
You can further enhance your designs by experimenting with blending modes on your clipped layers or adjustment layers. For instance, setting a clipped image layer to a "Screen" or "Overlay" blending mode can create interesting interactions with the base layer. Similarly, applying adjustment layers with specific blending modes clipped to a group of layers can yield sophisticated visual effects.
Working with Groups
While you cannot clip a group to a group, you can clip layers to a group. If you have a group of layers and want to mask them all with a single shape, place the shape layer below the group and then create a clipping mask for the group itself. This will apply the shape's boundaries to all layers within that group.
Maintaining Flexibility
Remember that clipping masks are non-destructive. You can always edit the base layer to change the masking shape, or edit the clipped layer(s) to reposition, rescale, or alter their content. If you need to adjust the original image that was used as the base for the mask, you can always release the clipping mask (Layer > Release Clipping Mask) and then reapply it after making your modifications.
Conclusion: Unleash Your Creativity
The clipping mask is a fundamental yet incredibly powerful tool in Photoshop. It offers a non-destructive, flexible, and efficient way to integrate images, textures, and adjustments into specific shapes and elements. Whether you're aiming for subtle refinements or dramatic visual transformations, mastering clipping masks will undoubtedly elevate your Photoshop workflow and unlock new creative possibilities. Don't hesitate to experiment with different layer types, blending modes, and combinations to discover the full potential of this essential feature.