In the intricate world of digital art and photo manipulation, Photoshop's Layers panel is a cornerstone of organization and creative control. As projects grow in complexity, managing numerous layers can become a daunting task. This is where the powerful, yet often underutilized, feature of linking layers comes into play. Linking layers in Photoshop allows you to maintain a cohesive relationship between multiple elements on your canvas, ensuring they move, transform, and interact as a single unit, all while preserving their individual editability. This guide will delve into the mechanics of linking and unlinking layers, explore its practical applications, and differentiate it from other organizational tools like grouping, ultimately empowering you to streamline your workflow and enhance your creative process.
The Core Concept: What Are Linked Layers?
At its heart, linking layers in Photoshop is a directive to the software that specific layers should behave as one when certain transformations are applied. Imagine you've meticulously crafted a scene with multiple elements - text, images, shapes, and effects. If you decide to reposition a single component, without linking, you would have to manually select and move each associated layer, a process that is not only time-consuming but also prone to errors, leading to misaligned elements.

Linked layers solve this problem elegantly. Once linked, these layers maintain their spatial relationship on the canvas. Whether you choose to move them, rotate them, scale them, or apply other transformations, they will do so in unison. This is crucial for maintaining the integrity of your design, especially when dealing with elements that are intended to be a unified whole, such as a caption box and its accompanying text, or different parts of a character's body.
The primary benefit of linking layers is the ability to manipulate multiple elements simultaneously without losing their relative positions. This is particularly useful when you have a design with several layers that are not necessarily contiguous in the layer stack but are functionally related. For instance, you might have a main image and several adjustment layers that are meant to affect only that image. Linking these layers ensures that if you move the main image, the associated adjustment layers move with it, maintaining the intended effect.
Practical Application: Linking and Unlinking Layers
The process of linking and unlinking layers in Photoshop is straightforward and accessible directly from the Layers panel.
Linking Layers: Establishing the Connection
To link two or more layers, you first need to select them. You can do this by clicking on the first layer you wish to link, and then holding down the Cmd (macOS) or Ctrl (Windows) key while clicking on any additional layers you want to include. For a contiguous selection, click on the first layer, hold down the Shift key, and then click on the last layer in the sequence.
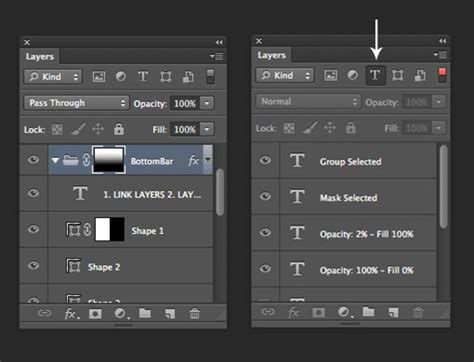
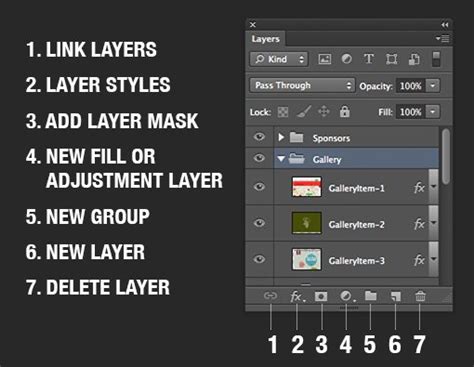
Once your desired layers are selected, locate the "Link layers" icon. This icon typically resembles a small chain link and is found at the bottom of the Layers panel, often grouped with other layer management options. Simply click this icon, and a small chain link symbol will appear next to each of the selected layers, indicating that they are now linked.
Alternatively, you can select a layer and then click in the column immediately to the left of any other layer you wish to link to it. A link icon will then appear in that column, establishing the connection. This method is particularly useful for linking a single layer to multiple others individually.
Once layers are linked, any transformation you apply to one of the linked layers (such as moving, scaling, or rotating) will be reflected across all linked layers. This means you can move your linked thought bubble and its caption together seamlessly, ensuring they remain perfectly aligned.
Unlinking Layers: Breaking the Connection
There are several ways to unlink layers, depending on your needs.
- Full Unlinking: To remove the link between all currently linked layers, simply select any one of the linked layers and click the "Link layers" icon again. This will remove the chain link symbol from all associated layers, and they will revert to behaving as independent entities. You can also select all the linked layers and then click the link icon.
- Temporary Disabling of a Link: In some scenarios, you might want to temporarily disable the linked behavior without completely unlinking the layers. To achieve this, hold down the Shift key and click on the "Link layers" icon for a specific linked layer. This action will place a red 'X' over the chain link icon, indicating that the link is temporarily disabled. The layers will now move independently. To re-enable the link, simply Shift-click the icon again, and the red 'X' will disappear.

This temporary unlinking is a handy feature when you need to make a minor adjustment to one layer within a linked set without affecting the others, but you intend to re-establish the link shortly thereafter.
Linking vs. Grouping: Understanding the Differences and When to Use Each
While both linking and grouping are powerful tools for organizing layers, they serve distinct purposes and are best suited for different situations.
Grouping Layers: Creating Folders for Your Layers
Grouping layers involves collecting multiple layers into a single, collapsible folder within the Layers panel. To group layers, select all the layers you wish to include, then click the "Group Layer" icon, which typically looks like a folder, at the top of the Layers panel. Once a group is formed, it is open by default, and the layers within it are slightly indented.

The primary advantage of grouping is enhanced organization within the Layers panel. As your project grows, a well-organized panel with logical groups can prevent clutter and make it easier to find specific layers. You can collapse a group to hide all its contents, decluttering your view, or expand it to access individual layers. Furthermore, you can turn the visibility of individual layers on or off within a group, or toggle the visibility of the entire group with a single click.

The Key Distinctions:
- Relationship: Linked layers maintain a functional relationship for transformations (moving, scaling, etc.) as if they were one layer, but they remain separate entities in the layer stack. Grouped layers are physically contained within a folder structure, offering a hierarchical organization.
- Transformation Behavior: When you transform a linked layer, all linked layers transform together. When you transform a group, all layers within that group transform together. However, the effect of transformations on individual layers within a group can be more nuanced, especially with layer masks and blend modes.
- Purpose: Linking is primarily for maintaining the spatial integrity of related elements during transformation. Grouping is primarily for visual organization and managing the visibility of sets of layers.
- Flexibility: Linked layers offer more flexibility when elements need to remain in different parts of the layer stack, perhaps interspersed with other unrelated layers. Grouping is ideal for bundling logically connected elements together.
When to Link vs. When to Group:
Link Layers When:
- You have elements that need to be moved, rotated, or scaled together consistently, but their positions within the layer stack are important for other operations (e.g., a text layer that needs to be above a specific image layer for visual hierarchy, but also needs to move with a related graphic).
- You want to perform transformations on a set of layers without merging them, preserving their individual editability for future changes.
- You are working with a small number of closely related elements that don't warrant the structure of a group.
Group Layers When:
- You have a large number of layers that represent a distinct component of your design (e.g., a character, a UI element, a background scene).
- You want to easily toggle the visibility of an entire set of related layers on or off.
- You need to apply adjustments or effects to a collection of layers as a whole, which can sometimes be more efficiently managed within a group.
- You want to keep your Layers panel tidy and manageable, especially in complex projects.
Kris, a contributor to Tech Tuesday, emphasizes that while linking layers may be fast for temporary arrangements, grouping is a superior organizing tool for long-term project management. They advocate for creating specific groups, such as an "Archive" group for layers that are candidates for deletion but not yet ready to be discarded, keeping this group turned off to declutter the active workspace.
Advanced Layer Management Techniques
Beyond simple linking and grouping, Photoshop offers a suite of tools to further refine your layer management.
Naming and Color Coding Layers
As projects grow, layer names become critical identifiers. Double-clicking a layer or group name in the Layers panel allows you to rename it. Assigning descriptive names that reflect the content of each layer is a fundamental practice for maintaining clarity.
Complementary to naming, color coding layers and groups provides a visual cue for locating related elements quickly. Right-clicking on a layer or group in the Layers panel reveals a color-coding option, allowing you to assign distinct colors. This visual system can significantly speed up your workflow, especially when navigating a densely populated Layers panel.
Deleting and Exporting Layers
When layers are no longer needed, they can be deleted. Select the layer(s) you wish to remove and click the delete icon (often a trash can) at the bottom of the Layers panel, or select "Delete > Hidden Layers" from the Layers menu to remove all layers that are currently invisible.
Photoshop also allows you to export individual layers or groups to separate files. This is incredibly useful for creating assets for web design, app development, or for sharing specific elements with others. You can export all layers or just the visible layers.
Rasterization and Its Implications
Certain layer types, such as type layers, shape layers, vector masks, and Smart Objects, contain vector or generated data. These layers cannot be directly modified with painting tools or filters. To edit them with these tools, they must first be rasterized, converting them into pixel-based layers.
What is Rasterize in Photoshop? (Converting Text, Vectors & Smart Objects into Pixels)
It is a best practice to duplicate a layer before rasterizing it. This ensures you have a backup of the original vector or generated data, allowing you to revert if necessary. Rasterizing type on a type layer, for example, converts the editable text into pixels, which can then be painted on or filtered but can no longer be edited as text.
Merging and Flattening: Reducing File Size and Complexity
When you have finalized the content of layers and no longer need to edit them individually, you can merge them to reduce file size and simplify your project.
- Merge Down: To merge two adjacent visible layers where the bottom layer is a pixel layer, select the top layer and choose "Layer > Merge Down" or use the shortcut Cmd+E (macOS) / Ctrl+E (Windows).
- Merge Visible: To merge a selected subset of layers, hide the layers you don't want to combine, select a pixel layer as your base, and then choose "Merge Visible" from the Layers panel menu.
- Stamp Visible: A related operation is stamping visible layers. This is useful when you want to edit multiple layers with the same tools but only one at a time. To stamp visible layers, disable the layers you don't wish to stamp by turning off their visibility and then press Shift+Opt+Cmd+E (macOS) / Shift+Alt+Ctrl+E (Windows). This creates a new layer at the top that is a composite of all visible layers.
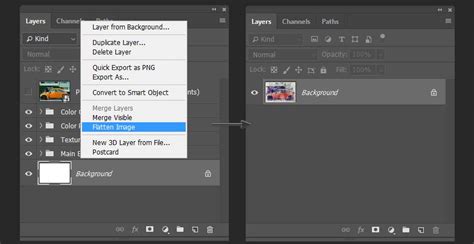
Flattening is a more drastic step that merges all visible layers into a single background layer and discards any hidden layers. Any transparent areas are filled with white. This significantly reduces file size but eliminates all layer-based editing capabilities. There is also an option to "Flatten All Layer Effects," which flattens only the layer styles without merging the entire image file.
It's important to note that while flattening reduces file size, certain actions, like converting between some color modes, can also result in flattening. As of July 2024, Photoshop’s legacy 3D features have been removed, simplifying some aspects of layer management.
The Power of Unity: Why Linking Matters
In conclusion, the ability to link layers in Photoshop is a fundamental technique for efficient and organized workflow. It allows designers and artists to maintain control over complex compositions, ensuring that related elements behave as a cohesive unit during transformations. While grouping offers excellent organizational benefits for managing large sets of layers, linking provides a more direct and flexible way to handle the spatial relationships between elements that might be scattered throughout the layer stack. By mastering both linking and grouping, alongside other layer management techniques like naming, color-coding, and strategic merging, you can transform potential chaos into creative clarity, allowing your artistic vision to flourish without being bogged down by the intricacies of layer management. The Adobe Photoshop community remains a valuable resource for further tips and tricks, encouraging users to share their knowledge and explore the full potential of this powerful software.