Achieving a tack-sharp image can be a complex endeavor, especially when dealing with scenes that have significant depth, from very close foreground elements to distant backgrounds. Focus stacking emerges as a powerful technique to overcome the limitations of a single photograph's depth of field, particularly in landscape photography when employing super wide-angle lenses. This method allows photographers to combine multiple images, each focused on a different plane, into a single, exceptionally sharp final image.
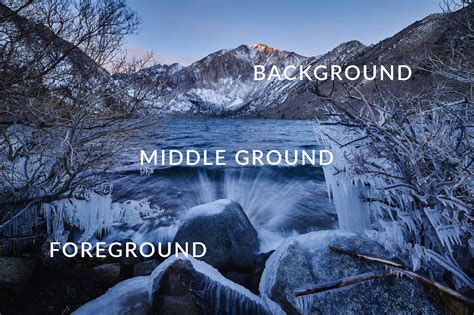
The Challenge of Depth of Field
In photography, the depth of field (DOF) refers to the range of distance within a scene that appears acceptably sharp. When photographing subjects that are very close to the camera, such as in macro photography or when using wide-angle lenses for landscapes, the DOF is inherently shallow. This means that even at smaller apertures (larger f-numbers), it can be difficult, if not impossible, to get both a nearby foreground element and a distant background in sharp focus simultaneously.
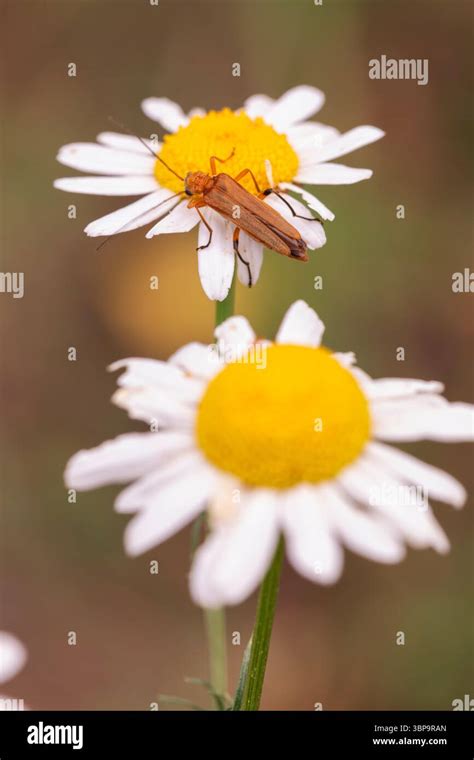
For instance, imagine photographing an insect on a flower petal. If you focus on the insect, the delicate details of the flower petals might be soft. Conversely, focusing on the petals would render the insect out of focus. Similarly, a striking sunset with a prominent rock in the immediate foreground and the vibrant sky in the distance presents a similar challenge. The desire for a "tack sharp" image across the entire scene, from the closest point to the furthest, is a common goal for many photographers.
Understanding Focus Stacking
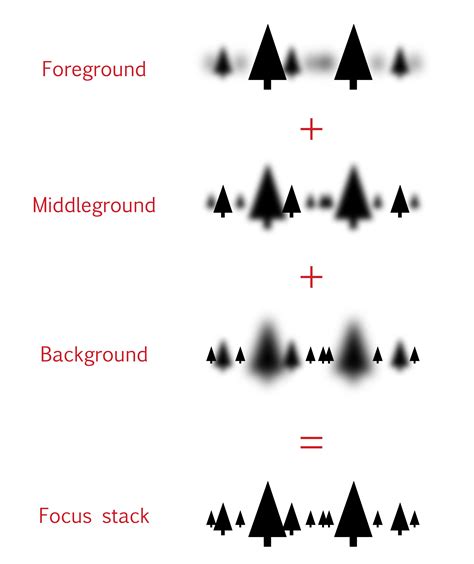
Focus stacking, also known as focus blending, is a technique that addresses this limitation by taking a series of photographs of the same subject or scene. Each photograph is captured with a slightly different focal point, effectively "walking" the plane of focus across the entire depth of the scene. These individual images are then combined in post-processing software, most notably Adobe Photoshop, to create a single image where all elements, from foreground to background, are in sharp focus.
The magic of focus stacking lies in Photoshop's ability to analyze each image in the stack, identify the sharpest areas, and then intelligently blend them together. It's not merely combining images; it's about merging the depth of field from each individual shot into one comprehensive, sharp image. This technique is particularly invaluable in macro photography, where the depth of field can be measured in mere millimeters, making it virtually impossible to achieve full sharpness in a single exposure. It's also a lifesaver in situations where low light conditions force the use of wider apertures, thus narrowing the depth of field.
The FOCUS STACKING TUTORIAL I Wish I Had Earlier (PHOTOSHOP)
Capturing Images for Focus Stacking
The success of a focus stack heavily relies on the quality and technique used during image capture. While it might seem straightforward, there are crucial considerations to ensure Photoshop can effectively blend the images.
Essential Gear and Settings
- Tripod: This is non-negotiable. A sturdy tripod is essential to keep the camera absolutely still between shots. Even the slightest movement can cause significant alignment issues later on.
- Manual Focus: Set your lens to manual focus. Do not rely on autofocus, as it can shift unpredictably between shots.
- Remote Release or Timer: To eliminate any camera shake from pressing the shutter button, use a remote cable release or your camera's built-in timer (typically 2-second or 10-second delay). Some photographers even opt for "Silent Photography" or electronic shutters on their cameras, though this may not always be compatible with external flashes.
- Consistent Settings: Maintain the same aperture, ISO, and white balance across all images in the sequence. The only variable that should change is the focus point.
Shooting Techniques
There are a couple of primary approaches to capturing your image series:
- The "Moving Outward" Technique: This method involves setting your initial focus on the closest element you want in focus. Then, while maintaining the camera's position perfectly still (no left, right, up, or down movement), you slowly adjust the focus ring to move the focal plane progressively backward towards the background. This is a more controlled method, aiming to ensure that each subsequent shot captures a slightly different slice of the depth of field.
- The "Refocusing" Technique: A "lazier" but often effective approach involves staying in the exact same spot and taking multiple photos, each time refocusing on a different part of the scene. You might focus on the foreground, then the mid-ground, then the background, and points in between. While this can work, it's crucial to be mindful of potential issues if you accidentally move the camera slightly between shots, which can lead to alignment problems.
The goal is to ensure that every part of your subject or scene is captured sharply in at least one of the photographs. This often means taking more shots than you might initially think necessary. For a complex scene, this could range from a few dozen to over a hundred images. It's better to have too many sharp images than not enough.
Considerations in the Field
When out in the field, especially when capturing a magnificent sunset, photographers are often working fast. It’s vital to quickly inspect your shots instead of assuming you've nailed it. After taking a picture, zoom in all the way on your main subject to check its sharpness. Then, check other critical areas if they need to be sharp as well. Sometimes, not every part of the image needs to be in perfect focus; artistic intent might dictate a softer background to draw the viewer's eye.
For scenes with foliage, it's important to note that there should be virtually no wind. Foliage that is perfectly still is crucial for successful focus stacking, as any movement between shots will lead to misaligned elements and visible stacking artifacts. Photographing insects also presents a significant challenge due to their inherent movement. Trying to capture a sharp macro shot of an insect requires immense patience and often a bit of luck, as you can't exactly ask them to hold still.
The aperture choice also plays a role. If the lighting allows, choosing a larger f-number (e.g., f/15 or f/16) will provide a greater depth of field, meaning you'll need fewer shots to cover the entire range. However, if low light forces you to use a wider aperture (e.g., f/5), you'll need to take many more shots to achieve the desired sharpness across the entire scene.
Processing Focus Stacks in Adobe Photoshop
Once you've captured your series of images, the next step is to bring them into Photoshop and combine them. The process involves loading the images, aligning them, and then blending them to create the final focus-stacked image.
Loading Images into a Stack
- Open Photoshop: Launch Adobe Photoshop.
- Load Files into Stack: Navigate to
File > Scripts > Load Files into Stack…. - Select Images: In the dialog box, click
Browse…to locate and select all the images you intend to stack. You can select multiple files by holding down theShiftkey. - Automatic Alignment: Crucially, check the box that says
Attempt to Automatically Align Source Images. This step is vital for compensating for minor shifts or the "focus breathing" effect (where the focal length slightly changes as focus is adjusted). ClickOK.
Photoshop will now load each selected image as a separate layer in a single document. This process can take some time, depending on the number of images and your computer's processing power.
Aligning and Blending Layers
After the images are loaded as layers, Photoshop will attempt to automatically align them. If you didn't select the automatic alignment option during loading, or if you need to re-align them, you can do so by selecting all layers in the Layers panel and going to Edit > Auto-Align Layers…, choosing Auto mode.
Once the layers are aligned, the blending process begins:
- Select All Layers: In the Layers panel, select all the loaded layers. You can do this by clicking on the first layer and then holding down the
Shiftkey while clicking on the last layer. - Auto-Blend Layers: Go to
Edit > Auto-Blend Layers…. - Stack Images: In the Auto-Blend Layers dialog box, ensure that
Stack Imagesis selected. Also, check the boxes forSeamless Tones and Colorsand, if available in your Photoshop version,Content Aware Fill Transparent Areas. The latter option helps to fill in any transparent areas that might appear around the edges after the blend. ClickOK.
Photoshop will now analyze each layer, identify the in-focus areas, and generate layer masks to reveal those sharp sections while hiding the out-of-focus parts. This is another process that can take a significant amount of time, especially with a large number of layers.
Reviewing and Refining the Stacked Image
When the auto-blend process is complete, you should have a single image where all elements are sharp. However, Photoshop's automatic masking isn't always perfect.
- Inspect the Result: Examine your image closely. You might notice areas that are still soft, or areas where Photoshop has incorrectly masked.
- Manual Mask Correction: If you find errors, you can manually correct them by working with the layer masks. By clicking on a layer mask thumbnail, you can use Photoshop's brush tool (with black to hide and white to reveal) to refine the mask and selectively bring in sharp details from different layers. This is where your understanding of Photoshop's masking tools becomes essential. Some photographers prefer to flatten the image at this stage to reduce file size, while others keep the layers intact for further refinement.
- Cropping: After blending, you might find that due to alignment adjustments or the content-aware fill, there are blurred edges or unwanted transparent areas. You can use Photoshop's crop tool to trim these away and finalize the composition.
Troubleshooting Common Issues
- Misalignment: If your images are not properly aligned, the focus stack will show visible seams or ghosting. Ensure you used
Auto-Align Layersor that your initial capture was stable. - Unsharp Areas: If certain parts of your final image remain blurred, it's likely because those areas were not captured sharply in any of your source images. You may need to go back and reshoot, ensuring a greater overlap in focus planes.
- Incorrect Masking: Sometimes Photoshop selects a blurred area instead of a sharp one. This requires manual intervention with layer masks to correct.
Use Cases and Artistic Considerations
While achieving absolute sharpness is a primary goal, focus stacking isn't always about making every single pixel in the frame sharp.
- Macro Photography: As mentioned, this is a prime application. Insects, flowers, textures, and small objects benefit immensely from focus stacking, revealing intricate details that would otherwise be lost.
- Product Photography: For detailed product shots, especially those with a shallow depth of field due to close proximity, focus stacking ensures every feature is rendered with clarity.
- Group Portraits (Long Shots): If you're shooting a group of people in a row with a long lens, focus stacking can ensure everyone from the front to the back is in sharp focus.
- Landscapes: Particularly with wide-angle lenses where foreground elements are very close, focus stacking can create breathtakingly sharp landscapes.
However, it's crucial to remember that sharp focus isn't always the best artistic choice. Sometimes, a deliberate shallow depth of field is used to isolate a subject and draw the viewer's eye, creating a more compelling image. Focus stacking is a powerful tool to have in your arsenal, but its application should be guided by your artistic vision for the scene.
Beyond Photoshop: Other Tools
While Adobe Photoshop offers robust focus stacking capabilities, it's not the only option. Third-party software like Helicon Focus is specifically designed for focus stacking and macro photography and is highly regarded for its advanced algorithms and user-friendly interface.
Conclusion
Focus stacking is a technique that, while requiring careful capture and post-processing, can dramatically enhance the sharpness and detail in your photographs. By understanding the principles of depth of field, employing a systematic shooting approach, and leveraging the power of software like Photoshop, you can transform images that would otherwise suffer from limited focus into stunning, tack-sharp compositions. It's a valuable trick to add to any photographer's repertoire, opening up new possibilities for capturing the world with unparalleled clarity.