Pixels are the fundamental building blocks of all digital images. Typically, these minuscule squares blend seamlessly to create a coherent visual, but when this blending fails, a noticeable "pixelation" effect emerges. Adobe Photoshop offers powerful tools to not only understand this phenomenon but also to intentionally harness it for creative purposes. Whether you aim to evoke the nostalgic charm of 8-bit video games, mimic the aesthetic of mosaic tilework, or create a pointillist painting effect, Photoshop provides a versatile toolkit. Furthermore, pixelation can be a crucial technique for preserving privacy by obscuring specific details within an image.
Understanding the Nature of Pixelation
To grasp pixelation, it's essential to understand how pixels form digital images. Most common image file formats, such as JPG, PNG, and GIF, are bitmap images. These are essentially "maps of bits," which translates to grids of individual pixels. When viewed at their intended size and resolution, these pixels merge imperceptibly, forming a smooth, continuous image. Pixelation occurs when these individual pixels become large enough to be discernible by the naked eye, disrupting the seamless visual flow. This effect can manifest accidentally, most commonly when an image is enlarged beyond its native resolution, leading to a blocky, distorted appearance. However, this same principle can be manipulated to create deliberate artistic effects.
Intentional Pixelation: The Mosaic Filter
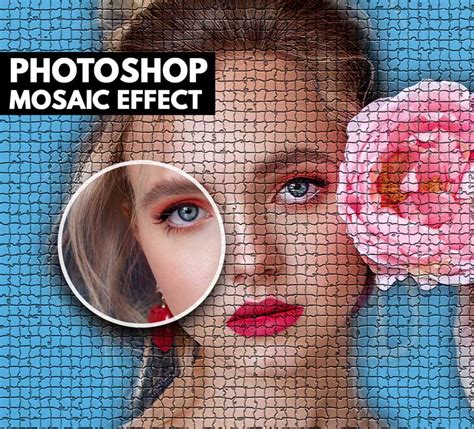
One of the most straightforward methods to achieve a pixelated look in Photoshop is by utilizing the Mosaic filter. This filter works by redrawing pixels into larger blocks of uniform color, effectively creating a mosaic-like appearance.
To implement this effect, begin by opening your desired image in Photoshop. For optimal results, ensure your photo is in RGB Color mode and set to 8 Bits/Channel. A recommended image size for this process is between 2500 and 4500 pixels wide or high. Crucially, your image should be on the "Background" layer.
The next step involves converting your layer into a Smart Object. This is achieved by navigating to Filter in the top menu and selecting Convert for Smart Filters. The advantage of using Smart Filters is that they are non-destructive; you can add, remove, adjust, or hide them at any time without permanently altering the original image data.
Once your layer is a Smart Object, access the Mosaic filter by going to Filter › Pixelate › Mosaic. A preview window will appear, allowing you to adjust the size of the pixel blocks. Moving the slider to the right will increase the pixel size, resulting in a more pronounced pixelation, while moving it to the left will decrease the size, yielding a subtler effect. Experiment with the slider until you achieve the desired level of pixelation.
Selective Pixelation: Precision with the Eraser and Layer Masks
While the Mosaic filter can pixelate an entire image, there are scenarios where you might want to apply the effect selectively. For instance, you might want to pixelate a specific area to obscure personal information or to create a contrasting visual element.
After applying the Mosaic filter as a Smart Filter, you can refine the effect using the Eraser tool. Select the Eraser tool and carefully brush over the areas you wish to remain unaffected by the pixelation. This allows you to maintain sharp details in certain parts of the image while the rest is rendered in larger blocks of color.
Another sophisticated method for selective pixelation involves the use of layer masks. After applying the Mosaic filter, you can add a layer mask to the filtered layer. By default, a layer mask often hides the entire layer. You can then use a brush tool with white as the foreground color to paint on the mask, revealing the pixelated effect only in the desired areas. This method offers precise control over where the pixelation is visible.
For more advanced selective pixelation, Photoshop's "Select Subject" tool can be invaluable. This AI-powered tool can automatically identify and select the main subject of your image. Once the subject is selected, you can then apply pixelation effects specifically to the background or other parts of the image, ensuring the subject remains clear.
2.6 Using Layer Masks for Selective Editing: Adobe Photoshop CS4 video
Advanced Techniques: Emulating Pixel Art and Oil Painting
Beyond the basic Mosaic filter, Photoshop offers more intricate methods for creating unique pixelated aesthetics, including simulating the look of classic pixel art or even combining pixelation with other artistic styles like oil painting.
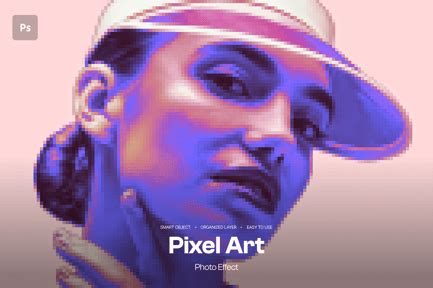
One advanced technique involves creating a layered effect that mimics the look of 8-bit pixel art. This process often begins by duplicating the background layer (Control-J on Windows, Command-J on Mac). Then, you might apply a stylizing filter, such as "Oil Paint" (Filter > Stylize > Oil Paint), with very subtle settings (e.g., Stylization at 0.1 px, Cleanliness at 0 px). This step subtly alters the image's texture.
Following this, a screenshot of the current state is captured (Control-Alt-Shift-E on Windows, Command-Option-Shift-E on Mac) to a new layer. A layer mask is applied to this new layer, set to "Hide All," effectively making the layer invisible. Using the Rectangular Marquee Tool, you can then manually draw rectangles on this mask, aligning them with the underlying pixel grid of the image. By filling these masked areas with white, you reveal the pixelated effect in precise blocks. Further duplication of this layer and the application of a Motion Blur filter (Filter > Blur > Motion Blur) with specific angles and distances can add a unique, retro-tech shimmer.
To further enhance this pixel art effect and integrate it with an oil painting aesthetic, additional layers and adjustment layers are employed. A new layer can be created for "Canvas Texture," and then adjustment layers like "Curves," "Selective Color," "Gradient Map," "Levels," and "Vibrance" are introduced. Each of these adjustment layers is carefully configured with specific settings to fine-tune the color, contrast, brightness, and saturation, ultimately blending the pixelation with a rich, painterly quality. For instance, a "Curves" adjustment layer can control the overall tonal range, while a "Selective Color" adjustment can modify specific color channels. A "Gradient Map" can introduce dramatic tonal shifts, and "Levels" can refine black and white points. Finally, a "Vibrance" adjustment layer boosts the color intensity.
A final touch often involves creating a composite layer (Control-Alt-Shift-E) and then desaturating it (Control-Shift-U). Changing the blending mode of this desaturated layer to "Vivid Light" and adjusting its opacity (e.g., to 50%) can add a final layer of artistic polish, unifying the pixelated and painted elements. This multi-step process, while complex, allows for remarkable control and the creation of truly unique visual styles.
Leveraging Photoshop Actions for Rapid Pixelation
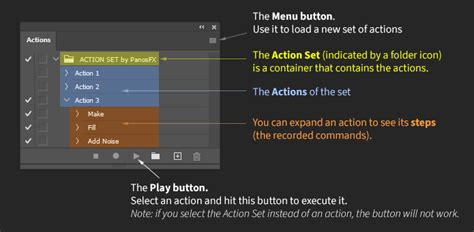
For those seeking efficiency and a variety of pre-set pixelated looks, Photoshop Actions are an invaluable resource. Actions are essentially recorded sequences of commands that can be replayed with a single click. Numerous pre-made Photoshop Actions are available that can transform any photo into a pixelated effect with remarkable speed and ease.
These actions often offer a wide range of customizable options. For example, some actions can generate pixelated glitch effects, allowing you to brush over areas where you want the effect applied and then play the action. Others provide a selection of different pixel sizes, extrusion angles, and depths, enabling you to convert any photo into an 8-bit pixel art effect in a matter of moments. You can often choose from small, medium, or large pixel sizes and even modify the background. The beauty of these actions lies in their ability to produce complex, stylized results with minimal user input, making them ideal for quick creative exploration or for achieving a consistent aesthetic across multiple images.
Beyond Aesthetics: Pixelation for Privacy
While often explored for its artistic potential, the ability to pixelate parts of an image serves a critical practical purpose: privacy. In photography, journalism, and everyday use, it's frequently necessary to obscure faces, license plates, or other identifying information to protect individuals' anonymity or comply with privacy regulations. Photoshop’s pixelation tools, particularly the Mosaic filter and selective application via layer masks, are indispensable for this task. By carefully selecting and applying the Mosaic filter to only the sensitive areas of an image, users can effectively render them unreadable while preserving the overall integrity and context of the photograph. This functionality underscores the versatility of Photoshop, extending its utility from creative expression to essential data protection.