Transforming a mundane photograph into an evocative scene often hinges on the subtle addition of atmospheric elements. Among these, fog stands out for its ability to imbue images with mystery, depth, and a touch of the ethereal. Whether you aim for photo-realistic integration or a more fantastical interpretation, Photoshop offers a versatile toolkit to achieve compelling fog effects. This guide delves into various techniques, from foundational depth map manipulation to the creative application of brushes and overlays, empowering both novice and seasoned digital artists to master this atmospheric enhancement.
The Foundation: Leveraging Depth Maps for Realistic Fog
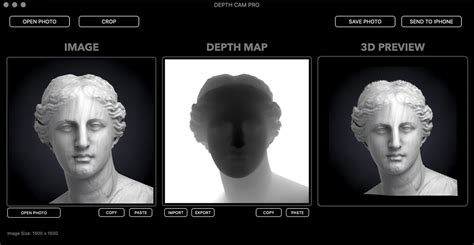
One of the most powerful methods for creating realistic fog in Photoshop begins with the concept of a depth map. This technique allows Photoshop to understand the three-dimensional space within an image, enabling the fog to interact with the scene in a believable manner.
The process typically starts by isolating or generating a depth map. Within Photoshop, this can involve using specific filters or adjustments. A key step is to ensure the depth map layer is set to "Screen" blending mode. This allows the lighter areas of the depth map to interact with the base image, creating the illusion of atmospheric perspective.
When the depth map produces areas that appear too harsh or unnatural, the Lasso Tool, with a significant Feather value (e.g., 100 px), becomes invaluable. This allows for soft, gradual selections and adjustments, smoothing out any abrupt transitions and ensuring the fog blends seamlessly with the existing scene.
To further enhance the realism and add dynamism, consider incorporating cloud textures. Using the Rectangular Marquee tool, select a square portion of existing clouds within your image or from a separate cloud asset. Copy and paste this selection onto a new layer. By setting this new layer to "Overlay" and clipping it to the fog base layer, you introduce texture and a sense of movement to the fog, making it feel less static and more organic.
The strength of the fog is paramount for achieving the desired mood. The opacity of the fog base layer can be lowered until it reaches your preferred intensity. Various level-adjusting tools offer granular control over this. To amplify the fog's presence, brightening the highlights of the fog base layer can be particularly effective. For color adjustments, the Hue/Saturation tool, with "Colorize" checked, provides a straightforward way to tint the fog. A crucial aspect of realism is to incorporate colors that reflect the surrounding ambient light. For instance, if the scene is bathed in the warm glow of a setting sun, introducing a golden yellow hue into the fog will significantly enhance its believability.
This depth map-centric approach is the cornerstone for creating fog effects, offering a robust foundation upon which to build. The subsequent steps then focus on customization, allowing for a spectrum of results from hyper-realistic to entirely fantastical, all through thoughtful color application and refinement.
Harnessing the Power of Brushes for Custom Fog Creation
Beyond depth maps, Photoshop's brush engine offers a highly intuitive and flexible method for painting fog directly into an image. This approach allows for precise control over placement, density, and texture, making it ideal for situations where a depth map might not suffice or for adding specific atmospheric nuances.
A prime example of this technique is the creation and use of custom fog brushes. Image-editing expert Aaron Nace, for instance, demonstrates how to craft a fog brush from a photograph of a cloud. This involves leveraging Photoshop's Channels to isolate the cloud from its background. By inverting the mask and then painting white over the cloud to brighten it, a reusable fog brush can be generated.

Once a custom fog brush is created, its settings become critical for achieving a natural appearance. When using the brush, varying the brush size can approximate different densities and scales of fog. Starting with a lower brush flow, around 30%, is highly recommended. This allows the fog to build up gradually with multiple strokes, mimicking the organic diffusion of real fog. While a graphics tablet offers the most natural control, it's also possible to achieve convincing results with a mouse, albeit with a steeper learning curve.
For those looking to quickly integrate high-quality fog elements, pre-made resources are abundant. High-resolution fog brushes for Photoshop are readily available, offering a wide array of textures and styles to enhance any photograph. Downloading and loading these brushes into Photoshop is a simple process. Typically, this involves double-clicking on a .abr file, which automatically loads the brush presets into your Brush panel. Once loaded, the Phlearn Fog Brush, for example, can be selected by choosing the Brush Tool (B) and then right-clicking to access the list of available presets.
The application of these brushes can be further refined. Using masks instead of the eraser tool is a recommended practice. Masking allows for non-destructive editing, meaning you can always paint back areas of fog if you over-erase or decide to alter the effect later. This flexibility is crucial for iterative refinement and achieving the perfect atmospheric balance.
The Art of Fog Overlays: Seamless Integration and Atmospheric Depth
Fog overlays offer a swift and effective way to introduce atmospheric effects into photographs, particularly when time is a constraint or when precise brushwork isn't the primary goal. These are essentially pre-made images or textures of fog, designed to be blended seamlessly with your existing photographs.
The process begins by importing the chosen fog overlay image into Photoshop. You can do this by dragging the overlay's thumbnail onto your background image. If the overlay's dimensions don't match your photo, the Free Transform tool (Command/Control + T) allows for easy resizing and rotation to fit the composition.
The key to making fog overlays look natural lies in their blending modes and adjustment layers. Often, fog overlays come with a black background. To integrate them smoothly, changing the overlay layer's Blending Mode to "Screen" or "Lighten" effectively removes the black background, allowing the fog texture to show through. Adjusting the layer's Opacity can then fine-tune the intensity of the fog.
To add depth and prevent the overlay from looking like a flat layer pasted onto the image, a Levels Adjustment Layer is often employed. By clipping this adjustment layer to the fog overlay, it will only affect the fog layer itself. Manipulating the Black Point slider (moving it to the right) can help to further remove any residual black or dark tones, making the fog appear more diffused. The Mid Point and White Point sliders can then be used to control the overall brightness and contrast of the fog.
Beyond the fog itself, enhancing the background image can further integrate the atmospheric effect. A Color Lookup adjustment layer can be used to subtly alter the background's color temperature and tone, for instance, using a "FoggyNight.3DLUT" preset and reducing its opacity. This helps to unify the lighting and color palette of the entire image, making the added fog feel like a natural part of the scene. Finally, a Brightness/Contrast adjustment layer applied to the overall image can further refine the mood, perhaps by increasing contrast to make the fog pop against darker elements.
The application of fog overlays is a versatile technique that can transform a daylight scene into a foggy afternoon or add a subtle atmospheric haze to any picture, regardless of the setting. Whether you're a photography novice or a seasoned professional, these high-resolution fog overlays are a valuable asset for elevating your images to a professional level.
Adding Beams of Light: Illuminating the Fog
While fog itself creates atmosphere, the addition of light beams can dramatically enhance its dramatic effect, adding a sense of depth and focus. This technique is particularly effective for creating sunbeams piercing through mist or moonlight illuminating a foggy landscape.
The process of creating light beams in Photoshop often starts with a new, empty layer. Using the Brush Tool, paint random patches of white onto this layer. The goal here is not to create distinct shapes but rather to establish areas of varying brightness that will later be transformed into streaks of light.
Create LIGHT RAYS in Photoshop for Overlays & Brushes
Once these white patches are in place, the "Radial Blur" filter is applied. Navigate to âFilter â Blur â Radial Blurâ. Within the filter's settings, choose "Zoom" under the "Blur Method." The amount of zoom should be adjusted to around 80, but this value can be experimented with to achieve different intensities of light streaks. Crucially, selecting the correct center point for the zoom blur is vital. Clicking on the "Blur Center" graph allows you to position the origin of the light beams. If the initial blur center is incorrect, simply undo the filter and reapply it, adjusting the center point until the streaks emanate from the desired location.
These light streaks can then be further refined. They can be built up over several layers, which, similar to using masks for fog, offers greater control. Adjusting the blend modes and opacities of these light layers allows for subtle integration or bold, dramatic illumination. For instance, setting these layers to "Screen" or "Lighten" will make them interact with the underlying fog and image elements, creating a more integrated and realistic effect.
The combination of fog and light beams can transform an image, adding a cinematic quality and drawing the viewer's eye to specific areas of interest. This technique allows for the creation of powerful atmospheric effects, turning ordinary scenes into captivating visual narratives.
Considerations for Realism and Artistic Expression
While the technical steps for creating fog effects in Photoshop are well-defined, achieving a truly compelling result often involves a deeper understanding of how fog behaves in the real world and how to translate that into digital art.
Fog adds a dreamy effect and mysticism, which can be a complementary addition to almost any photo. Getting out of bed early in the morning to capture a sleepy image with overlying fog can be an absolute treat. However, since we canât always rely on the weather, knowing how to add fog or mist in post-processing becomes a handy skill. Adding such an element to our images can completely transform them.
The strength and density of fog vary greatly depending on atmospheric conditions, humidity, and light. In some cases, fog might be a light, ethereal haze, while in others, it can be dense and visibility-obscuring. When adding fog digitally, consider the context of the image. For instance, if the photograph depicts a sunny day, a heavy, all-encompassing fog might look out of place unless aiming for a surreal or fantasy effect. Conversely, in a scene already suggesting damp or cool conditions, a thicker fog would be more believable.
The color of fog is also influenced by ambient light. While fog itself is essentially water vapor and appears white or grey, it will pick up colors from its surroundings. A fog illuminated by streetlights might take on a yellowish or orange hue. Fog at dawn or dusk could reflect the soft pinks and purples of the sky. Bringing in color from the surrounding ambient light, like a golden yellow from the sun, is crucial for a realistic effect.
Furthermore, consider the interaction of fog with objects in the scene. Fog tends to obscure distant objects more than closer ones, creating a sense of depth and atmospheric perspective. It can also wrap around subjects, softening their edges and creating a more intimate feel. When using brushes or overlays, think about how the fog should behave around trees, buildings, or people. Using masks and varying brush opacity can help to achieve these nuanced interactions.
Ultimately, the creation of fog effects in Photoshop is a blend of technical proficiency and artistic vision. While tools like depth maps, brushes, and overlays provide the means, it is the artist's understanding of light, atmosphere, and composition that elevates a digital effect from a mere addition to a truly transformative element within an image. Whether the goal is to replicate the subtle beauty of a misty morning or to conjure an otherworldly atmosphere, Photoshop offers the creative freedom to bring any vision to life.