Achieving clean, seamless edges when isolating elements in Photoshop is a fundamental skill for any digital artist or photo editor. Whether you're compositing objects onto new backgrounds, creating intricate masks, or simply refining a subject's outline, jagged or pixelated edges can detract from the professionalism and realism of your work. This tutorial delves into the various techniques Photoshop offers to smooth these transitions, transforming stark cutouts into naturally integrated elements within your images.
Understanding the Need for Smooth Edges
In the realm of digital image manipulation, the ability to cut out an element from its original context and place it into a new one is a cornerstone of photo editing. This process, often referred to as compositing, relies heavily on the quality of the edges of the extracted element. When these edges are harsh and unrefined, the composite image can appear artificial and unconvincing. Think of it like trying to fit a puzzle piece with rough, uneven edges into a perfectly cut slot - it simply won't fit seamlessly.
This is particularly true when dealing with subjects that have complex outlines, such as hair, fur, or delicate fabric. Standard selection tools, while powerful, often struggle to perfectly capture these fine details, leading to the characteristic "jagged" or "pixelated" edges that betray the editing process. The subtle contrast between an object and its original background can also contribute to these difficulties.
The goal of smoothing edges is to create a natural-looking transition between the pixels of the extracted object and the pixels of its new environment. This is achieved by softening the opacity and color transition along the edge, making it appear as if the object truly belongs in its new setting.
Feathering: The Art of Softening Edges
One of the most widely used and effective methods for softening hard edges in Photoshop is feathering. Feathering is a technique that gradually fades the colors of the pixels on the edge of a selection into the colors of the surrounding pixels. This creates a soft, diffused border that helps newly added elements blend in seamlessly with the rest of the image.
How Feathering Works
When you apply feathering, Photoshop essentially creates a semi-transparent transition zone around your selection. The extent of this transition is determined by the Feather Radius, a value you set in pixels. A smaller radius, typically between 0.5 to 2 pixels, is suitable for subtle softening, while larger values, ranging from 5 to 20 pixels or more, create wider, more pronounced feathery effects. The appropriate feather amount often depends on the size of your selection and the object you are isolating.
It's important to note that while feathering is incredibly useful for blending, it can also increase file size slightly due to the introduction of semi-transparent pixels. Therefore, it's advisable to use feathering conservatively on low-resolution web images where file size is a critical factor.
Applying Feathering in Practice
There are several ways to apply feathering in Photoshop:
- During Selection: When using shape-based selection tools like the Elliptical Marquee or Lasso tool, you can often find the feathering option directly in the Options bar at the top of the screen. You can enter a feather radius here before making your selection.
- Modifying an Existing Selection: If you've already made a selection, you can feather it by going to
Select > Modify > Feather. This opens a dialog box where you can input your desired Feather Radius. Alternatively, a handy shortcut for this isShift + F6. - Layer Styles: Double-clicking a layer in the Layers panel will open the Layer Style dialog. Within this dialog, you can often find options related to feathering or similar effects, particularly when working with layer effects like drop shadows or bevels, which can indirectly influence edge softness.
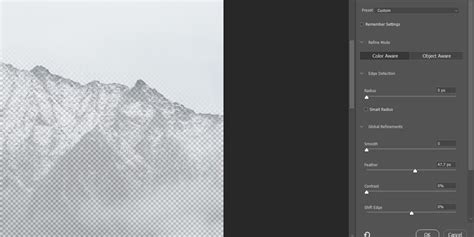
- Select and Mask Workspace: For more advanced control, the
Select and Maskworkspace (Select > Select and Mask) offers a dedicated environment for refining selections. Here, you can adjust the Feather slider to precisely control the softness of your edges, with a real-time preview to guide your adjustments.
When feathering, remember the principle of subtlety. Start with a small radius and gradually increase it until you achieve the desired blend without losing too much detail. It's often better to make multiple passes with smaller feather values than to apply one overly large feather that can blur essential image information.
Anti-aliasing: The First Line of Defense Against Jagged Edges
Before diving into feathering, it's crucial to understand anti-aliasing. Anti-aliasing is a technique that smooths out jagged or "stair-stepped" pixel edges that can appear when an object is selected or rendered. It works by strategically coloring pixels along the edge to create a smoother transition between the object's color and the background color.
While anti-aliasing smooths jagged edges, it does not create the gradual fade or blur that feathering does. It's more about making the existing edge look less pixelated. Many selection tools in Photoshop have an "Anti-alias" option that you should ensure is checked by default for cleaner initial selections.
Advanced Techniques: Channels, Dodge & Burn, and Blur Tools
While feathering and anti-aliasing are excellent starting points, Photoshop offers more sophisticated methods for achieving exceptionally smooth and natural-looking edges, particularly for challenging subjects like hair.
Channel Pulls with Dodging and Burning
A technique sometimes referred to as a "channel pull" leverages the color channels within an image to create highly precise masks. This method often involves:
- Selecting the Subject: Use tools like the Quick Selection Tool and its "Select Subject" feature to get an initial selection.
- Choosing the Best Channel: Examine the Red, Green, and Blue channels in the Channels panel and select the one that offers the most contrast between your subject and the background.
- Creating a Mask: Duplicate the chosen channel and then use Levels or Curves to further enhance contrast, making the subject white and the background black.
- Dodging and Burning: This is where the power of this technique lies. Use the Dodge and Burn tools set to "Highlights" and "Shadows" respectively, to selectively lighten and darken areas of the mask, especially along intricate edges like hair. This allows for incredibly fine control over transparency.
- Loading the Selection: Once your mask is refined, Ctrl/Cmd-click on the channel thumbnail to load it as a selection, resulting in a clean cutout.
This nuanced approach, especially when combined with dodging and burning, can produce incredibly realistic results, particularly when isolating subjects with fine, wispy details.
5 Pro Photoshop Masking Tricks You Don't Know (Probably)
The Blur Tool for Manual Refinement
For selective smoothing, the Blur Tool can be invaluable. This tool allows you to manually soften specific edges by blurring the pixels directly. It's ideal for situations where you need to apply smoothing only to certain areas.
To use the Blur Tool effectively:
- Select the Tool: Choose the Blur Tool from the toolbar.
- Adjust Brush Settings: In the Options bar, set the brush size and strength. It's often recommended to choose a brush size slightly larger than the edge you want to smooth. The strength determines how intensely the blur is applied.
- Paint Over Edges: Carefully paint over the edges you wish to soften. Use short strokes and build up the effect gradually to avoid over-blurring and losing detail.
While the Blur Tool offers direct control, it's essential to use it with precision and zoom in closely to ensure you're only affecting the intended pixels.
Refining Selections: The Select and Mask Workspace
The Select and Mask workspace is Photoshop's dedicated environment for refining selections and masks. It offers a comprehensive set of tools that go beyond basic feathering and anti-aliasing.
Within Select and Mask, you can:
- Adjust Edge Properties: Tools like "Radius," "Smooth," "Feather," "Contrast," and "Shift Edge" allow for precise control over the selection's boundaries.
- Refine Hair and Fur: The "Refine Edge Brush Tool" is specifically designed to detect and select fine details like hair and fur, making it incredibly useful for difficult cutouts.
- View Modes: Various view modes (Onion Skin, Overlay, On Black, On White, etc.) allow you to preview your selection against different backgrounds, helping you assess the quality of the edges.
- Output Options: You can choose to output your refined selection as a selection, a new layer, a layer mask, or other options, providing flexibility in your workflow.
This workspace provides a real-time preview, allowing you to see the impact of your adjustments instantly and fine-tune them until you achieve the perfect result.
Combining Techniques for Optimal Results
The truth is, in most complex scenarios, a combination of techniques will yield the best results. For instance, you might start with the Object Selection Tool for an initial, intelligent selection, then refine it within the Select and Mask workspace. After that, you might apply a subtle feather, and finally, use the Blur Tool or a channel-based method for intricate areas like hair.
Some commonly recommended workflows include:
- Contract and Feather: Contract your selection slightly (e.g., by 1-2 pixels) to remove any stray pixels, and then apply a moderate feather (e.g., 4-8 pixels) to soften the edges. This is particularly effective for portraits and objects with defined shapes.
- Feather and Gaussian Blur: After making a selection and applying a feather, you can further refine the edges by applying a Gaussian Blur filter to the layer mask or the layer itself. The recommended value for Gaussian Blur is highly image-dependent and should be adjusted based on the desired effect and image resolution.

Practical Tips for Smoothing Edges
- Subtlety is Key: Always start with lower values for feathering and other smoothing tools. It's easier to add more smoothing than to undo excessive blurring.
- Zoom In: Work at a high zoom level (e.g., 100% or more) to see the individual pixels and make precise adjustments.
- Use a Contrasting Background: When refining edges, temporarily placing your subject on a solid, contrasting background (like black or white) can help you clearly see any imperfections in the selection.
- Consider Multiple Passes: Don't expect to get the perfect result in one go. Applying techniques in stages and making multiple small adjustments can lead to a more refined outcome.
- Non-Destructive Editing: Whenever possible, use layer masks rather than directly editing pixels. This allows you to go back and make changes without permanently altering the original image data. Duplicating your layer before making significant adjustments is also a good practice.
- Save Actions for Repetitive Tasks: If you find yourself performing the same sequence of edge-smoothing steps frequently, consider recording an Action in Photoshop. This can automate the process and save you significant time.
Beyond Photoshop: Alternative Tools
While Photoshop is the industry standard, other software options exist that can also assist with edge smoothing. Luminar Neo, for example, offers tools that can perform similar functions, often with a more user-friendly interface for certain tasks. For those who find Photoshop's selection and masking workflows complex, exploring these alternatives might be beneficial.
Ultimately, mastering smooth edges in Photoshop is a skill that develops with practice. By understanding the various tools and techniques available, and by applying them thoughtfully, you can elevate your image compositing and editing to a professional level, creating images that are both visually stunning and seamlessly integrated.