Creating impactful presentation folders requires a blend of design creativity and technical precision. Adobe InDesign, a powerful tool for graphic design and layout, offers templates that streamline this process, ensuring your final product is both visually appealing and print-ready. This guide delves into the intricacies of using InDesign folder templates, from initial download and design setup to final export, providing essential instructions and insights for designers of all levels.
Understanding the Foundation: InDesign Folder Templates
The process of designing for print, especially for dimensional items like presentation folders, necessitates adherence to specific guidelines. InDesign folder templates are meticulously crafted to incorporate these requirements, acting as a blueprint for your design. These templates typically include dielines, artboards, and crucial guides for bleed, safe zones, and gluing areas.
Downloading and Selecting Your Template
The first step in utilizing InDesign for your folder project is to acquire the correct template. This involves navigating to the specific "Presentation Folders" page on the provider's website. Here, you will be prompted to choose your product options, which may include size, pocket configurations, and other features. Once you have finalized your selections, scroll down and locate the InDesign (Id) icon to download the template file. It is imperative to select the template that precisely matches the folder style and dimensions you intend to produce.
The provided information highlights a wide array of folder types, each with its own template:
Standard Templates: These are the most common and readily available. Examples include:
- 24 Hour Folder (24-G TEMPLATE): A 9" x 12" presentation folder with two 4" glued pockets.
- 4-Color Process Folders (CP-1000-1, 44-CP-2000-1, 44-CP-2000-2, 44-CP-2000-3): These come in various configurations, offering one or two sides of 4-color printing and different pocket arrangements, including a 1/2" tab for filing.
- Tri-Panel Folders (340-CP-1000-1, 340-CP-1000-2, 340-CP-1000-3, 344-CP-2000-1, 344-CP-2000-2, 344-CP-2000-3): These offer more expansive design real estate with multiple panels and varied pocket and flap designs.
- Large Folders (VP-1000, HV-1000, LS-1000): These include larger formats and different pocket orientations, such as vertical sleeve pockets.
- Economy Folders (CE-1000-1, CE-2000-1, CE-1000-2, CE-2000-2, CE-1000-3, CE-2000-3): These are cost-effective options with standard pocket sizes, some featuring reinforced edges or wraparound tabs.
- Group A & B Folders (GA-1000-1, GA-2000-1, GA-1000-2, GA-2000-2, GA-1000-3, GA-2000-3, GB-1000-1, GB-2000-1, GB-1000-2, GB-2000-2, GB-1000-3, GB-2000-3): These offer a range of pocket configurations and reinforced edges.
Specialty Folders: Designed for specific purposes:
- Prestige Folders (PFPrestige Folder): High-quality folders with 4" pockets and business card slits.
- Report Covers (RC-1000-1, RC-2000-1, RC-1000-2, RC-2000-2): These feature die-cut windows to showcase cover pages.
- Certificate Holders (CH-2000-1): Designed to hold standard certificates.
- Legal Size Folders (LG-1000): Accommodate legal-sized documents.
- Escrow Jackets (EJ-1000-1, EJX-1000-1): For organizing important documents.
- Blank Folders (BF-1000-1): Basic folders ready for customization.
- CD/DVD Holders (CD-2000-1, CD-2000-2, CD-2000-3, CD-2000-1-S, CD-2000-3-S): Designed to securely hold discs, with options for additional pockets.
- Hotel Key Holders (HK-1000-1, HK-2000-1, HK-4000-1, HK-1000-2, HK-2000-2, HK-4000-2): Compact holders for hotel key cards.
- Document Folders (SF-1000-1, SF-2000-1, SF-1000-2, SF-2000-2, SF-1000-3, SF-2000-3, SF-1000-4, SF-2000-4): Various sizes and configurations for organizing documents.
- Disc Sleeves (DS-4000-1): Simple sleeves for protecting discs.
The provider also mentions the capability to create custom dies for unique folder designs, providing custom templates per specifications if a standard option is not suitable. It's important to note that die-cut slits for business cards, discs, or other inserts are often not depicted on diagrams or templates as they are interchangeable and need to be specified during the ordering process.

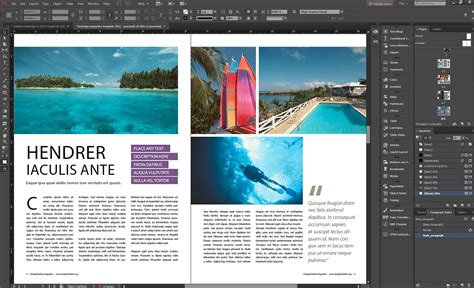
Designing Within the Template: Key Considerations
Once you have downloaded the appropriate template, it's time to bring your design to life. InDesign templates are structured to guide you, but understanding the purpose of each element is crucial for a successful outcome.
Layer Management and Document Integrity
The template will likely contain multiple layers. The most important one for your design work is typically labeled "Your Design" or something similar.
- Place your design on the "Your Design" layer: This ensures that your artwork is separate from the template's structural guides.
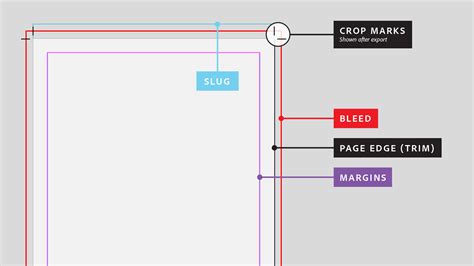
- Do not modify the document dimensions, rotate the dieline, or edit the dieline and the artboard in any way: These elements are precisely set by the manufacturer to ensure accurate cutting and folding. Altering them will lead to production errors. The dieline represents the cut lines, the artboard defines the final trimmed size, and maintaining their integrity is paramount.
Bleed and Safe Zones: Ensuring a Polished Finish
- Extend all design elements to the bleed line: The bleed area is an extension of your design beyond the trim edge. This is a critical safety margin to account for slight variations in the cutting process. Any color, image, or graphic that is intended to go to the edge of the final folder must extend into this bleed area to prevent unprinted white edges after trimming. The standard bleed is usually 0.125 inches.
- Keep all important design elements (text, logos, etc.) within the safe zones: The safe zone, often indicated by an inner margin, is the area where you should place all critical content. This ensures that no important elements are accidentally cut off during the trimming process or obscured by folds or pockets.
Text and Graphic Orientation
- Pay attention to text and graphics orientation: When designing for a folded product, it's easy to get disoriented. Always ensure that your text and graphics are oriented correctly for the final unfolded and folded states. Use the template's guides and any provided visual references to confirm the correct orientation.
- Use our template for reference: The template itself serves as the best visual aid for understanding how your design will appear on the finished folder.
Gluing Area Specifications
- Your design should extend only 0.125” into the gluing area. Keep the rest of the gluing area blank: The gluing area is where pockets or flaps are adhered. Extending your design too far into this area can interfere with the adhesive, compromise the bond, and result in a poorly constructed folder. A small extension of 0.125” is usually sufficient for design elements to visually connect to the pocket, but the majority of this area must remain free of ink to ensure proper adhesion.
Image and Graphics Quality
- If you use images in your design, they must be set to 300ppi resolution and to CMYK colour mode: For professional printing, images need to be of high resolution (300 dots per inch or PPI) to ensure sharpness and clarity. Additionally, colors should be specified in the CMYK (Cyan, Magenta, Yellow, Black) color mode, which is the standard for printing, rather than RGB (Red, Green, Blue), which is used for digital displays. Using RGB images can lead to color shifts and unexpected results when printed.
- All strokes should be at least 0.25pt: Thin strokes can become invisible or break apart during the printing and cutting process. A minimum stroke weight of 0.25 points ensures that lines and borders are clearly reproduced.
- Borders around the outside edges are not recommended: Borders placed too close to the edge can appear uneven due to slight cutting variations.
- If your design has borders (frames) near the edges, they must be at least 0.25” away from the edges of the paper: This guideline further reinforces the need for a safe distance for any border elements to avoid them appearing off-center or being cut off.
Preparing Your File for Print: Exporting a Print-Ready PDF
The final stage of the design process is exporting your artwork into a print-ready PDF file. This format is universally accepted by commercial printers and preserves all your design elements, fonts, and color information.
Step-by-Step PDF Export Process
- Turn off the visibility of all template layers. Only leave the "Your Design" layer active: This is a critical step. The template layers (dielines, guides, etc.) are for your reference during the design process only and should not be included in the final print file. Hiding them ensures that only your artwork is exported.
- Go to File / Export: Navigate to the export function within InDesign.
- For the file type, choose Adobe PDF (Print): This is the correct format for professional printing. Click "Save."
- On the General tab, choose "Press Quality" preset: The "Press Quality" preset is a robust starting point that includes essential settings for commercial printing. It's advisable to review and potentially customize these settings further.
- Check "All Pages" and "Export As Pages": If your template spans multiple pages (e.g., for different sides of a folder or pocket designs), ensure all are exported. "Export As Pages" creates individual PDF pages for each artboard.
- On the Marks and Bleeds tab, check "Use Document Bleed Settings": This crucial step ensures that the bleed you've set up in your document is included in the exported PDF. This is essential for the printer to achieve edge-to-edge color.
- Click Export: Once all settings are confirmed, export your PDF.
How to Export a PDF for Print in InDesign in UNDER 2 mins
Advanced Export Settings and Considerations
While the "Press Quality" preset is a good starting point, for optimal results, consider the following:
- Compression: Ensure that images are downsampled appropriately (e.g., to 300ppi for color and grayscale images) and that compression settings (like ZIP or JPEG with high quality) are chosen to maintain image fidelity without creating excessively large files.
- Fonts: Verify that all fonts are either embedded or converted to outlines. Converting to outlines (as mentioned in point 10 of the initial instructions) is often preferred by printers as it eliminates any potential font issues.
- Color Conversion: If your source documents are in RGB, ensure they are correctly converted to CMYK during the export process. A professional printer can advise on the best color profiles to use.
- Bleed and Marks: Double-check that the bleed settings are correctly applied and that any necessary printer marks (like crop marks) are included if requested by your printer. However, for folder templates, often only bleed is required, and crop marks can sometimes be omitted to avoid confusion with the dieline.
Beyond the Standard: Customization and Unique Folder Styles
The world of presentation folders extends far beyond the basic layouts. As mentioned, providers often offer a vast array of alternate folder styles and can even create custom dies for truly unique designs. This flexibility allows for a wide range of applications, from standard business folders to specialized packaging and report covers.
Exploring Diverse Folder Types
The detailed list of templates provided illustrates the breadth of options available:
- Report Covers: These often feature die-cut windows, allowing the title page of a report to be visible.
- Certificate Holders: Designed with specific slits to securely hold award or achievement certificates.
- CD/DVD Holders: Integrated solutions for distributing media along with printed materials, with various configurations for disc placement and additional pockets for inserts.
- Legal Size Folders: Tailored to accommodate larger legal documents, offering more space for information.
- Expandable Folders: These are designed with gussets or expanding pockets to hold a larger volume of documents.
Understanding these variations helps in selecting the most appropriate template and in designing effectively for the intended purpose and capacity of the folder.
The Role of Customization
For businesses with specific branding requirements or unique product needs, custom folder designs are invaluable. This might involve:
- Unique pocket shapes or sizes.
- Specialized inserts or compartments.
- Unconventional folding mechanisms.
- Die-cut elements for aesthetic or functional purposes.
When opting for a custom design, close collaboration with the printing provider is essential. They will work with you to create a tailored die-line and subsequently a custom InDesign template that precisely matches your specifications. This ensures that your vision is accurately translated into a physical product.
Final Checks and Best Practices
Before submitting your InDesign file for printing, a thorough review is indispensable.
- Proofread meticulously: Check all text for spelling errors, grammatical mistakes, and typos.
- Verify all elements are correctly placed: Ensure no critical information is too close to the edge or in the gluing area.
- Confirm image resolution and color mode: As previously stated, 300ppi and CMYK are standard.
- Check stroke weights: Ensure all strokes meet the minimum requirements.
- Preview the PDF: Open the exported PDF in Adobe Acrobat Reader and zoom in to check for any anomalies, such as jagged edges, missing elements, or incorrect color rendering.
By meticulously following these guidelines and leveraging the power of InDesign templates, you can produce professional, high-quality presentation folders that effectively represent your brand and message. The key lies in understanding the technical requirements of print production and applying them within the creative framework of your design.