DaVinci Resolve's Render Queue is a powerful tool that allows users to efficiently manage and export multiple video projects or different versions of the same project. This feature is crucial for streamlining the post-production workflow, especially when dealing with complex projects or the need for various output formats. Understanding how to effectively utilize the Render Queue can significantly save time and enhance productivity.
Adding Jobs to the Render Queue
The process of adding a job to the Render Queue begins after you have defined all the necessary settings for rendering your media and specified the range of the current session you wish to export. The Render Queue can accommodate an unlimited number of jobs, allowing you to queue up renders for various files based on your project's requirements.
Each job can be customized with individual settings. This includes specifying unique ranges of clips, different render directories, varying formats, resolutions, data levels, and burn-in settings. This flexibility enables you to queue up multiple sections of a single session, or to create several versions of the same media with distinct characteristics. Furthermore, you can even queue up multiple sessions if you are working on several projects with different color grades.
To add a job to the Render Queue, follow these steps:
- Select a Timeline: Ensure the timeline you intend to render is active.
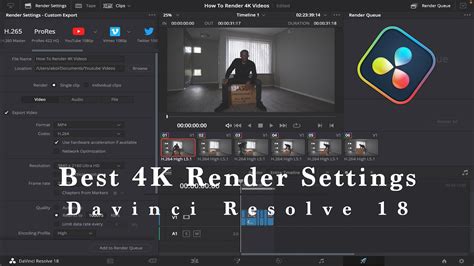
- Configure Render Settings: Within the Render Settings panel, choose your desired presets or create custom settings. This is where you define the output format, codec, resolution, frame rate, and other crucial parameters.
- Define Render Range: Use the Deliver page timeline to specify the range of clips you want to render. This can be done by setting In and Out points or selecting specific sections.
- Add to Queue: Click the "Add to Render Queue" button located at the bottom of the Render Settings panel.
- Specify File Destination: If you haven't already chosen a location for your render, a "File Destination" dialog will appear. Select your desired directory and click "OK." You may encounter a warning message stating, "This render may overwrite existing clips in this folder" if the chosen location already contains media. Confirm by clicking "Yes" to proceed or "No" to cancel.
Once these steps are completed, the render setup is added as a job to the Render Queue. It will display the project and timeline name, along with the file path where the render will be saved.
Managing Jobs in the Render Queue
The Render Queue provides several options for managing your queued jobs. You can view detailed information about each job by clicking the "Render Queue Option" menu in the upper right-hand corner and selecting "Show Job Details." This will reveal the frame size, format, frame rate, audio channels, sample rate, and duration for each queued item.

Jobs can be easily renamed by clicking on the default job name (e.g., "Job 1," "Job 2") and typing a new, custom name. This is particularly useful for organizing jobs that you might need to re-render multiple times throughout your project's development.
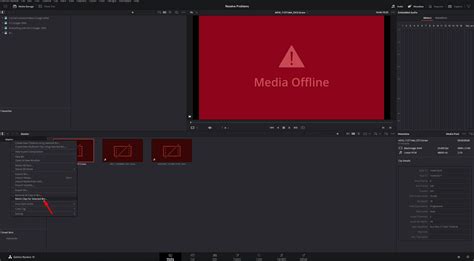
Handling Media Offline Issues
If you attempt to add a job to the Render Queue with a timeline that contains any offline material (missing media), DaVinci Resolve will automatically display a warning. You have the option to either cancel adding the job or proceed, acknowledging that you will be rendering one or more offline clips.
Starting the Rendering Process
To initiate the rendering of your queued jobs:
- Select Jobs (Optional): If you wish to render only specific jobs, select them by clicking on one and then using Command-click (on Mac) or Control-click (on Windows) for discontinuous selections, or Shift-click to select a range of jobs. If no jobs are selected, all jobs in the queue will be rendered.
- Initiate Render: Click the "Start Render" button, typically located beneath the Viewer to the right of the interface.
- Handle Re-rendering: If your Render Queue contains jobs that have already been rendered, a dialog will appear asking, "Selected items contain already rendered items. Do you want to re-render them?" Clicking "Yes" will re-render all jobs. Clicking "No" will render only the jobs that have not yet been processed. Clicking "Cancel" will halt the entire rendering operation.
Tip: While rendering is in progress, a small progress bar will appear on the DaVinci Resolve icon in the dock (macOS) or taskbar (Windows), providing a visual indicator of the rendering status.
As rendering begins, it starts with the highest job in the list. An "Overall Progress" bar will fill up, indicating the cumulative progress of all queued renders. A significant advantage of DaVinci Resolve is the ability to continue working on other tasks within the software simultaneously while rendering is in progress.
Advanced Rendering Techniques: Remote Rendering
For users with DaVinci Resolve Studio, remote rendering offers a powerful way to offload rendering tasks to a secondary computer on your network. This frees up your primary workstation, allowing you to continue editing, compositing, grading, or mixing other projects without interruption.
Quick Setup for Remote Rendering
- Enable Remote Render Mode: On the secondary "Render Computer" within your network's project manager, right-click to enter "Remote Render" mode.
- Send Render Job: On your main Resolve computer, after adding a job to the Deliver page's Render Queue, click the Wi-Fi-like button. This action sends the render job to an available remote computer on your network.
- Continue Working: The button will turn blue. Once you initiate the render, you can return to your primary tasks in Resolve, such as cutting, compositing, grading, or mixing, while the remote render machine handles the intensive timeline crunching.
Remote Render Requirements
To successfully implement remote rendering, several prerequisites must be met:
- DaVinci Resolve Studio: This feature is exclusive to the Studio version of DaVinci Resolve.
- System Preferences: On all involved computers, navigate to Resolve Preferences > System > General and ensure "Auto Scan other project libraries for remote rendering jobs" is enabled.
- Network Infrastructure: A stable network connection is essential. This can be a standard network, a Blackmagic Cloud Server connection, or local network access keys.
- Shared Media Access: Access to shared media is required. This is typically achieved through a Network Attached Storage (NAS) device like a Synology NAS or a shared Samsung SSD.
- High-Speed Ethernet: For optimal performance, a wired Ethernet connection is recommended, ideally 10GbE or 2.5GbE.
Network and Computer Configuration
- Remote Render Computer:
- Mac System Settings: Enable "Screen Sharing" (note the IP Address) and "Remote Login" for SSH terminal access. Grant "Full Disk Access" for remote operations.
- Remote Access Software: Consider using applications like Jump Desktop, Parsec, or TeamViewer for enhanced remote control.
- Main Artist Computer:
- Mac System Settings: Enable "File Sharing." Add the external SSD volume storing your footage to be shared as a network volume accessible by the remote computer.
The GUI Workflow via Screen Sharing
Using screen sharing software, you can effectively control the remote rendering process.
- Virtual Display: Add the screen sharing application as a virtual display on the remote computer.
- Open Resolve: Launch DaVinci Resolve on the remote machine.
- Add and Send Job: On your main artist computer, add the desired job to the render queue and click the Wi-Fi button to select the remote computer. You may need to restart Resolve on the main machine if it was already running when setting up remote rendering for the first time.
This advanced workflow, often utilized in professional Hollywood-level productions, is seamlessly integrated into DaVinci Resolve Studio. Furthermore, Resolve Studio includes a license for Fusion Studio, which features a dedicated Render Manager capable of leveraging all available network horsepower for image sequence rendering. This Fusion Renderer is a powerful tool that warrants its own detailed tutorial.
Understanding the Render Process
Rendering is the final stage where DaVinci Resolve processes your entire project, incorporating all applied effects, transitions, LUTs, and color grades, to create a final, watchable video file. This process is governed by the specific settings you choose in the Deliver page.
Quick Export vs. Detailed Export
For a quick export, you can utilize the "File > Quick Export" option. This provides a handful of preset export settings. However, for more control and tailored results, the detailed export process in the Deliver tab is recommended.
It's important to distinguish between the "render cache" and "rendering the timeline." The render cache is a feature designed to improve playback performance by pre-rendering computationally intensive parts of your timeline, particularly those with complex effects, transitions, or color grades that might strain your system's playback capabilities.
Step-by-Step Exporting in DaVinci Resolve
The Deliver tab is the central hub for exporting your projects. Key areas to focus on include:
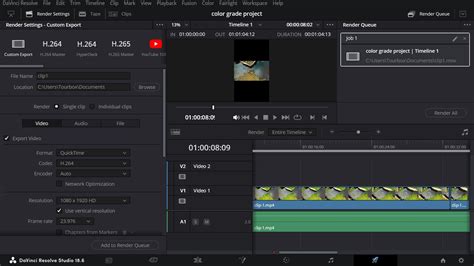
- Render Settings: Located in the top-left, this panel is where you configure video format, resolution, file types, and audio settings.
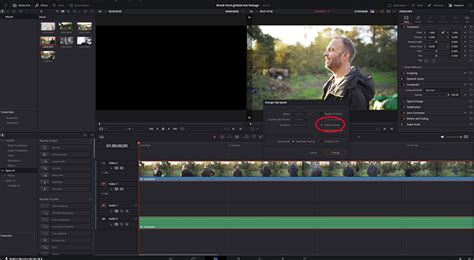
- Preview Window and Timeline: You can scrub through your timeline and preview the playback in the central window. While editing is not possible here, you can set In and Out markers to define specific render ranges.
- Render Queue: Situated in the top-right, this panel lists all the videos you have queued for export.
Here are the detailed steps to export a video file:
- Select the Deliver Tab: Click "Deliver" at the bottom of the DaVinci Resolve interface.
- Choose a Preset or Custom Export: In the Render Settings panel, select a preset or click "Custom Export" to configure your own settings. Presets are optimized for various platforms, but custom settings often yield superior results.
- Set Filename and Destination: Assign a filename to your export and choose the destination folder where DaVinci Resolve will save the video file.
- Select Video Format and Codec: Choose your desired "Format" and "Codec" from the drop-down menus. The format acts as a container for video, audio, and subtitle streams, while the codec determines how these streams are encoded. Together, they influence quality, file size, and playback compatibility.
- MP4: A widely used format balancing quality and file size, ideal for web uploads (YouTube, social media) and compatible with H.264 or H.265 codecs.
- QuickTime (MOV): Favored for high-quality exports, often used with DNxHD/DNxHR and ProRes codecs for professional productions.For social media and YouTube, MP4 or QuickTime with H.265 is generally recommended.
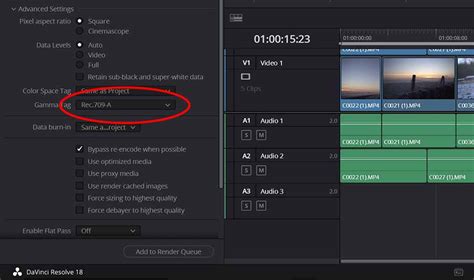
- Choose Resolution and Frame Rate: Ensure your resolution and frame rate settings match your timeline settings. Exporting at a higher resolution than your timeline will result in an error. You can check your timeline settings by right-clicking on the timeline in the Media tab and selecting "Timeline Settings."
- Restrict the Bitrate (Optional): In the "Quality" section, you can tick "Restrict to" and enter a desired bitrate. A higher bitrate generally means better quality but a larger file size. YouTube provides recommended bitrates for various resolutions and frame rates, which can serve as a useful guideline. Experimenting with different bitrates is key to finding the optimal balance for your footage.
- Add to Render Queue: Scroll down and click "Add to Render Queue."
- Select Render All: In the Render Queue window, click "Render All" to begin the export process. Depending on the video's length, resolution, and format, this may take some time. Always review the rendered file to ensure there are no issues.
Troubleshooting Common Render Issues
Encountering render problems is not uncommon. Here are solutions to some frequent issues:
The Render Fails or Stops Halfway Through
This can occur due to corrupted media, problematic effects, or insufficient hard drive space.
- Solution: Identify where the render stopped and locate that section in your timeline. Try replacing the media or disabling effects and transitions in that area. Ensure you have ample free space on your hard drive for the export.
Audio and Video Are Out of Sync
This can be caused by corrupt audio clips, frame rate mismatches, or outdated software.
- Solution: Re-import or convert corrupt audio files. Ensure your project, timeline, and export settings all share the same frame rate. DaVinci Resolve does not handle variable frame rate footage well; convert such footage to a fixed frame rate using tools like Shutter Encoder. Keep your DaVinci Resolve software updated and use compatible codecs and audio formats. If issues persist, try converting your video files to formats like MP4 or MOV, or manually adjust clip timing in the timeline.
Render Artifacts Appear in the Final Video
Artifacts like glitches, color shifts, or black screens can arise from temporary bugs or outdated graphics card drivers.
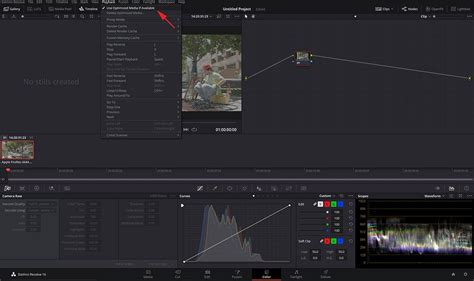
- Solution: Try changing the render codec or format, as some codecs may be more prone to artifacts on less powerful systems. Update your graphics card drivers. Consider rendering using optimized media by right-clicking media files in the Media Pool and selecting "Generate Optimized Media."
There's No Sound in the Exported File
This common issue can stem from missing or incorrect audio tracks, improper audio output settings, or incorrect project settings.
- Solution: Verify your audio files, check output settings in the Deliver tab, and ensure you're using a supported audio codec. Confirm that your project settings align with your desired audio export format. Ensure the "Export Audio" checkbox is enabled.
The File Size Is Larger Than Expected
An unexpectedly large file size usually indicates that the bitrate has been set too high.
- Solution: Lower the bitrate in the "Quality" settings to achieve a more manageable file size.
Optimizing Playback and Export
To improve playback speed within DaVinci Resolve and ensure smoother editing, you can render your cache or generate optimized media.
- Render Cache: This pre-renders computationally intensive parts of your timeline, enhancing playback performance.
- Generate Optimized Media: In the Media or Edit tab, select your desired media in the Media Pool, right-click, and choose "Generate Optimized Media." This process creates proxy files that are easier for your system to handle, leading to smoother playback and potentially faster exports.
Exporting for Specific Platforms
DaVinci Resolve offers presets for popular platforms like YouTube and Vimeo, simplifying the export process.
- YouTube/Vimeo Presets: Selecting a platform preset will pre-configure settings like resolution and frame rate. You can customize these further and even directly upload to your accounts by managing them in Preferences > Internet Accounts.
Advanced Export Options
- Individual Clips: In certain scenarios, you may need to export individual clips rather than a single, combined video file. This can be achieved by selecting "Individual Clips" in the render settings and choosing options like "Filename Uses Source Name."
- Chapters from Markers: For platforms like YouTube, you can utilize the "Chapters from Markers" option to split your video into chapters based on markers placed in your timeline. This aids in navigation for viewers.
- Render In/Out Range: Instead of rendering the entire timeline, you can define specific sections to export using In and Out points. This is invaluable for sending specific scenes to clients or collaborators. Multiple In/Out ranges can be added to the Render Queue as separate jobs.
By mastering the Render Queue and understanding these various export options, you can significantly enhance your post-production workflow in DaVinci Resolve, ensuring efficient and high-quality delivery of your final video projects.