Achieving a clear distinction between the subject and its surroundings is a cornerstone of compelling photography and graphic design. Whether you're looking to enhance a portrait, isolate a product for advertising, or simply create a more visually engaging image, mastering foreground and background separation in Photoshop is an invaluable skill. This article delves into various techniques, from fundamental layer manipulation to advanced masking strategies, empowering you to imbue your images with depth and impact.
Understanding the Fundamentals: Layers and Selections
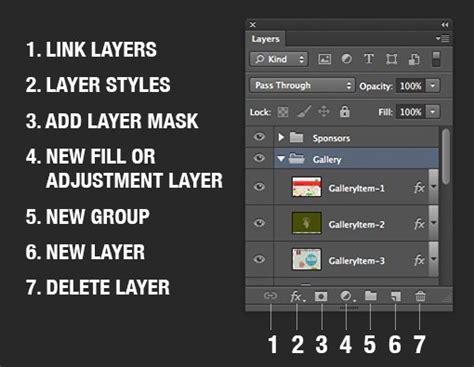
At its core, separating foreground from background in Photoshop revolves around the concept of layers and making precise selections. Layers are like transparent sheets stacked on top of each other, each containing different elements of your image. By isolating your subject onto its own layer, you gain the freedom to manipulate it independently of the background, and vice versa.
The Power of Selection Tools
Before you can separate, you must select. Photoshop offers a robust suite of tools to define the boundaries of your subject.
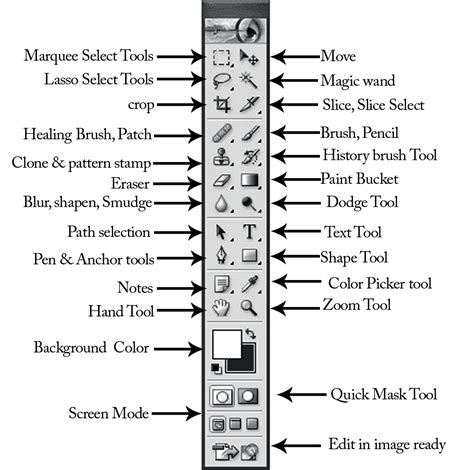
- Quick Selection Tool: This intuitive tool allows you to "paint" over your subject, and Photoshop intelligently detects edges based on color and texture. It's ideal for subjects with well-defined borders.
- Magic Wand Tool: Designed to select areas of similar color, the Magic Wand is effective for solid-colored backgrounds or subjects with distinct color differences from their surroundings. The "tolerance" setting allows you to control how similar colors need to be to be selected.
- Lasso Tools (Lasso, Polygonal Lasso, Magnetic Lasso): These tools offer more manual control. The standard Lasso lets you freehand a selection, the Polygonal Lasso creates straight-edged selections, and the Magnetic Lasso attempts to snap to edges as you trace.
- Pen Tool: For the most precise and intricate selections, the Pen Tool is unparalleled. It allows you to create vector paths with anchor points, offering complete control over curves and edges. While it has a steeper learning curve, it's indispensable for complex subjects like hair or fine details.
- Object Selection Tool: Introduced in newer versions of Photoshop, this tool uses AI to automatically detect and select distinct objects within an image. You can draw a rectangle or lasso around the area you suspect contains the object, and Photoshop will attempt to isolate it.
- Select Subject: Leveraging Adobe Sensei, Photoshop's AI, this command automatically analyzes your image and attempts to identify and select the main subject. While remarkably effective, it may require minor refinements using other selection tools.
Refining Your Selections
Once a preliminary selection is made, the "Select and Mask" workspace becomes your best friend. This dedicated environment provides a suite of tools to refine edges, smooth selections, and decontaminate colors, especially crucial for areas like hair or fur where fine details are critical. Within this workspace, you can adjust sliders for global refinement, use brushes to add or subtract from the selection, and preview your results against different backgrounds.
Advanced Separation Techniques
Beyond basic selections, several powerful techniques can be employed to achieve nuanced foreground and background separation.
Frequency Separation: Isolating Detail and Color
Frequency separation is a sophisticated technique that divides an image into two layers: a high-frequency layer containing fine details (like texture, pores, and lines) and a low-frequency layer holding color and tonal information. This separation allows for independent editing. For instance, you can smooth skin texture on the high-frequency layer without affecting the underlying skin tones, or adjust color and shadows on the low-frequency layer without altering the fine details.
The process typically involves duplicating your background layer, then using the "Apply Image" command. By selecting "Shadows + Color," "Subtract," with a Scale of 2 and an Offset of 128, you can create these distinct layers. This method is particularly effective for portrait retouching, enabling precise adjustments to skin imperfections and tonal variations.
HOW to SMOOTH SKIN using FREQUENCY SEPARATION in Photoshop | Skin Retouching Tutorial
Layer Masks: Non-Destructive Separation
Layer masks are fundamental to non-destructive editing in Photoshop. Instead of deleting pixels, a layer mask uses black and white to hide or reveal parts of a layer. A black mask hides, a white mask reveals, and shades of gray create semi-transparency.
- Create a Selection: Begin by making a precise selection of your foreground subject.
- Create a Layer Mask: With the selection active, add a layer mask to your subject layer. This will automatically hide everything outside your selection.
- Refine the Mask: Use the Brush Tool with black or white paint to refine the mask, ensuring a clean separation, especially around intricate edges like hair.
- Adjusting the Background: With the subject isolated, you can now apply adjustments to the background layer independently, such as desaturating it, applying a blur, or changing its color entirely.
Creating Depth with Color and Tone
The perceived distance between foreground and background is significantly influenced by color and tonal relationships.
- Color Temperature: Warmer colors tend to advance, while cooler colors recede. By making your foreground warmer and your background cooler, you can enhance the sense of depth.
- Saturation and Contrast: Reducing saturation and contrast in the background can make it appear further away. Conversely, increasing saturation and contrast in the foreground will help it pop.
- Vignetting: A subtle darkening of the image edges (vignetting) can draw the viewer's eye towards the center and the main subject, effectively separating it from the periphery.
Using Adjustment Layers and Clipping Masks
Adjustment layers provide non-destructive ways to modify color, tone, and other image properties. When combined with clipping masks, their effects can be confined to a specific layer.
- Apply an Adjustment Layer: For instance, add a Curves adjustment layer to lighten or darken your image.
- Create a Clipping Mask: With the adjustment layer selected, go to Layer > Create Clipping Mask (Option+Command+G on Mac, Alt+Ctrl+G on Windows). This ensures the adjustment only affects the layer directly below it, which in this case would be your foreground subject or background layer.
This allows you to, for example, brighten a background using a Curves adjustment layer that is clipped to the background layer, without affecting your foreground subject.
Content-Aware Fill for Background Replacement
When you need to remove a subject entirely, Content-Aware Fill is a powerful tool. After selecting the subject and inverting the selection (to select the background around it), you can use Edit > Fill, and choose "Content-Aware." Photoshop analyzes the surrounding pixels and intelligently fills the selected area, often creating a seamless removal of the subject.
Practical Applications and Workflow Tips
Separating foreground from background isn't just for dramatic effects; it's a fundamental technique for refining images.
Automating the Process with Actions
For repetitive tasks, Photoshop Actions can be a lifesaver. You can record a series of steps, such as duplicating layers, applying specific adjustments, or creating masks, and then replay them with a single click. This is particularly useful for setting up frequency separation layers or consistent background adjustments.
To create an action:
- Open the Actions panel (Window > Actions).
- Click "Create New Action."
- Name your action and assign a function key if desired.
- Perform the desired steps in Photoshop.
- Click the "Stop" button in the Actions panel when finished.
The Importance of Patience and Subtlety
As noted, rushing the masking or selection process can quickly undermine the entire effect, leading to distracting halos or imprecise edges. Take your time, especially with complex areas like hair. Furthermore, the most effective separation is often subtle. The goal is to enhance the image and guide the viewer's eye, not to create an unnaturally stark divide.
Beyond Photoshop: Lightroom's Capabilities
While Photoshop offers the most granular control, it's worth noting that Lightroom also provides tools for foreground and background separation. Using the Adjustment Brush, you can selectively apply warmer, more saturated settings to your foreground or cooler, desaturated settings to your background, achieving a similar depth effect without leaving the Lightroom environment.
The Role of Foreground and Background Colors
In Photoshop, the foreground and background color swatches play a crucial role in many tools, including brushes, gradients, and erasers. Understanding how these colors interact with your workflow is essential. The foreground color determines the color of your brush or pencil, while the background color is used for erasing or as a default for new canvas areas and gradients. Selecting appropriate foreground and background colors can significantly impact the overall mood and aesthetic of your design. For instance, using a bold foreground color will draw attention to your subject, while a more subdued background color will help it recede.
By mastering these techniques, you can transform ordinary photographs into visually dynamic compositions, guiding the viewer's eye and enhancing the storytelling power of your images. The ability to artfully separate foreground from background is a testament to your command of Photoshop and your understanding of visual perception.
tags: #foreground #and #background #photoshop