Photoshop, the industry-standard image editing software, offers a vast array of customization options through its Preferences dialog box. These settings allow users to tailor the program's behavior, appearance, and performance to their specific needs and workflows. From how tools function to how the workspace is displayed, nearly every aspect of Photoshop can be fine-tuned. Understanding where these preferences are stored and how to manage them is crucial for both optimizing your creative process and troubleshooting potential issues.
Accessing and Navigating Photoshop Preferences
The gateway to customizing Photoshop is its Preferences dialog box. To open it, users can navigate through the application's menu. On macOS, this is done by selecting "Photoshop" from the menu bar, followed by "Preferences," and then "General." For Windows users, the path is "Edit" in the menu bar, then "Preferences," and finally "General." Alternatively, a universal keyboard shortcut exists: pressing Command-K on macOS or Ctrl-K on Windows will instantly bring up the Preferences window.
Once open, the Preferences dialog box presents a categorized list of settings on the left-hand side. Selecting a category reveals a multitude of related options on the right. This structure allows for organized adjustments, enabling users to modify aspects of Photoshop from tool behavior to performance enhancements. For those who might forget the function of a particular setting, a helpful feature is the presence of tooltips. Hovering the cursor over a setting for a brief moment will display a small yellow explanation, clarifying its purpose.
A convenient method for quickly moving between preference categories is to hold down the Command key (Ctrl on Windows) and use the up and down arrow keys on the keyboard. This allows for rapid cycling through the various sections without needing to click on each category individually.
The General Preferences Pane: A Foundational Hub
The "General" pane in Photoshop's Preferences dialog box serves as a central hub for settings that don't neatly fit into other categories. While many of these options are self-explanatory, such as "Beep When Done," or are explained in detail elsewhere in the software's documentation, a few warrant closer examination due to their impact on usability and performance.

For instance, the "Export Clipboard" option, found within the General preferences, can significantly influence system performance. When enabled, this setting ensures that copied images or layers within Photoshop are also transferred to the operating system's clipboard. This facilitates pasting content into other applications like Adobe Illustrator or InDesign. However, given the potentially large file sizes of Photoshop documents, exporting these to the system clipboard can consume considerable RAM and lead to errors or sluggishness. By default, "Export Clipboard" is enabled. To maintain a smoother workflow and prevent performance issues, especially when working with large files, it is often recommended to disable this option. If there's a need to transfer content between applications, saving the file in Photoshop and then opening it in the other program is a more robust approach.
Another area within the Preferences that significantly impacts the user experience is the "Interface" section. Here, users can customize the overall color theme of Photoshop's workspace. Adobe provides four distinct gray-scale themes, ranging from dark to light. The darker themes, often the default in newer versions like Photoshop CC and CS6, are designed to be less intrusive, allowing for a greater focus on the image being edited. However, personal preference plays a significant role, and users can opt for lighter themes if they find them more comfortable.
In Photoshop CC, an additional "Highlight Color" option is available within the Interface preferences. This setting determines the color used to highlight active layers or selected elements within panels. While the default gray often blends seamlessly with the interface, users can choose a distinct color, such as blue, to make these highlighted items more visually prominent.
The "UI Font Size" is another important setting within the Interface preferences, available in both CC and CS6. This controls the size of the text displayed throughout Photoshop's interface. For individuals who experience difficulty reading smaller print, increasing the UI font size to "Medium" or "Large" can greatly improve readability. Changes to font size require a restart of Photoshop to take effect.
Tool-Specific Settings and Workflow Enhancements
Beyond general appearance and core functionality, Photoshop's preferences delve into the specifics of how tools operate and how workflows can be optimized. The "Tools" category, introduced as a new section in Photoshop CC, consolidates many tool-related settings.
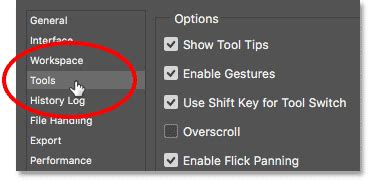
A key feature within the Tools preferences is "Show Tool Tips." These helpful pop-up messages appear when a user hovers their cursor over a tool or an option. While invaluable for beginners learning the software, they can become a distraction for experienced users. Tooltips are enabled by default, but can be disabled to streamline the interface. In Photoshop CS6, this setting is found within the Interface category.
The "Use Shift Key for Tool Switch" option, located in the Tools preferences for CC and in General preferences for CS6, affects how users select grouped tools. Many tools in Photoshop's toolbar share a common keyboard shortcut. For instance, pressing "L" typically selects the Lasso Tool. However, if other Lasso variants (like the Polygonal Lasso or Magnetic Lasso) are grouped with it, pressing "L" repeatedly might only cycle through the Lasso Tool itself. To access the other grouped tools, one would typically need to hold down the Shift key while pressing "L." Disabling "Use Shift Key for Tool Switch" allows users to cycle through all grouped tools simply by repeatedly pressing the tool's shortcut key without the need for the Shift modifier, potentially speeding up workflows.
File Handling and Performance Optimization
The "File Handling" category of Photoshop's preferences addresses how the software manages files and data. A critical feature here is "Auto Save," first introduced in Photoshop CS6. This function automatically saves a backup copy of the user's work at user-defined intervals. Given the potential for system crashes or unexpected power outages, Auto Save is an invaluable safety net. By default, it's set to save every 10 minutes, but users can reduce this interval to 5 minutes for more frequent backups, especially on less stable systems or during intensive work sessions.
Best Setting to Automatically Save Recovery File in Photoshop
Another important setting is "Recent File List Contains." This preference determines how many recently opened files Photoshop will track. These recent files are often displayed as thumbnails on the Photoshop Start screen, providing quick access to ongoing projects. The default setting typically tracks the last 20 files, but this can be increased up to 100 for users who frequently work with a large number of documents.
The "Performance" category is paramount for ensuring a smooth and responsive Photoshop experience, especially when dealing with complex projects. The "Memory Usage" option allows users to allocate a specific portion of their computer's RAM to Photoshop. Photoshop is a memory-intensive application, and providing it with more memory generally leads to better performance. By default, Photoshop is set to utilize 70% of the system's available RAM. If performance issues arise with large files, increasing this value can be beneficial. However, it's crucial to maintain a balance, as other open applications also require memory. Closing unnecessary programs while working in Photoshop is highly recommended to free up resources. If other applications must remain open, it's wise to avoid setting Photoshop's memory usage much beyond 90% to prevent system instability.
"History States" refers to the number of undo steps Photoshop remembers. A higher number of History States allows users to revert to earlier stages of their work, offering more flexibility. In Photoshop CS6, the default was 20 History States, often recommended to be increased to 30. Photoshop CC significantly increased this default to 50. While a higher number provides more undo options, it also consumes more memory. If performance problems occur, reducing the number of History States can help.
Scratch Disks: Expanding Photoshop's Workspace
When Photoshop exhausts the available system RAM, it utilizes "Scratch Disks." These are designated areas on a computer's hard drive that Photoshop uses as temporary virtual memory. In the "Scratch Disks" category within Performance preferences, users can select which drives will serve this purpose.

Ideally, Photoshop should not be set to use the startup disk as its sole scratch disk, as the operating system heavily relies on it. If multiple hard drives are available, it's best to choose a drive that is not the startup disk for better performance. Furthermore, if a Solid State Drive (SSD) is present, it should be prioritized as a scratch disk due to its significantly faster read/write speeds compared to traditional Hard Disk Drives (HDDs). Even if the SSD is also the startup disk, it remains the optimal choice for scratch disk operations. Users can configure primary and secondary scratch disks to further optimize performance.
Resetting Photoshop Preferences: Troubleshooting and Recovery
Despite the benefits of customization, corrupted preference files are a common cause of unexpected behavior and performance issues in Photoshop. Fortunately, Adobe provides several methods for resetting preferences to their default state, which can often resolve these problems.
Methods for Resetting Preferences
There are three primary ways to reset Photoshop preferences:
Using a Keyboard Shortcut: This is often the quickest method. With Photoshop closed, press and hold the following key combination:
- macOS: Command + Option + Shift
- Windows: Ctrl + Alt + ShiftImmediately after pressing these keys, launch Photoshop. Before the application fully opens, a dialog box will appear asking, "Delete the Adobe Photoshop Settings file?" Clicking "Yes" will reset all preferences to their default values, and new preference files will be created in their original locations.
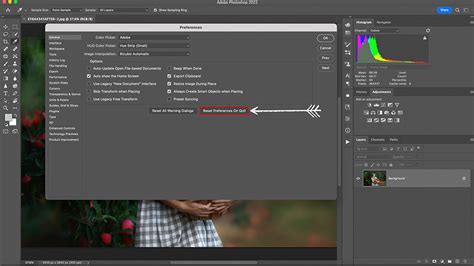
Using the Preferences Dialog Box: This method involves resetting preferences from within the application itself.
- Open Photoshop's Preferences dialog box as described earlier (Photoshop > Preferences > General on Mac, or Edit > Preferences > General on Windows).
- Click the "Reset Preferences On Quit" button.
- Click "OK" in the confirmation dialog that asks, "Are you sure you want to reset preferences when quitting Photoshop?"
- Quit Photoshop. The preferences will be reset the next time the application launches.
Manually Removing Preference Files: This is the most thorough method, ensuring that all user-specific settings and potentially problematic plug-in preferences are removed.
- macOS: Navigate to
Users/[user name]/Library/Preferences/Adobe Photoshop [version] Settings. The User Library folder is hidden by default on macOS 10.7 and later. To access it, open Finder, click "Go" in the menu bar, hold down the Option key, and select "Library." - Windows: Navigate to
Users/[user name]/AppData/Roaming/Adobe/Adobe Photoshop [version]/Adobe Photoshop [version] Settings. The Application Data/AppData folder is hidden by default on Windows. To access it, open File Explorer, go to the "View" tab, and check the "Hidden items" box. - Once the "Adobe Photoshop [Version] Settings" folder is located, drag the entire folder to the desktop or another safe location. This serves as a backup of your current settings.
- Launch Photoshop. The application will automatically create a new, default settings folder.
- macOS: Navigate to
Before attempting any reset, especially the manual method, it is highly recommended to back up your existing preferences. This allows you to restore your customized settings if the reset doesn't resolve the issue or if you wish to revert to your previous configuration. This backup process can be automated with scripts for efficiency, especially for users who frequently deal with troubleshooting or managing settings across different installations.
Advanced Considerations and User Perspectives
The complexity and sometimes obscure nature of locating and managing Photoshop preferences have led to discussions among users about Adobe's approach. Some users express frustration with the perceived difficulty of these procedures, suggesting that simpler, script-driven solutions could be implemented to automate backup and restoration processes. The ability to quickly restore a known working set of preferences can be invaluable when troubleshooting, and automating this with simple scripts can save significant time and reduce the risk of errors associated with manual file manipulation.
For instance, a user might develop a script that periodically backs up critical preference files to a compressed, timestamped archive. This script could be scheduled to run automatically, ensuring that a recent, functional version of the preferences is always available. In the event of a problem, the user could then easily select the most recent backup and restore it, or compare a problematic set of preferences with a known good one.
While Photoshop Elements and Adobe Premiere Elements also have their own preference files, the core principles of accessing, customizing, and resetting preferences remain largely consistent across Adobe's creative suite, with minor variations in file paths and specific dialog box options. Understanding these preferences is not just about fixing problems; it's about empowering users to mold Photoshop into a truly personal and efficient creative tool.
tags: #where #is #photoshop #preferences