Photoshop offers a powerful suite of tools for digital artists, and the ability to create custom brushes is one of its most significant advantages. This tutorial delves into the process of crafting a versatile fur brush within Photoshop, utilizing only the default assets readily available within the program. By understanding the fundamental settings and techniques, you can generate a multitude of fur styles simply by adjusting color palettes and subtle textural variations. This approach not only builds your personal library of design assets but also deepens your understanding of the software's intricate functionalities, allowing you to tackle complex design challenges one step at a time.
Building the Foundation: Creating the Basic Fur Brush Preset
The journey to a realistic fur effect begins with the creation of a custom brush. This process involves carefully configuring various brush dynamics to mimic the organic, irregular nature of animal hair. We will start by defining the core shape and then progressively introduce parameters that add depth and variation.
To initiate this, select a basic brush, such as the "hard round" brush, which serves as an excellent starting point. Within the brush settings, navigate to "Shape Dynamics." Here, the "Control" parameter should be set to "Pen Pressure," allowing for variations in stroke thickness based on your drawing tablet's input. Set the "Minimum Diameter" to zero to ensure the brush can taper to a fine point. "Roundness Jitter" can remain at zero for this foundational step.
Next, focus on the "Scattering" options. For a basic fur brush, it is often beneficial to leave both "X" and "Y" axes unchecked. The "Count" should be set to six, and "Count Jitter" can be kept at zero. Crucially, reduce the "Size Jitter" to one. This adjustment is critical; a lower "Size Jitter" value, when combined with other settings, helps create the appearance of individual hairs rather than a uniform blob. Observing the difference as you modify this setting is key to understanding its impact. Ensure your "Count" is sufficiently high to create a dense effect.
The "Texture" setting plays a pivotal role in adding subtle, inherent grain to the fur. You will need to manually select a texture. A highly effective choice for fur is the "Clouds" pattern, often found within the "Legacy Patterns" collection. If the "Legacy Patterns" are not immediately visible, they might be located outside the standard brush presets and may require manual loading or locating within your Photoshop installation files. Once selected, set the "Scale" to one percent. This minuscule scale ensures the texture is fine enough to contribute to the fur's detail without appearing as a distinct pattern. Adjust the "Brightness" and "Contrast" as needed to fine-tune the texture's appearance. Ensure "Texture Each Tip" is selected. Set the "Mode" to "Height" and the "Depth" to 100%. "Depth Jitter" should be set to zero for consistency.
The "Dual Brushes" setting can be an advanced tool for more specific fur effects, such as creating spotted furs or adding layered textures. While not essential for the basic fur brush, understanding its potential is valuable for future experimentation.
For "Color Dynamics," ensure "Apply Per Tip" is selected. This setting allows for color variations within individual strokes, which is crucial for realistic fur. Set the "Control" to "Off" and all other related jitter settings to zero. For the initial creation of the brush, it's often best to work with black and white. However, the "Color Dynamics" settings will become far more impactful when you introduce color later in the process. Ensure "Buildup," "Smoothing," and "Protect Texture" are selected in the main brush settings panel.
Once you are satisfied with the appearance of your brush strokes, it's time to save it. Use the Marquee tool to select just the brushwork you have created, ensuring you do not select the entire canvas. Then, go to "Edit" > "Define Brush Preset" and give your new brush a descriptive name, such as "Basic Fur Brush."
Refining the Brush: Adjusting Dynamics for Versatility
With the basic fur brush preset created, the next step is to refine its behavior to achieve different fur styles. These adjustments are made within the Brush Settings panel and allow for significant control over the final look.
To demonstrate the impact of these settings, let's consider a scenario where you are trying to create a tail-like fur effect. You will notice a significant difference in the style of the brush as you modify these parameters. It is essential to save your brush with these adjusted settings.
Begin by setting the brush size to approximately 200 pixels for this demonstration. Revisit "Shape Dynamics." As previously set, "Control" should be "Pen Pressure," and "Minimum Diameter" should be zero. "Roundness Jitter" can remain at zero.
Moving back to "Scattering," for this specific application, you can leave both axes unchecked. Set the "Count" to six, and "Count Jitter" to zero. Now, reduce the "Size Jitter" to one. You will observe a noticeable difference in the brush's output. Ensuring the "Count" is appropriately set will contribute to the density of the fur.
The "Texture" settings, as previously configured with the "Clouds" pattern at 1% scale, "Height" mode, and 100% depth, remain a strong foundation. "Texture Each Tip" should be selected.
Now, let's explore "Color Dynamics" in more detail. For this, it's helpful to visualize the effect in black and white first. Set your "Jitter" to 100 percent. This will result in a darker color. You can further reduce this value, and you will observe a greater prevalence of darker tones. When working with a white background, the white color becomes dominant. This highlights the crucial role "Color Dynamics" plays in achieving different fur styles. By manipulating these settings, you can effectively control the color variation within the brush strokes, leading to a more natural and varied appearance.
Illustration Masterclass: Painting with Color Dynamics
The Art of Fur Painting: Applying Your Custom Brush
Creating the brush is only half the battle; effectively applying it to paint realistic fur is where the true artistry lies. This involves understanding underpainting, color layering, and blending techniques.
Begin by creating a sketch of your subject. This sketch serves as a guide, and you can even include directional lines to indicate the flow of the fur, acting as a roadmap to ensure you paint in the correct direction.
Create a new layer below your sketch layer. Then, create another layer beneath that and fill it with white or a soft cream color. This will serve as your base canvas. It is good practice to name your layers as you create them. You should now have at least three layers: sketch, transparent layer for painting, and background.
Ensure you are on the correct layer (the transparent layer in the middle) to begin blocking in colors. Use a soft round brush for this initial underpainting. Avoid using pure white as an underpainting if your subject is white, as your brush strokes may not be visible. Think about shadows and the underlying colors. For very white areas, consider using subtle hues like pinks, purples, violets, and blues. At this stage, the painting might look unrefined, which is perfectly normal; this is merely the underpainting.
Once your base colors are blocked in, switch to the Mixer Brush tool. For effective blending, set the "Wet" to 10%, "Load" to 5%, "Mix" to 26%, and "Flow" to 26%. Ensure "Sample All Layers" is turned off. The goal here is to blend the initial colors so they are not too harsh and create a smoother transition. Don't hesitate to add more color, darken or lighten areas as needed. To subtly darken or lighten an area without making harsh marks, reduce the brush opacity before painting.
Addressing the edges of your painting can be challenging to make look soft and to hide hard lines. After completing the underpainting and blending, add a new layer below it and fill it with black. This black layer acts as a temporary background, making it easier to see the subtle variations and the overall effect of your painting. This layer can be removed once the fur is complete. Conversely, if you are working on a dark area, create a new layer below it and fill it with white for better visibility.
Now, it's time to use your custom fur brush. Select your newly created fur brush and choose your desired colors. Begin with the eye area as a starting point. As you paint, you will want to adjust settings like scatter and brush size. Always pull or push the brush in the direction of the fur's growth. Start with a shadow color and gradually build up to lighter tones. Work these colors back and forth, as layering is key to achieving depth and realism.
For instance, you might start with a dark shadow color like 32261b. If this appears too strong, lower the brush opacity. Next, introduce a mid-tone, such as c2b7b7. This mid-tone should ideally harmonize with your underpainting, making it blend seamlessly. Follow this with a slightly lighter mid-tone, like d2c5c5. Finally, add the highlights with a color like e1d8cd. It's generally advisable to avoid using pure white until the very last stages, and only in the areas of strongest light. The same principle applies to using pure black.
Enhancing Realism: Smudging and Iterative Refinement
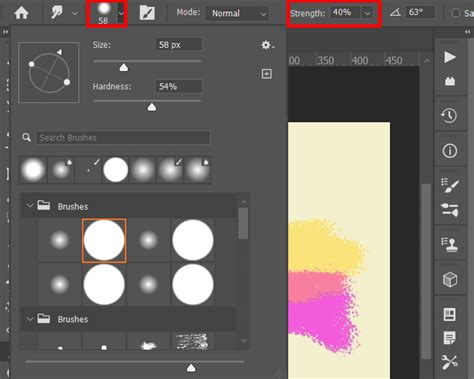
To further enhance the realism of your painted fur, the smudge tool can be employed with careful precision. Use the smudge tool with the same fur brush you've been using. Lightly follow the direction of the fur strokes again. Crucially, reduce the "Strength" of the smudge tool to at least 50% or more. The goal is to soften the individual strokes just enough to create a more cohesive, natural flow without losing the texture of the fur.
The key to achieving believable fur lies in iterative refinement and constant adjustment. Throughout the painting process, you will be making three primary adjustments: "Scatter," "Brush Size," and "Opacity." A smaller brush size and scatter value will result in finer, more delicate hairs. The process essentially becomes a continuous cycle of working colors back and forth â dark, medium, light â followed by a subtle smudge, then adding a touch more dark, a little more light, and smudging again.
This iterative approach, often described as "play, play, play," is essential. Experiment until you are completely satisfied with the result. It's easy to get lost in the details, so remember to take breaks and revisit your work with fresh eyes. Consistent practice with these techniques will build your confidence and skill in rendering fur in Photoshop.
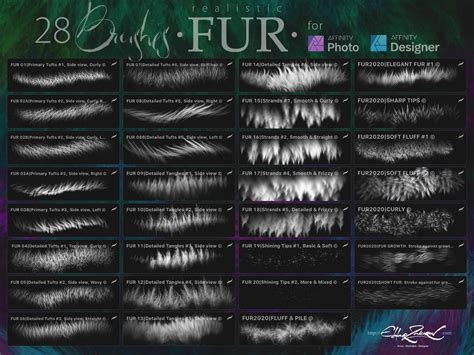
For those seeking even more specialized tools, there are commercially available custom Photoshop hair and fur brush sets. These sets are often designed from the ground up to work in conjunction with each other, allowing for layered building of incredibly lifelike results. Unlike simple textures or stamps, these brushes are engineered to paint fur in the direction of your brush stroke, offering a more dynamic and intuitive painting experience. Such resources can significantly accelerate your learning curve and expand your artistic capabilities, making the creation of complex textures more accessible and enjoyable.