Unwanted elements in photographs, whether they are people, objects, or distractions, can detract from an otherwise perfect shot. Photoshop, a leading image editing software, offers a suite of powerful tools to address this common challenge. From traditional techniques that rely on meticulous manual work to cutting-edge artificial intelligence, Photoshop provides a range of solutions for removing anything that pulls focus away from your subject. This comprehensive guide delves into the various methods available, explaining how to achieve seamless results and improve your overall photo editing workflow.
The Evolution of Object Removal in Photoshop
Historically, removing unwanted elements from an image in Photoshop has involved a combination of manual techniques. Tools like the Clone Stamp Tool, Spot Healing Brush, and Patch Tool have been staples for years, allowing editors to meticulously sample and paint over distracting areas. These methods, while effective, often require significant time, patience, and a good understanding of the surrounding image content to produce believable results. The process typically involves carefully selecting areas of the image that match the background and then painting them over the unwanted object.
Traditional Tools: The Foundation of Removal
Before the advent of advanced AI, editors relied on a set of robust tools:
- Spot Healing Brush and Healing Brush Tool: These tools are adept at fixing small imperfections, such as blemishes on a face or removing thin wires. They work by sampling nearby pixels and blending them with the target area. While effective for minor touch-ups, they can struggle with larger or more complex removals.
- Patch Tool: This tool allows you to select an area you want to remove and then drag that selection to a source area from which Photoshop will sample pixels to fill the selected region. It offers more control than the Spot Healing Brush for larger areas.
- Clone Stamp Tool: This is a more direct approach. You manually sample a source area by holding down the "Alt" or "Option" key and then paint over the area you want to remove. This method provides precise control but demands a keen eye for detail to ensure the cloned area blends seamlessly with the background and doesn't create repetitive patterns or obvious edits. It's often used to clean up areas that other tools may have left imperfect.
- Content-Aware Fill: Introduced as a more intelligent solution, Content-Aware Fill analyzes the surrounding pixels and attempts to intelligently fill the selected area. This feature can be accessed through "Edit" > "Content-Aware Fill" and often yields good results with minimal user intervention, though for complex scenes, its accuracy might vary.
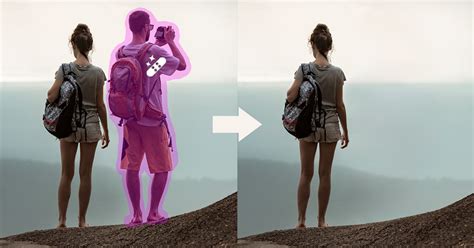
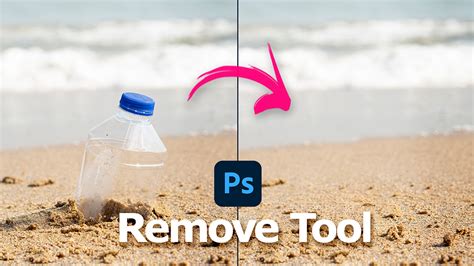
The Power of AI: Introducing the Remove Tool
More recently, Photoshop has embraced artificial intelligence to revolutionize object removal. The Remove Tool, powered by AI and machine learning, offers a remarkably intuitive and efficient way to erase people, objects, or distractions from photos. This tool operates on a simple principle: you paint over the unwanted element, and the AI intelligently reconstructs the background.
How the Remove Tool Works
The Remove Tool is designed for ease of use, eliminating the need for complex selections or confusing dialog boxes. Here's the basic workflow:
- Select the Remove Tool: You can find the Remove Tool within the group of healing tools in the Photoshop toolbar. If you've recently used the Spot Healing Brush, you might need to click and hold its icon to reveal the Remove Tool.
- Adjust Brush Size: Resize your brush using the left and right bracket keys (
[and]) on your keyboard to match the size of the object you want to remove. - Paint Over the Object: Simply brush over the person or object you wish to eliminate. Ensure the entire area is covered by the brush stroke.
- Release and Observe: By default, as soon as you release your mouse button, the Remove Tool will process the area and remove the painted-over content.
Key Features and Options of the Remove Tool
The Remove Tool offers some crucial options that enhance its flexibility:
- "Remove after each stroke": By default, this option is checked, meaning the removal process happens automatically once you release the mouse button. For smaller objects, this is very convenient. However, for larger or more intricate areas, you might want to uncheck this option.
- "Remove after each stroke" (unchecked): When this option is unchecked, the Remove Tool waits for your explicit command. This allows you to paint over a larger area with multiple strokes without the tool attempting to fill the area prematurely. Once you've finished painting the entire region you want to remove, you can then release your mouse button, and the AI will process the entire painted area at once. This is particularly useful for complex removals where multiple strokes are needed to cover the object. You can also click the checkmark icon in the Options Bar to initiate the removal after completing your strokes.
- "Sample all layers": This option is crucial for non-destructive editing. When enabled, the Remove Tool will sample information from all visible layers in your Layers panel. This means you can work on a separate layer above your original image, ensuring that your edits don't permanently alter the background image.
Non-Destructive Editing with the Remove Tool
A significant advantage of the Remove Tool is its ability to work non-destructively. To achieve this:
- Create a New Layer: In your Layers panel, create a new, empty layer above your background image.
- Select the Remove Tool: Choose the Remove Tool from the toolbar.
- Enable "Sample all layers": In the Options Bar at the top of the screen, ensure that "Sample all layers" is checked.
- Paint and Remove: Now, paint over the object you want to remove on this new layer. The AI will generate the replacement content based on the layers below, but the actual edit will be confined to your new layer. This preserves your original image and allows for easy adjustments or removal of the edit later.
How to use the Remove Tool in Photoshop
Comparing the Remove Tool with Traditional Methods
The Remove Tool often surpasses traditional tools like the Spot Healing Brush, especially for complex removals. For instance, when removing a person, the Spot Healing Brush might incorrectly fill the area with a portion of the person's arm or create awkward artifacts. In contrast, the Remove Tool, powered by AI, is far more adept at analyzing the surrounding environment and generating a more plausible and seamless fill.
When comparing results side-by-side, the Remove Tool frequently emerges as the clear winner, producing cleaner and more natural-looking outcomes. While traditional tools still have their place for specific, minor touch-ups, the Remove Tool offers a significant leap forward in efficiency and quality for general object and person removal.
Advanced Techniques and AI-Powered Companions
Beyond the basic removal of objects, the Remove Tool also proves to be an excellent companion to other AI-powered features in Photoshop, such as Generative Fill.
Working with Generative Fill
Generative Fill, another AI-driven feature, excels at creating new content or filling in large, complex areas. The Remove Tool can be used to first clean up any initial problems or unwanted elements within an AI-generated area. For example, if Generative Fill produces an artifact or an unwanted object within the generated content, you can use the Remove Tool to quickly and easily erase it, refining the AI's output.
Repairing Edges and Complex Details
The Remove Tool's AI capabilities extend to more nuanced tasks, such as repairing edges. In scenarios where the edges of objects or structures are misaligned after a removal, the Remove Tool can be used to intelligently snap those edges back into alignment. This often requires a patient approach with multiple short brush strokes along the edge, allowing the AI to analyze and correct each section individually. While it may not always fix highly complex edges, especially on uneven surfaces like ground textures, it significantly simplifies the process of restoring visual integrity.
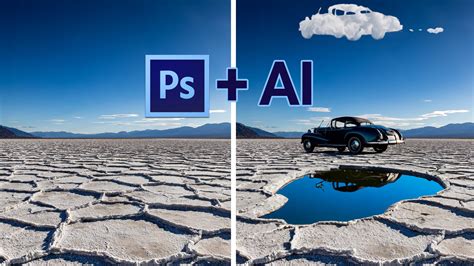
Image Stacking: A Specialized Approach
For certain types of photography, particularly when dealing with moving subjects in a static scene, image stacking offers a unique solution for removing unwanted elements. This technique involves capturing a series of photos of the same scene, with a time delay between each shot, ensuring that the unwanted subjects (like people) have moved out of the frame.
The Image Stacking Process
- Tripod is Key: Using a tripod is essential to ensure the camera remains perfectly still between shots, allowing the images to align accurately during the blending process.
- Capture Multiple Images: Take a sequence of photos, waiting approximately 25 seconds between each to give people enough time to move.
- Utilize Stack Modes: In Photoshop, you can then open these images as layers in a single document and use specific stack modes, such as "Mean" stack mode. This mode calculates a statistical average of the pixel values across all the layers. In a scene with moving people and a static background, the static background elements will be averaged and preserved, while the moving people, appearing in different positions or not at all in some frames, will be effectively averaged out and disappear.
This method is commonly employed in astrophotography and macro photography to enhance image quality, but it can also be a powerful technique for removing transient elements from a scene. However, it does require capturing a large number of photos initially and can demand significant computer performance.
Considerations for Optimal Removal
Regardless of the tool used, achieving the best results in object removal often involves a combination of techniques and careful consideration of the image's context.
The Importance of Context and Combination
It's rare for a single tool to be a one-stop solution for all removal scenarios. Often, the most effective approach involves combining different tools. For example, you might start with the Remove Tool for the primary removal, then use the Clone Stamp Tool to refine subtle details or fix any minor artifacts left behind. Similarly, Content-Aware Fill can be a good starting point, followed by manual cleanup with the Clone Stamp Tool.
Artistic Skill and Patience
Removing objects, especially complex ones, is not always a purely technical process. It requires artistic judgment, an understanding of light and shadow, texture, and perspective. Patience is also a virtue; rushing the process can lead to obvious edits. Taking the time to carefully sample source areas, blend edges, and refine details will result in a much more convincing final image. Using a digitizer tablet can also offer more precise control for intricate cloning and painting tasks.
Generative AI and Commercial Safety
With the rise of AI-powered tools like Adobe Firefly's Generative Remove, the barrier to entry for professional-looking edits has been significantly lowered. Generative Remove in Firefly works similarly to Photoshop's Remove Tool, allowing users to brush over unwanted objects and have them intelligently replaced. A key advantage of Firefly's generative AI models is that they are trained on licensed content, such as Adobe Stock, and public domain content, making them commercially safe to use. This means creators can remove logos, watermarks, stray text, or distracting people from their images with confidence.
To use Generative Remove in Firefly:
- Navigate to the Firefly image editor.
- Select "Generative Remove" from the Quick Actions Menu.
- Use the brush tool to select the unwanted object.
- Click "Generate."
Firefly automatically fills the area with natural-looking results, keeping visuals clean and polished. This AI-driven approach requires no specific design skills, making advanced editing accessible to a wider audience.
Ultimately, Photoshop offers a dynamic and evolving toolkit for removing people and objects from photographs. Whether you opt for the intuitive AI-powered Remove Tool, the precise control of traditional methods, or the specialized approach of image stacking, the key to success lies in understanding the strengths of each tool and applying them judiciously to achieve seamless and professional results.