The Lasso Tool in Adobe Photoshop is a fundamental selection instrument, empowering users to meticulously define and isolate specific areas within an image. While often overshadowed by more automated selection methods, the Lasso family of tools offers unparalleled manual control, making them indispensable for a wide array of editing tasks. This article will explore the intricacies of the Lasso, Polygonal Lasso, and Magnetic Lasso tools, detailing their functionalities, best use cases, and how to wield them effectively for precise and impactful image manipulation.
The Core of Freehand Selection: The Regular Lasso Tool
At its heart, the Lasso Tool is a freehand selection utility. This means it operates precisely as the user guides it, without any automatic snapping to object edges or predictive selection capabilities. Wherever the digital "rope" of the lasso is drawn, that's where the selection will remain. This direct, unassisted control is its defining characteristic.
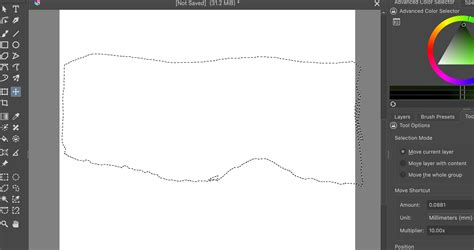
The regular Lasso tool is ideal for situations where speed is paramount and a rough selection will suffice, or when working with Generative Fill to indicate the precise area you wish to modify. To initiate a selection, simply click and drag the cursor around the desired object. When you return to your starting point, the selection will be demarcated by the characteristic "marching ants" line. While this tool offers immediate ease of use, achieving surgical precision can be challenging for novice users. However, with practice, it becomes an efficient method for isolating even irregularly shaped elements.
Enhancing Precision with Lasso Tool Options
The Lasso tool, like many other selection tools in Photoshop, offers additional functionalities to refine the selection's appearance. The Feathering and Anti-alias settings play crucial roles in determining the softness or sharpness of the selection's edges.
- Feathering: By inputting a value into the Feather option, you essentially soften the edges of your selection. This creates a gradual transition between the selected area and the surrounding pixels, rather than a harsh, abrupt boundary. This is particularly useful when compositing images or performing background removals where a blended edge is desired.
- Anti-aliasing: Ticking the "Anti-aliased" option further softens the edges, helping to avoid jagged or stair-stepped appearances that can detract from the professionalism of an edit. This setting is generally recommended for most selections to ensure a smoother, more natural look.
Furthermore, Photoshop provides a suite of selection commands that allow for post-selection refinement. These commands enable users to adjust their selections by adding to, subtracting from, or intersecting with existing selections, ensuring that the final boundary perfectly matches the user's intent.
When to Choose the Regular Lasso Tool
The regular Lasso tool excels in scenarios demanding quick, albeit less precise, selections. It's particularly useful for:
- Rapid object isolation: When a deadline is looming and a near-perfect selection is acceptable.
- Indicating areas for Generative Fill: To guide Photoshop's AI in modifying specific parts of an image.
- Selecting basic shapes: For simpler objects where freehand drawing is sufficient.
- Users with excellent mouse control or graphics tablet users: These users can leverage their dexterity for more accurate freehand selections.
Structured Selections: The Polygonal Lasso Tool
The Polygonal Lasso Tool offers a distinct approach to selection by operating in straight lines. While it also allows for freehand drawing, its primary strength lies in creating selections with sharp, defined edges. Unlike the regular Lasso tool where you click and drag continuously, the Polygonal Lasso tool operates by setting anchor points.
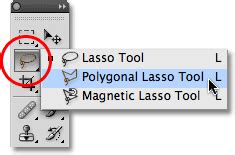
To use the Polygonal Lasso Tool, you click to set an anchor point, then move the mouse to the next point where you want a line to end, and click again. This process is repeated, creating a series of straight lines that form the selection boundary. This method is particularly effective for selecting objects with geometric shapes or clear, straight edges. If a mistake is made, pressing the "Backspace" key allows for undoing the last point. To close the selection, you can either double-click or click back on the initial anchor point.
Applications of the Polygonal Lasso Tool
The Polygonal Lasso Tool is the go-to choice for:
- Selecting objects with straight edges: Buildings, geometric patterns, or elements with sharp corners are ideal candidates.
- Creating precise selections where curves are not dominant: It offers more control than the freehand Lasso for angular shapes.
- Situations requiring sharp, well-defined borders: For clean cuts and distinct object separation.
- Users who prefer a point-and-click selection method: This tool provides a more structured way to build a selection.
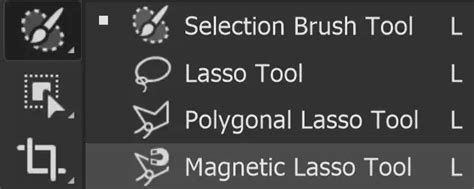
The Intelligent Edge Hunter: The Magnetic Lasso Tool
As its name suggests, the Magnetic Lasso Tool behaves like a magnet, automatically snapping to the edges of objects as you move your cursor nearby. This feature is incredibly beneficial for users who struggle with a steady hand or find freehand drawing to be too time-consuming.
To initiate a selection with the Magnetic Lasso Tool, you click once to set the first anchor point on the edge of the object you wish to select. Then, you simply move your mouse around the object's perimeter. Photoshop will intelligently detect the color and tonal differences between the object and its background, creating anchor points automatically to create a selection that adheres to the edge. You can also manually add anchor points by clicking, which can be useful for areas where the tool might struggle to find the edge. To finish the selection, you click back on the initial anchor point.
Magnetic Lasso Tool Settings for Optimal Performance
Several settings within the Magnetic Lasso Tool can be adjusted to enhance its performance:
- Width: This parameter defines the radius around your cursor within which Photoshop will search for an edge. A larger width is suitable for well-defined edges, while a smaller width is better for more intricate details. You can adjust this dynamically by using the left and right bracket keys on your keyboard.
- Contrast: This setting determines how much Photoshop considers the difference in color and brightness between the object and its background. A higher contrast value is effective when there is a clear distinction between the subject and the background, while a lower value is useful for subjects with less pronounced edges.
- Frequency: This setting controls how many anchor points are created along the selection's path. A higher frequency results in more anchor points, which can be beneficial for selecting objects with many curves and irregular details.
Best Use Cases for the Magnetic Lasso Tool
The Magnetic Lasso Tool is particularly effective for:
- Selecting objects against high-contrast backgrounds: Where the subject clearly stands out from its surroundings.
- Users with less steady hands: The automatic edge detection compensates for minor hand tremors.
- Complex shapes with defined edges: It can efficiently trace outlines that would be tedious to draw freehand.
- When speed and reasonable accuracy are required: It offers a good balance between the precision of the Polygonal Lasso and the speed of the regular Lasso.
It's important to note that with the Magnetic Lasso Tool, you cannot directly undo moves in the same way as the Polygonal Lasso. If an incorrect anchor point is placed, you can remove it by pressing the "Delete" key. Alternatively, switching to the Polygonal Lasso tool and selecting "Add to selection" can be used to correct mistakes or adjust portions of the selection.
Combining Lasso Tools for Ultimate Control
One of the most powerful aspects of the Lasso tools is their ability to be combined. You can start a selection with one type of Lasso tool and then switch to another to leverage its unique strengths. For instance, you might use the Magnetic Lasso Tool to trace the majority of an object's edge and then switch to the Polygonal Lasso Tool to create a sharp, straight line for a specific section.
To combine selections:
- Add to Selection: Hold down the Shift key while using any of the Lasso tools. This will add the newly drawn area to your existing selection.
- Subtract from Selection: Hold down the Alt key (Windows) or Option key (Mac) while using any of the Lasso tools. This will remove the newly drawn area from your existing selection.
This flexibility allows for the creation of highly precise and complex selections that might be difficult to achieve with a single tool. For example, if you have an object with both smooth curves and sharp angles, you can use the Magnetic Lasso for the curves and the Polygonal Lasso for the angles, seamlessly blending the two selection methods.
Beyond Basic Selections: Refinement and Application
Once a selection has been made using any of the Lasso tools, further refinement is often necessary to achieve a professional result. The Select and Mask workspace in Photoshop provides a comprehensive suite of tools for this purpose. Here, you can:
- Smooth edges: Reduce any choppiness or jaggedness in the selection.
- Feather the selection: Create a softer transition, as discussed earlier.
- Adjust Contrast: Enhance the sharpness of the selection's edges.
- Shift Edge: Expand or contract the selection boundary.
Turn On This Secret Setting for Flawless Hair Masks! - Photoshop Tutorial
The ability to make precise selections is a foundational skill in Photoshop, opening doors to a multitude of advanced editing techniques. Common applications include:
- Background Removal: Isolating a subject from its background for replacement or isolation. This is perhaps the most frequent use case for the Lasso tools, especially when dealing with complex or poorly defined backgrounds.
- Compositing: Seamlessly combining elements from multiple images into a single, cohesive artwork.
- Targeted Adjustments: Applying color corrections, filters, or other edits to specific parts of an image without affecting the rest.
- Object Manipulation: Copying, moving, or resizing individual elements within an image.
Conclusion: The Enduring Power of Manual Control
While Photoshop continually introduces automated selection tools, the Lasso family remains a cornerstone of the software's selection capabilities. The regular Lasso offers freehand freedom, the Polygonal Lasso provides geometric precision, and the Magnetic Lasso brings intelligent edge detection. By understanding the strengths of each tool and mastering the art of combining them, users can achieve highly accurate and sophisticated selections, elevating their image editing to new levels of artistry and professionalism. The Lasso tools, in their various forms, empower users to take complete control over their selections, ensuring that every pixel is precisely where it needs to be.