The world of digital art is constantly evolving, and with it, the tools artists use to express their creativity. Among these tools, custom brushes play a pivotal role, allowing for unique textures, effects, and artistic styles. ibisPaint, a popular and powerful drawing application, offers extensive capabilities for users to create their own brushes, including those that produce "glitch" effects. This tutorial delves into the core components and processes involved in designing and implementing glitch brushes within ibisPaint, transforming ordinary strokes into visually striking elements.
Understanding the Building Blocks of Custom Brushes
At the heart of creating any custom brush in ibisPaint lies a fundamental understanding of its constituent parts. These elements work in concert to define how a brush behaves and the marks it leaves on the canvas.
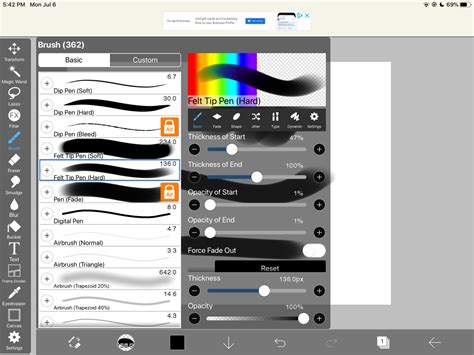
The first critical component is the Brush Pattern. This is the fundamental shape or image that repeats along the path of your stroke. You define this in the [Shape] tab's [Brush Pattern] setting. Imagine it as the "stamp" that your brush uses. Lines are drawn by repeating this pattern, and its characteristics directly influence the texture and appearance of the final stroke.
Complementing the brush pattern is the Texture. This setting, found in the [Type] tab's [Texture Pattern] setting, applies a paper-like texture to your brush strokes. This can add a subtle or pronounced tactile quality, mimicking traditional media and enhancing the overall realism or artistic feel of your artwork.
Furthermore, the Blurring Shape plays a significant role in controlling the brush's fade. Located in the [Fade] tab's [Blurring Shape] setting, this dictates how the brush tapers off at the edges of its stroke, influencing its softness, sharpness, and overall appearance.
The [Type] Setting: Monochrome vs. Color Brush Patterns
The [Type] setting within the brush creation menu is crucial as it determines the nature of your brush pattern. You have two primary options:
Brush Pattern (Mono): This option allows you to create an image that will serve as a brush pattern for monochrome brushes. The resulting patterns are best suited for black and white or grayscale applications, providing distinct shapes and textures without color variation within the pattern itself.
Brush Pattern (Color): This option enables the creation of brush patterns that can incorporate multiple colors. This is where the magic for more complex and visually dynamic brushes, including many glitch effects, truly begins. The initial settings of a brush created using this option will differ depending on the template you choose. ibisPaint provides a selection of templates, and selecting one that is closest to your desired brush is a strategic starting point. For instance, if you aim to create a brush that functions like a stamp, setting the type to [Brush Pattern (Color)] and the template to [Star] is a recommended approach.
Editing and Refining Your Brush Patterns
Once you've chosen your [Type], the next step is to define the actual pattern. When you select ⑥[Edit Pattern], the canvas transforms into your drawing space. Whatever you draw here becomes the repeating shape for your brush pattern.
A common challenge when creating custom brush patterns, especially for the first time, is that the pattern shape might not appear as expected in the test drawing. You might only see a simple line, indicating that the pattern isn't being applied correctly. This often stems from two primary settings: brush Thickness and Spacing.
If your pattern isn't showing up, the first troubleshooting step is to try increasing the Thickness. The maximum brush thickness can be adjusted within the [Settings] menu under the Max Thickness setting. A pattern with a very thin thickness might be imperceptible.
Equally important is Spacing. If the spacing between repeated pattern elements is too small, they can blend together, making the individual pattern less distinct. Experimenting with increasing the spacing can help reveal the intended shape more clearly.
After you've finalized your brush pattern and are satisfied with its appearance, you can save it. When you go ⑭[Back to My Gallery], the brush pattern image is automatically uploaded to the server, making your new brush pattern ready for use. Selecting "OK" will then add the brush you used for testing to the ⑯[Custom] tab within the Brush Window. It's worth noting that there's a limit to the number of original brush patterns you can import from other users, so creating your own is a valuable skill.
The Art of Color Brush Patterns and Base Color
Creating a brush pattern from scratch can indeed be a complex endeavor. Often, a more accessible and efficient method is to begin by customizing an existing brush that you already favor. You can then register this modified brush as a custom brush.
When focusing on creating brush patterns, particularly those with a visual flair, the Brush Pattern (Color) option is invaluable. This allows you to create patterns that incorporate multiple colors, opening up a world of possibilities for dynamic and unique effects, including glitch art.
The core principle behind color brush patterns is the transformation of the ①[Color of Brush Pattern Image] based on the ②[Color Currently Selected] by the artist when they use the brush. This interaction between the pattern's inherent colors and the active drawing color is what allows for sophisticated visual results.
Furthermore, you can set a ③[Base Color] for your color brush pattern. This base color is not merely an aesthetic choice; it plays a crucial role in how the colors within your brush pattern will be interpreted and displayed when you actually use the brush. Within Pattern Editing Mode, you'll find a ⑤[Base Color Button].
The importance of the base color lies in its influence on the hue. If your brush pattern is predominantly red, setting the base color to red is a logical step. Similarly, if the pattern is primarily blue, a blue base color would be appropriate. This ensures that the color transformations during brush use are more predictable and aligned with your artistic intent.
Understanding Color Dynamics in Brush Patterns
Let's delve deeper into the practical application of color brush patterns and the role of the base color. Imagine you first create a canvas specifically for a brush pattern using the ⑥[Brush Pattern (Color)] type.
The ⑧ [Base Color] button is instrumental here, as it sets the foundational hue for your pattern. To determine the right hue for your base color, a highly effective technique is to use the eyedropper tool. Pick a color that is representative of your brush pattern from the canvas itself.
Once your color brush pattern is established with its base color, you can then test its behavior with different drawing colors. For example, if you've created a pattern that resembles a sunflower and set its base color appropriately, when you test the brush with yellow as your currently selected drawing color, you will likely see a vibrant yellow sunflower appear. This signifies that you have successfully finished creating your sunflower brush.
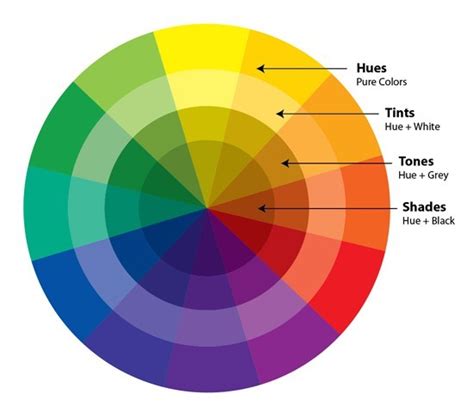
Now, let's explore the dynamic color shifts that occur when you change the brush color. Consider a scenario where your base color was red. If you then change the currently selected brush color to green, the hue of your pattern will shift. The magnitude of this hue change is not arbitrary; it's based on the color wheel. In this instance, when you change a color from red to green, the hue changes by approximately 120 degrees.
If you further modify the brush color from green to blue, the difference in hue between red (your base color) and blue is approximately 240 degrees. These color shifts are fundamental to how color brush patterns function and allow for a wide range of chromatic variations from a single pattern.
It's important to maintain a clear understanding of color properties like brightness and saturation. The examples discussed so far - red, green, and blue - are often considered to have 100% brightness and saturation. However, a critical limitation to remember when working with color brush patterns is that the image drawn on the canvas will never possess more vividness than the original brush pattern image itself. The base color and the selected drawing color modify the hue and potentially saturation/brightness relative to the original pattern, but they cannot enhance the inherent qualities beyond what was initially defined in the pattern.
Advanced Techniques for Glitch Brushes
The principles of color brush patterns, base colors, and hue manipulation are particularly powerful when creating "glitch" effects. Glitch art intentionally uses digital errors, distortions, and visual artifacts to create striking imagery. In ibisPaint, this can be achieved by creating brush patterns that are intentionally fragmented, pixelated, or have repeating elements that are subtly offset or color-shifted.
For instance, you could create a brush pattern that consists of several slightly misaligned copies of a simple shape, each with a different color. When used with a base color and then a different drawing color, these misalignments and color differences can create a visually chaotic and "glitchy" appearance.
Another approach involves using textures that mimic digital noise or static. By combining a glitchy brush pattern with a suitable texture, you can achieve a more convincing digital distortion effect.
Experimentation is key. Don't be afraid to try unconventional shapes for your brush patterns. Think about repeating geometric shapes, fragmented text, or even abstract noise patterns. The more unexpected the pattern, the more unique the glitch effect can be.
Consider the implications of the [Blurring Shape] setting. A sharp, hard-edged blurring shape might produce a more defined glitch artifact, while a softer, more feathered shape could lead to a more diffused or "bleeding" glitch effect.
Practical Considerations and Tips for Glitch Brush Creation
When aiming for a glitch effect, consider the following:
- Layering is Your Friend: Even with a complex custom brush, layering is essential for advanced glitch art. You can use multiple glitch brushes, combine them with other brush types, and apply layer modes (like 'Add' or 'Screen') to achieve unique visual outcomes.
- Experiment with Color Palettes: The interaction between your brush pattern's base color and the selected drawing color is paramount. Try using complementary colors, or colors that are far apart on the color wheel, to create more pronounced glitch effects.
- Distortion and Displacement: While ibisPaint doesn't have direct "glitch" filters for brushes, you can simulate these effects. Consider drawing your brush pattern with elements that appear "broken" or "displaced." For example, a line that seems to jump or a shape that is partially cut off.
- Subtlety Can Be Effective: Not all glitch art needs to be overtly chaotic. Sometimes, a subtle shift in color or a slight misalignment in a repeating pattern can add a sophisticated digital edge to your artwork without overwhelming it.
- Save Iterations: As you experiment, save different versions of your custom brushes. You might discover that a particular iteration, even if not exactly what you initially intended, can be a fantastic starting point for a different kind of effect.
- Embrace Imperfection: The essence of glitch art is often the embrace of digital errors and imperfections. Don't strive for perfect symmetry or flawless rendering in your brush patterns if your goal is a glitch effect. Deliberate "mistakes" can be the source of your most compelling results.
By meticulously understanding and manipulating these settings, artists can move beyond the standard brush library and craft truly unique digital tools that bring their artistic visions to life, whether it's for subtle textural enhancements or bold, eye-catching glitch effects. The power to define your own artistic language lies within the custom brush creation tools of ibisPaint.