Digital photography offers an unparalleled advantage in its ease of manipulating and refining images. Gone are the days of relying on physical tools like craft knives and glue sticks for image correction. Today, a powerful software like Adobe Photoshop CC provides the means to effortlessly remove unwanted elements, transforming a good photograph into a great one. Whether it's a distracting photobomber, an unsightly pole in an otherwise perfect background, or simply an ex-partner you wish to purge from your digital memories, Photoshop offers a suite of tools to achieve these corrections with remarkable ease. This article delves into various effective methods for removing unwanted elements, catering to a wide range of skill levels, from novice users to seasoned professionals.
The Swift Brush: A Direct Approach to Object Removal
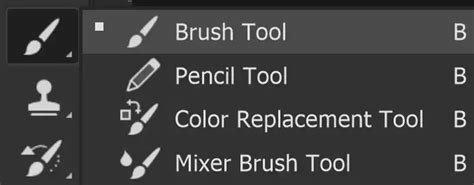
One of the most immediate and straightforward techniques for eliminating an unwanted object is akin to painting over it in the real world. This method, best suited for simpler backgrounds, involves selecting the Brush Tool. The key to success here is to sample the background color adjacent to the object you wish to remove. This is achieved by using the Eyedropper Tool, which allows you to pick up the precise color from your image. Once the background color is sampled, you can then "plaster" it over the unwanted element with the Brush Tool. While this approach might feel surprisingly simple, its effectiveness in many scenarios is undeniable.
The Spot Healing Brush: Tackling Smaller Imperfections with Ease
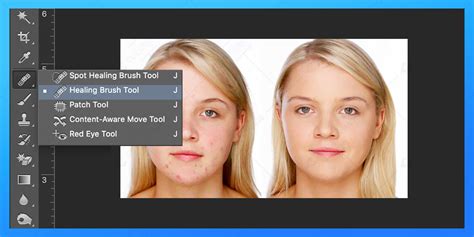
When dealing with smaller blemishes or minor distractions, the trusty Brush Tool might not always suffice. In such instances, the Spot Healing Brush Tool becomes an invaluable ally. This intelligent tool simplifies the removal process significantly. You simply paint directly over the element you want to eliminate. Photoshop then intelligently samples the surrounding pixels, analyzing their color, texture, and luminosity to seamlessly blend the corrected area. While the underlying technology might seem complex, the user experience is designed to be remarkably straightforward, making it a go-to tool for quick touch-ups and the removal of minor imperfections.
The Patch Tool: Precision and Control for Targeted Removal
While the Brush Tool and Spot Healing Brush are excellent for many tasks, they can sometimes offer limited user control, particularly when precise results are paramount. For situations demanding a higher degree of precision, the Patch Tool emerges as a superior option. This versatile tool allows you to create a selection around the unwanted object. Once selected, you can then drag this selection to an area of the image that possesses a more desirable texture or color, effectively "patching" over the blemish. Crucially, the Patch Tool also operates in reverse. You can select an area of the image that you wish to replicate and then drag that selection over the unwanted spot. To utilize this reverse functionality, simply switch the mode to "Destination" in the tool's options bar. This dual capability makes the Patch Tool exceptionally flexible for a variety of object removal scenarios.
The Clone Stamp Tool: Mastering the Art of Duplication
The Clone Stamp Tool is a cornerstone of digital retouching, revered by professionals worldwide for its power and versatility. While it may present a slightly steeper learning curve compared to some other tools, mastering it unlocks a vast realm of photo manipulation possibilities. The fundamental principle behind the Clone Stamp Tool is remarkably simple: you define a source area to copy from and then paint over the area you wish to conceal. To initiate this process, you typically hold down the ALT key (or Option key on a Mac) and click on an area of the image you want to duplicate. Once the source is established, you can then paint over the unwanted object. The tool will meticulously copy pixels from the source area to the destination, allowing for precise control over texture, color, and detail. This makes it ideal for reconstructing complex backgrounds or seamlessly replacing elements within an image.
Content-Aware Fill: Photoshop's Intelligent Solution
For a truly "hands-off" approach where Photoshop does the heavy lifting, Content-Aware Fill is an exceptionally powerful feature. This method leverages sophisticated algorithms to analyze the surrounding image content and intelligently fill in the selected area. The process begins by using one of Photoshop's selection tools, such as the Lasso Tool, to create a precise outline around the object you intend to remove. Once the selection is made, you navigate to EDIT > FILL and then select "Content-Aware" from the dropdown menu. Photoshop then analyzes the image, determines what content should logically occupy the selected space based on the surrounding pixels, and automatically fills the gap. This results in a remarkably seamless and natural-looking removal, often requiring minimal or no further refinement.

Generative Fill and Generative Remove: The AI-Powered Frontier
In recent iterations of Photoshop, and particularly with the integration of Adobe Firefly's AI capabilities, object removal has reached new levels of sophistication. Tools like Generative Fill and Generative Remove leverage artificial intelligence to achieve astonishing results.
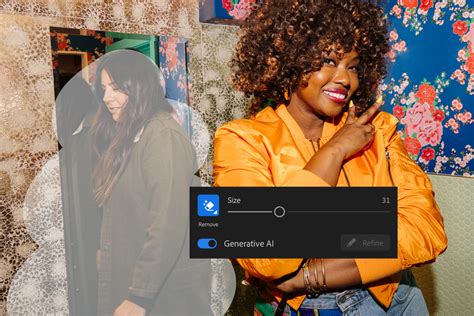
Generative Remove is designed for straightforward object elimination. You simply paint over the unwanted object with a brush, and with a single click of "Generate," the AI analyzes the surrounding image and fills the void with contextually appropriate content. This is particularly effective for removing distractions like power lines, wires, street signs, random logos, watermarks, or stray text. The AI aims to preserve the authentic details of your image while seamlessly erasing the unwanted elements. To use Generative Remove, you typically log in to Adobe Firefly, select the Generative Remove tool from the Quick Actions menu, brush over the area to be removed, and click "Generate." The results can be downloaded, copied, or shared directly.
Generative Fill, while often used for adding elements, also plays a crucial role in object removal by intelligently reconstructing the background. When an object is selected and Generative Fill is applied, it not only removes the object but also analyzes the surrounding context to generate a plausible replacement for the removed area. This is particularly useful for larger or more complex removals where simply cloning or patching might be tedious or produce less convincing results.
Both Generative Remove and Generative Fill are trained on commercially safe datasets, including Adobe Stock and public domain content, ensuring that their use is ethically sound and legally compliant for creative professionals. These AI-powered tools democratize advanced editing, meaning you don't necessarily need extensive design skills to achieve polished, professional-looking results. They significantly streamline the workflow, allowing creators to move from a raw image to a refined product much faster.
Content-Aware Fill vs. Generative AI: Choosing the Right Tool
While Content-Aware Fill has been a powerful tool for years, the advent of Generative AI in Photoshop (like Generative Fill and Generative Remove) offers a complementary, and often more advanced, approach. Content-Aware Fill analyzes the existing pixels in your image to intelligently blend the removed area. It's excellent for maintaining the original texture and color palette.
Generative AI, on the other hand, can go a step further by generating new pixels based on its understanding of what should be there. This can lead to more robust results, especially in complex scenarios where there isn't enough surrounding information for Content-Aware Fill to work with effectively. For instance, if you need to remove a large object from a relatively plain background, Generative AI can create a more convincing reconstruction than Content-Aware Fill might achieve.
However, Content-Aware Fill remains a highly effective and often faster tool for simpler removals or when you want to ensure that the replacement pixels are strictly derived from the existing image data. It's also important to note that sometimes, Photoshop's AI tools might produce unexpected or "wonky" results, and in such cases, reverting to the more predictable Content-Aware Fill or manual cloning can be the better option. The choice between these tools often depends on the complexity of the object being removed, the nature of the background, and the desired level of control and realism.
Photoshop's Content-Aware Fill Feature Explained & Simplified
Practical Applications: Real-World Scenarios
The ability to remove unwanted objects is not merely an aesthetic enhancement; it's a crucial skill that can significantly impact the success of a photograph. Consider a professional portrait session taken in a beautiful outdoor location. A stray piece of litter, an uninvited passerby, or a distracting sign can detract from the subject and undermine the overall quality of the image. Knowing how to use Photoshop's tools allows the photographer to salvage these shots, ensuring that the focus remains squarely on the intended subject.
In landscape photography, power lines, cell towers, or even unsightly trash receptacles can mar an otherwise breathtaking vista. Removing these elements can transform a decent landscape into a truly stunning one. Similarly, in event photography, capturing candid moments often means dealing with cluttered backgrounds. The ability to clean up these backgrounds by removing distracting objects can elevate the emotional impact and clarity of the photograph.
Even for casual photographers, the ability to remove a finger that accidentally crossed the lens, or to eliminate a group of tourists from a vacation photo, can make a world of difference in preserving cherished memories. This skill empowers photographers to present their images in the best possible light, enhancing their creative vision and ensuring that their photographs tell the story they intend to convey.
Understanding the Nuances: When to Use Which Tool
The effectiveness of each tool is highly dependent on the specific image and the nature of the object to be removed.
- Brush Tool (with sampled color): Best for very simple, uniform backgrounds where you can easily sample a clean color and paint over small imperfections. It offers direct control but can look unnatural if the background has texture or variation.
- Spot Healing Brush: Ideal for small, isolated blemishes like dust spots, skin imperfections, or minor scratches. It's automatic and quick.
- Patch Tool: Excellent for removing moderately sized objects with distinct textures or patterns, especially when you can find a clean source area to sample from. It offers a good balance of control and automation.
- Clone Stamp Tool: The most powerful and versatile tool for precise control. It's essential for complex backgrounds, reconstructing details, or when other tools fail. It requires more practice but yields the most professional results.
- Content-Aware Fill: A fantastic automated solution for a wide range of objects, especially when the surrounding area provides sufficient context for Photoshop to analyze. It's often a quick way to achieve good results.
- Generative Remove/Fill: The cutting edge of AI-powered removal. Highly effective for complex removals and when you need the AI to intelligently reconstruct areas. It's fast and can produce remarkable results, especially for removing larger, more integrated elements.
By understanding the strengths and weaknesses of each tool, photographers can make informed decisions, choosing the most efficient and effective method for any given object removal task. This mastery of Photoshop's object removal capabilities is a testament to the power of digital editing in enhancing and perfecting photographic imagery.