Removing the background from an image is a fundamental skill in photo editing, allowing for creative compositing, product showcasing, and general image refinement. Photopea, a free, browser-based photo editor that functions similarly to Photoshop, offers a variety of tools to achieve this, from quick, automated solutions to more precise manual methods. This tutorial will guide you through the most practical techniques for removing backgrounds in Photopea, ensuring professional-looking results with ease.
Understanding Backgrounds in Photography
In image editing, the background refers to the area behind the main subject of a photo. It provides context, depth, and atmosphere to an image but is often altered or removed to enhance the subject's focus. A background can be a simple solid color, a detailed landscape, or a textured pattern. It's important to note that a background is not always static; what is considered a background in one image may be the main subject in another. For example, a scenic beach might be the focus in a landscape photo but serve as the background when highlighting a person in a portrait. Altering a background can dramatically change an image's purpose. A product photographer may remove background distractions to create a clean, professional look for e-commerce. A digital artist may replace a dull sky with a vibrant sunset to add drama to a scene. The complexity of a background also affects how it is removed or replaced. A simple white backdrop is easy to remove, while a busy background with intricate details requires more advanced selection tools.
Photopea's Toolkit for Background Removal
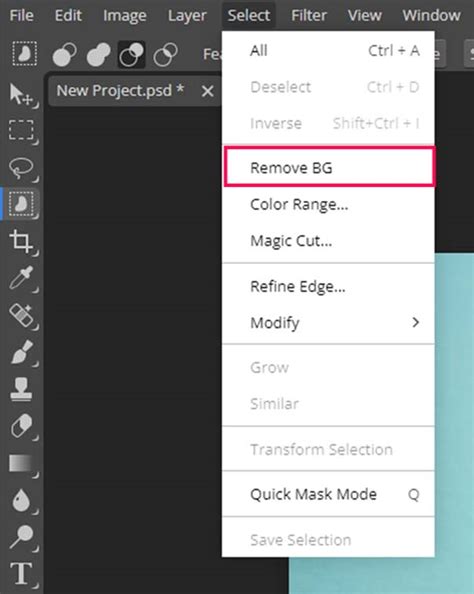
Photopea provides multiple tools to remove background elements effectively. The two most common and powerful are Magic Cut and Removebg, located as options in the "Select" menu. In addition to these, Photopea includes other useful tools like the Magic Wand, Lasso, and Erase tools, each offering different levels of control and automation.
Method 1: Using the Magic Wand Tool
The Magic Wand tool is a classic selection method that allows for more manual control. It can select an area with similar colors. This is particularly useful for images with solid or uniform backgrounds.
Steps to Remove Background with Magic Wand:
- Go to Photopea.com to start a free online photo editor.
- Open your image: Go to File > Open and select the image you want to edit. For demonstration, we will use an image of a tree where we want to remove the sky.
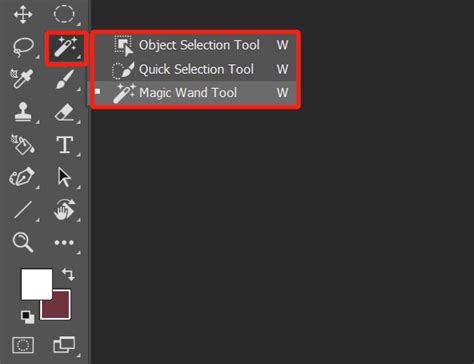
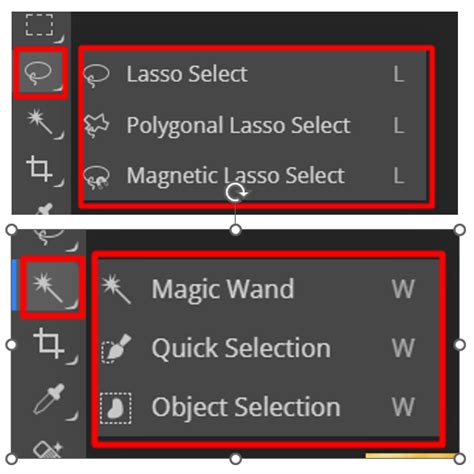
- Select the Magic Wand Tool: Locate the Magic Wand tool in the toolbar on the left.
- Adjust Tolerance: In the top menu, you will find options for "Tolerance" and "Contiguous." Tolerance determines how similar in color the pixels need to be to be selected. A lower tolerance selects fewer colors, while a higher tolerance selects a broader range. Experimenting with this setting is key.
- Click on the background area: Click on the sky area you want to remove. The tool will select contiguous pixels of similar color.
- Combine Selections: If the initial selection isn't complete, hold down the Shift key while clicking on other areas of the background to add them to the selection. Each click without Shift removes the old selection and creates a new one.
- Delete the selected area: Once the background is selected, you can delete it by pressing Edit > Clear in the top menu, or simply pressing the Delete key on your keyboard. If your layer is a Smart Object, you'll need to rasterize it first by going to Layer > Rasterize.
- Observe Transparency: The white and grey squares that appear indicate that the area is now empty or transparent.
- Save as PNG: To preserve the transparency, go to File > Export As > PNG and hit "Save."
Selecting may be hard and can take time, depending on the complexity of the image. The more time you spend refining your selection, the more perfect the result will become.
Method 2: Using Magic Cut
The free Magic Cut tool is a powerful method for semi-automatic and manual background removal in Photopea. It analyzes and attempts to detect edges and then automatically draws a selection.
Steps to Remove Background with Magic Cut:
- Open your image in Photopea.
- Navigate to Magic Cut: Go to Select > Magic Cut.
- Mark areas for selection: A new window will open. Use the green brush to mark areas you want to keep (your subject) and the red brush to mark areas you want to remove (the background). You can adjust the brush size for precision. A single click with a 26px brush is often enough to mark an area for removal. However, using a brush that is too large may cause undesired parts of the image to be selected. Adjusting the brush size carefully ensures precise background removal.
- Refine edges: If the initial result isn't perfect, you can use the red and green brushes to refine the selection. The gray brush can be used to erase any green or red marks when adjustments are needed. If green and red markings touch, the tool may misinterpret the selection, and an error message will be received.
- Preview the selection: Magic Cut allows you to preview the selection with three different background options: Transparent, White, or Black. This setting does not change the final output but helps visualize how the selection will look against different backgrounds.
- Apply changes: Once you are satisfied with the preview, click "OK" to apply the changes.
- Save as PNG: Go to File > Export As > PNG and save your image.
Magic Cut is smart enough to detect what areas need to be removed with minimal input. However, it's not always perfect and may require some practice to master, especially when dealing with complex compositions or fine details like hair or fur. Unlike some selection tools, Magic Cut does not have a built-in way to create straight lines by holding down the Shift key or using other shortcuts. This means that when using a mouse, precise selections require steady hand movement.
Method 3: Using Remove BG
RemoveBG is an automatic background removal tool in Photopea that instantly removes the background without the need for manual selection. It is a powerful and automatic background removal tool.
Steps to Remove Background with Remove BG:
- Open your image in Photopea.
- Access Remove BG: In the top menu, go to Select > Remove BG.
- Automatic Processing: The tool analyzes the image, detects edges, and separates the subject from the background with minimal effort. For images with clear contrast between the subject and background, RemoveBG provides quick and accurate results.
- Save as PNG: Once the background is removed, go to File > Export As > PNG to save your image with transparency.
While RemoveBG can be a useful tool for quick background removal, it's important to note that it may require disabling ad blockers if you are using the free version, as it sometimes relies on advertisements. For images with clear contrast between the subject and background, RemoveBG provides quick and accurate results.
Advanced Techniques and Tips for Refinement
While Photopea's automated tools are powerful, sometimes a combination of methods or extra refinement is needed for the best results.
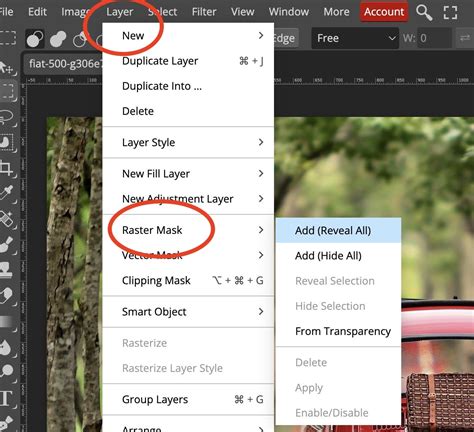
Using Layer Masks
Instead of erasing the background permanently, it's often better to use a layer mask. This is a non-destructive editing technique that allows you to hide parts of a layer without deleting them.
- Create a selection of your subject using any of the methods above.
- Add a Layer Mask: With the selection active, go to the Layers panel and click the "Add Layer Mask" icon (a rectangle with a circle inside). This will hide everything outside your selection.
- Refine the Mask: You can paint on the mask with black to hide more of the layer or with white to reveal parts of the layer. This offers great flexibility if you make a mistake or need to fine-tune the edges.
Manual Refinement with Other Tools
After using an automatic tool, you might encounter background artifacts, which are unwanted remnants of the original background that were not completely removed. These can appear as small patches of color or blurred edges.
- Lasso Tool: For manual selection of areas to remove background details precisely.
- Erase Tool: Allows users to manually remove remaining background elements after an automatic selection. It works by painting over unwanted areas to erase them permanently. The tool's brush settings, such as size, hardness, and opacity, can be adjusted to control the precision of the erasure. Since the Erase tool permanently deletes pixels, it is best used sparingly.
- Zoom In: When dealing with tricky areas like hair, fur, or fine edges, zoom in to at least 200â300%. Use a soft, round brush for smoother results. This extra step makes your cutouts look much more professional.
Adding a New Background
Once you have successfully removed the background and have a transparent image of your subject, you can add a new background.
- Open your background image: Go to File > Open & Place. The image you choose will be placed as a new layer.
- Position the background: Ensure the background layer is below your subject layer in the Layers panel. You can move and resize the background image by dragging its corners. Confirm the size by hitting Enter.
- Resize your subject: To resize your subject, use Alt + Ctrl + T (Windows) or Option + Cmd + T (Mac). Another way is by selecting the Move tool and checking the Transform Controls box. The bounding box will appear, allowing adjustments.
- Blend the subject: To make the composite look natural, consider the lighting and shadows. If your background is blurred, you might want to apply a slight blur to your subject using Filter > Blur > Gaussian Blur. You can also use the Blur Tool on the subject's edges at a low strength (10-20%) to soften them.
20 Photopea Tips and Tricks For BEGINNERS! (2021) - PhotoPea Guide
Alternatives and AI Tools
While Photopea is a powerful free option, there are other tools and services that can assist with background removal, especially when speed and automation are paramount.
Other Online Background Removal Services
Several free online background removal services offer quick and automated ways to remove background elements from an image. These tools use artificial intelligence to analyze the subject and separate it from the background without requiring manual selections. While they can be useful for quick tasks, they may not always provide the highest accuracy, and manual refinements are often needed.
Examples include:
- Erase.bg: A simple, one-click AI background remover that works quickly and efficiently.
- Remove.bg: Another popular AI-powered tool known for its speed and ease of use.
- Pixelbin AI background remover: Offers bulk edits and works through a browser or API.
- Fotor: An all-in-one design platform with an AI background remover.
- PhotoRoom: Popular for e-commerce and social media, offering templates and design features.
AI Tools for Background Removal
AI background removers are hassle-free options delivering fast, clean results in seconds. These are ideal for detailed images, product shots, or bulk tasks, and some also provide limited manual refinement options.
- Pixelbin AI background remover: Claimed to be one of the best for clean, professional background removal in a single click. It's a full image toolkit built for both regular users and businesses needing bulk edits.
- Erase.bg: Probably the simplest tool out there. You donât need any design skillsâjust upload your image, and within seconds the background is gone. Itâs lightweight, super-fast, and works on phones and desktops.
- Fotor: More of an all-in-one design platform than just a background remover. It offers AI-powered background removal and the ability to replace backgrounds with colors, patterns, or custom images.
- PhotoRoom: One of the favorite tools of online sellers and influencers. It doesnât just remove backgroundsâit transforms your photo into a ready-to-use design with stylish templates for e-commerce, ads, or social media.
Conclusion
Removing backgrounds no longer has to feel like a chore. With Photopea, you get a free, browser-based editor that offers a range of methods to suit every project. Whether you're using the quick Remove BG, the semi-automatic Magic Cut, or the detailed Magic Wand, there's a method that fits your needs. When speed is of the essence or for complex images, AI tools can also provide excellent results. Mastering these techniques will allow you to isolate subjects, create compelling composites, and elevate your image editing skills.
tags: #removing #background #photopea