Adding a touch of sparkle to your images can transform them from ordinary to extraordinary. Whether you're aiming for a subtle shimmer or a dazzling cascade of glitter, Photoshop offers a versatile toolkit to achieve these captivating effects. This tutorial will guide you through various techniques to create photo sparkles, make images glittery, and apply dynamic sparkle overlays, catering to both beginners and experienced users.
Establishing the Foundation: Creating a Sparkle Canvas
Before diving into the intricacies of sparkle generation, it's crucial to set up the right environment within Photoshop. This involves creating a new document and a foundational layer that will serve as the canvas for your glittering creations.
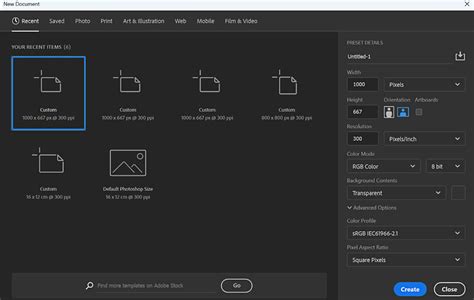
Begin by opening Photoshop and navigating to File > New. This action will prompt you to set up your canvas dimensions, resolution, and color mode. For most web-based applications, a resolution of 72 pixels per inch (PPI) is sufficient, while print work may require 300 PPI or higher. Select your desired color mode, typically RGB Color for digital displays.
Once your canvas is ready, the next step is to create a new layer. This can be achieved by clicking the "New Layer" button at the bottom of the "Layers" window, typically represented by an icon resembling a folded page. This new layer will be the primary space for constructing your sparkle elements.
To establish a dark base that will allow the sparkles to pop, select the Paint Bucket Tool (G). Ensure your foreground color is set to black, and then click anywhere on this newly created layer to fill it entirely with black. This black background is instrumental in making the subsequent sparkle effects visible and impactful.
Generating the Core Sparkle Elements
The heart of any glitter effect lies in the creation of the sparkle particles themselves. Photoshop provides several methods to generate these, ranging from procedural filters to imported textures.
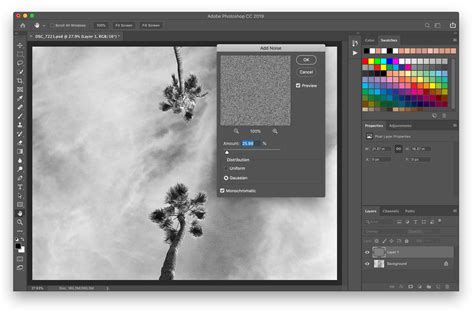
One effective method begins with applying a noise filter. With your black-filled layer selected, navigate to Filter > Noise > Add Noise. This filter introduces random speckles of color to your layer, forming the initial granular structure of your sparkles. Adjust the slider to control the intensity of the noise; a moderate amount is usually sufficient to start.
Following the noise application, a Curves adjustment layer is essential for refining the distribution and visibility of these initial speckles. Go to Layer > New Adjustment Layer > Curves. In the Curves dialog box, you'll see a diagonal line representing the tonal range. To enhance the contrast and make individual "sparkles" more defined, drag both ends of this curve towards the "hill" or peak in the background. This action effectively darkens the image while increasing the brightness of the brighter pixels, making the noise more distinct.
To further refine the sparkle shapes and prevent them from appearing too uniform, a Gaussian Blur can be applied. Select the noise layer and go to Filter > Blur > Gaussian Blur. A subtle blur can soften the edges of the noise, creating a more organic sparkle appearance. The exact radius will depend on the initial noise settings and desired effect.
Isolating and Manipulating Sparkles
With the base sparkle structure generated, the next phase involves isolating these elements and preparing them for placement onto your target image. This often involves leveraging Photoshop's channel-based selections and layer manipulation techniques.
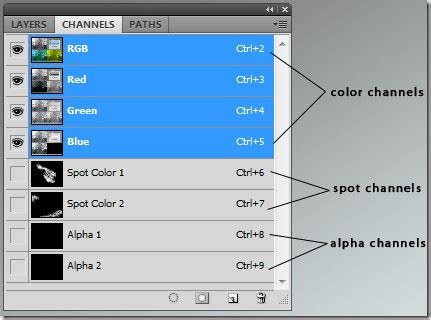
Navigate to the "Channels" tab, usually located alongside the "Layers" and "Paths" panels. Hold down the Control key (or Command on Mac) and click on any of the RGB channel thumbnails. This action creates a selection based on the luminance values of that channel, effectively selecting the brightest areas of your sparkle layer.
Return to the "Layers" tab. Create a new layer and fill it with white. If you then delete the lower, black-filled layer, you’ll observe that the black background has been removed, leaving only the selected sparkle elements on a transparent background.
To create variations in sparkle size and intensity, duplication and further filtering are employed. Duplicate the layer containing your isolated sparkles by pressing Control-J (or Command-J on Mac). Apply a Filter > Blur > Motion Blur to this duplicated layer. This will create a streaked or elongated effect, simulating motion. Adjust the angle and distance to achieve different motion blur appearances. Duplicate this layer again and apply Motion Blur with a longer smudge, and repeat the process once more with an opposite angle to introduce directional variation.
These layers, representing different sizes and motion characteristics of your sparkles, can then be grouped for better organization. Select all the sparkle layers by holding Shift and press Control-G (or Command-G on Mac) to create a group. Name this group "Big Sparkles."
To add a touch of organic randomness, you can apply the Filter > Render > Clouds filter to this group. This can introduce subtle variations in density and tone, making the sparkles appear more natural.
For a more complex and layered sparkle effect, duplicate the entire "Big Sparkles" group. Right-click the duplicated group and select "Merge Group." Then, right-click on the resulting layer's mask and select "Apply Layer Mask" to consolidate the effect.
Incorporating Smaller Particles for Dynamic Effects
A truly dynamic sparkle effect often requires a blend of larger, more prominent sparkles and finer, more numerous particles. This layering adds depth and realism.
To introduce these smaller particles, you can utilize previously created merged layers. Show the second merged layer you created at the beginning of the process. Make this layer twice as large as your original canvas by using the transform tools (Edit > Free Transform). Remove its black background using the same method as before: by creating a selection based on the channels and then filling a new layer with white, or by using blend modes and masks.
To ensure consistency in the masking of these smaller particles, you can drag and drop the Layer Mask from your "Big Sparkles" group onto the "Small Sparkles" layer. This transfers the masking shape, ensuring a cohesive appearance.
Further refinement of the smaller particles can be achieved with a Filter > Blur > Lens Blur. This filter can introduce a pleasing out-of-focus effect, mimicking how smaller particles would appear in the background. Duplicate this "Small Sparkles" layer and make it four times larger than the original canvas, effectively filling the frame with a denser concentration of smaller, blurred particles.
Achieving Visibility and Applying the Effect to Photos
At this stage, the Photoshop sparkle effect is largely constructed, but it might be invisible or less impactful on a light-colored background. To rectify this, a simple yet crucial step involves adding a solid black layer at the very bottom of your layer stack.
Add a Layer Mask to this black layer. Using a soft black brush, paint over the middle section of the mask. This will reveal the black background only where needed, allowing the sparkles to be seen against it. This technique ensures that your sparkle overlay effect is clearly visible and stands out.
To apply this meticulously crafted sparkle overlay effect to any photograph, open your desired image in Photoshop. Then, go to File > Place Linked (or File > Place Embedded if you prefer). Navigate to and select the file containing your sparkle effect. Resize it to your needs using the transform tools, ensuring it fits seamlessly over your photo. Adjust the blend mode of the sparkle layer to achieve different looks; "Screen" or "Add" are often excellent choices for making light-based effects like sparkles appear naturally.
Advanced Techniques and Alternative Methods
Beyond the procedural generation of sparkles, Photoshop offers other powerful tools and pre-made assets to achieve glittery results.
Photoshop Actions for Instant Sparkles
For those seeking to expedite the process, premium sparkle Photoshop Actions are available from platforms like Envato Elements. These actions are pre-recorded sets of commands that, when played, automatically generate complex sparkle effects.
To use such an action, you typically need to:
- Install the Action: In Photoshop, go to
Window > Actionsto open the Actions panel. Click the menu icon in the top-right corner of the panel and select "Load Actions." Navigate to your downloaded.atnfile and load it. - Prepare Your Image: Open the photo you wish to enhance.
- Play the Action: Select the sparkle action from the Actions panel and click the "Play" button.
Many actions allow for customization, enabling you to control the intensity, color, and type of sparkles. Some actions can even create animated light effects, suitable for social media videos or GIFs. You can often turn your photo into a glitter effect, create a trendy Photoshop dispersion effect, or add a dust particle effect with a single click after painting over selected areas. These professional actions can create stunning animated light effects with numerous customization options.
Sparkle Brushes for Artistic Control
Another accessible method involves using specialized sparkle brushes. These brushes can be loaded into Photoshop's brush library and allow you to "paint" sparkles directly onto your image.
To load a custom brush:
- Open the Brushes Panel: Go to
Window > Brushes. - Load Brushes: Click the menu icon in the top-right corner of the Brushes panel and select "Import Brushes." Navigate to your downloaded brush file (often
.abr) and select it.
Once loaded, select the brush tool (B). Choose your sparkle brush from the panel. You can then adjust the brush size, color, and opacity to paint sparkles onto a new layer. Some sparkle brushes offer a scattered effect that can be applied generously, while others provide more defined starbursts.
For a more textured glitter effect, you can create custom glitter patterns. This often involves generating a base pattern with noise and blur, then defining it as a pattern in Photoshop (Edit > Define Pattern). This pattern can then be applied to layers or text using a Pattern Overlay layer style.
Ombre and Gradient Glitter Effects
For a more sophisticated and visually interesting glitter, consider creating ombre or gradient glitter textures. This technique involves using gradients to color your sparkle base.
- Create a Base Glitter Layer: Follow the initial steps of generating noise and applying blur to create a granular texture.
- Apply a Gradient: Use the Gradient Tool (
G) to apply a gradient over this layer. Choose a gradient from Photoshop's defaults or create your own. The "Spectrum" gradient is an example that offers a wide range of colors. - Adjust Blend Mode: Change the layer's blend mode to "Color." This applies the gradient's hue and saturation to the underlying sparkle texture, creating a colorful, gradient glitter effect. For a more nuanced look, experiment with different layer blend modes and more complex gradient configurations.
This technique is particularly effective for text effects, backgrounds, and decorative accents, adding a touch of excitement and visual appeal.
Integrating Sparkles with Existing Images
When applying sparkle effects to an existing photograph, several considerations can enhance the final result.
Color Matching and Harmony
To create a cohesive look, try to match the color of your glitter textures to elements within the photo. Use adjustment layers like Hue/Saturation to fine-tune the color of your sparkle layers. This ensures that the added glitter doesn't feel out of place.
Selective Application and Masking
Not every part of an image needs to sparkle. Use selection tools like the Lasso Tool to isolate areas where you want the glitter to appear, such as on clothing, hair, or accessories. Convert these selections to Layer Masks to precisely control the visibility of your sparkle layers. Don't worry about making overly precise selections initially, as layer masks are easily cleaned up. This approach allows you to exaggerate the effect for an eye-catching style.
Using Smart Objects for Non-Destructive Editing
When applying filters like Levels or Hue/Saturation to your glitter textures, consider converting them to Smart Objects first (Layer > Smart Objects > Convert to Smart Object). This allows you to apply adjustment layers as Smart Filters, which can be edited or removed at any time without permanently altering the original pixel data. This non-destructive workflow offers greater flexibility during the editing process.
Blending Modes for Natural Integration
The choice of blend mode for your sparkle layers is critical for their integration with the underlying photograph. While "Screen" and "Add" are common for bright effects, exploring other modes like "Linear Dodge (Add)" can create even more intense and luminous sparkles. Experimentation is key to finding the blend mode that best suits your image and desired aesthetic.
Considerations for Different Photoshop Versions
It's important to note that Photoshop's interface and features can vary slightly between versions. For instance, if you are using Photoshop CC, you might need to install legacy patterns to access certain default patterns used in some tutorials. Similarly, the location of specific tools or options might change with software updates. Always refer to your specific version of Photoshop's documentation or online resources if you encounter any discrepancies.
For instance, the "Web" pattern mentioned in one method might not be present in all versions. In such cases, you can define your own patterns by creating a small tile with the desired texture and then using Edit > Define Pattern.
When using adjustment layers, be aware that they are non-destructive. This means you can always go back and modify their settings. If you are adding text or shapes, remember that you will likely need to rasterize them before applying certain filters or effects, which makes them uneditable as text or vector shapes afterward.
Expanding the Sparkle Effect Toolkit
The techniques discussed here are foundational, but the possibilities for sparkle creation in Photoshop are vast. You can modify these methods to create a wide array of other photo effects. For example, the principles of noise and blur can be adapted to create convincing snow effects, soft bokeh backgrounds, or atmospheric dust particles.
The core idea is to understand how to generate textured elements, control their distribution and visibility through masks and selections, and blend them harmoniously with your base image. Whether you're a hobbyist looking to add a magical touch to personal photos or a professional designer seeking to create stunning visual assets, mastering these Photoshop sparkle techniques will undoubtedly elevate your creative output.