Photoshop, a powerhouse in digital imaging and graphic design, offers an extensive array of tools and functionalities. To truly harness its capabilities and streamline your workflow, understanding and customizing keyboard shortcuts is paramount. This article delves into the intricacies of how to change Photoshop shortcuts, offering insights into efficient type manipulation, font management, and overall productivity enhancement. By personalizing shortcuts for the tools and actions you use most often, you can work more efficiently and keep your focus on the creative process.
The Foundation: Understanding Photoshop's Shortcut System
At its core, Photoshop's shortcut system is designed to provide quick access to commands and tools. While default shortcuts are in place, their effectiveness can be significantly amplified through customization. This allows users to tailor the software to their individual working habits, leading to a more intuitive and faster creative experience. The ability to create custom keyboard shortcuts in Photoshop is a valuable skill that can significantly speed up your workflow.
Navigating the Keyboard Shortcuts and Menus Dialog Box
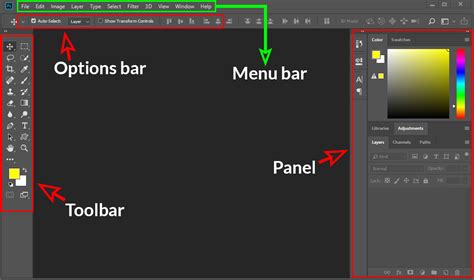
To begin customizing, you’ll need to open the Keyboard Shortcuts and Menus dialog box. This is achieved by navigating to Edit > Keyboard Shortcuts… in the top menu bar. This action will reveal a window that displays all the existing shortcuts for application menus, panel menus, and tools. Within this dialog, you can both create new shortcuts and modify existing ones, offering a comprehensive control panel for your workflow.
Modifying Existing Shortcuts and Creating New Ones
Within the Keyboard Shortcuts and Menus dialog box, the process of customization is straightforward. First, locate the command you wish to modify or assign a shortcut to. For instance, if you want to create a shortcut for "Convert to Smart Object," you would navigate to the Layer menu section, find Smart Objects, and then select the "Convert to Smart Object" entry. Once the desired command is highlighted, simply press the key combination you intend to use. A helpful rule of thumb suggested by many experienced users is that employing Shift + Option + Command + a letter (or Shift + Alt + Control + a letter on a PC) often yields an available and intuitive key combination.
Preserving Your Customizations: Saving and Loading Shortcut Sets
After you've meticulously customized your shortcuts to match your workflow, it's crucial to save these preferences. Within the same Keyboard Shortcuts and Menus dialog box, you'll find a save icon, typically resembling a floppy disk. Clicking this icon allows you to save your custom set as a file on your computer. This feature is invaluable, as it enables you to easily load your personalized shortcuts onto a new computer or share them with colleagues, ensuring consistency across different workstations. Furthermore, for documentation or reference purposes, you can generate a summary of all your shortcuts by clicking the "Summarize…" button.
Reverting to Defaults and Deleting Shortcuts
Should you decide to revert to the original keyboard shortcut for a specific command, or if you wish to remove a custom shortcut altogether, the dialog box provides these options. If you change your mind and want to use the original keyboard shortcut (assuming one existed), simply click "Use Default." If you decide you no longer want a shortcut assigned to a particular command, the "Delete Shortcut" option is available for removal.
Advanced Type Manipulation and Font Management Shortcuts
Beyond general tool shortcuts, Photoshop offers specialized shortcuts for enhancing your typography work. These can significantly improve the precision and speed with which you handle text.
Font Styles and Type Editing
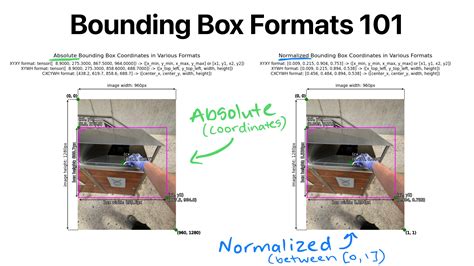
If a font "family" (such as Myriad or Minion) has a font "style" (like Bold or Italic), specific keyboard shortcuts can be employed to change the font style directly. When actively editing type, you can resize the type by Command-dragging (on Mac) or Control-dragging (on Windows) the anchor points of the bounding box.
The Move Tool Toggle and Type Layer Creation
Positioning the cursor slightly outside of the Type's bounding box temporarily toggles the icon to the Move tool. This handy trick allows for quick adjustments without having to switch tools manually. Furthermore, Shift-clicking the Type tool in the image area provides a method to create a new type layer, especially useful when you are working close to another type block. Adding the Shift key to this action prevents Photoshop from auto-selecting nearby text, which can be incredibly helpful when an image contains several type layers in close proximity.
Understanding Point Type vs. Paragraph Text
Simply clicking with the Type tool initiates "Point Type," which creates lines of type that must be manually broken with the Return key to wrap. For more structured text, "Paragraph Text" is created by clicking and dragging to define a text box.
Leveraging the Adobe Single-line and Every-line Composer
The overall "look and feel" of justified text can be vastly improved by calculating the justification settings based on more than one line of text in a paragraph, as opposed to setting each line individually. To toggle between the Adobe Single-line and Every-line Composer for paragraph text, use the shortcut: Command + Option + Shift + T (Mac) | Control + Alt + Shift + T (Win). This allows for more sophisticated text alignment.
Composition Composer NOT WORKING!! FIX 2022 | Photoshop NOT Working Explained | Creating NFT Live
Warping Text and Path-Based Typography
To warp multiple layers of text as a single unit, the most efficient method is to select the layers and convert them into a single Smart Object. Subsequently, you can apply the warp transformation via Edit > Transform > Warp.
When working with type that needs to follow a specific shape, you can utilize either the Shape tools or the Pen tool to create a path. It's important to remember that the type you add will flow in the direction that the anchor points were added to the path. However, it's worth noting that the text might flow in the opposite direction than anticipated, requiring a slight adjustment in path creation.
Font Management with Adobe Fonts Auto-Activation
Adobe Fonts are designed for seamless integration into your Photoshop workflow. They are automatically activated when you open a Photoshop document. This means that if a document contains Adobe Fonts that are not installed on your machine, Photoshop will automatically find, download (sync), and install these fonts. This feature eliminates the need to deal with missing font dialogs and the manual selection and relinking of fonts.
When you first open a file, you might notice the familiar yellow warning icon on offending Type layers in the Layers panel, indicating an uninstalled font. Adobe Fonts auto-activation will then commence, and you'll see a blue download-in-progress icon as your missing font starts downloading. This ensures that your documents always display correctly, regardless of whether you have the fonts locally installed.
Harnessing OpenType Features: Stylistic Sets
When working with OpenType fonts, you gain access to advanced features like Stylistic Sets. These sets make it easier to apply a font's alternate characters. For example, you can substitute a more decorative glyph for a standard "g" with a simpler one. It's important to understand that stylistic sets are a character-level attribute. Therefore, selected sets (Sets 1-20) are maintained even if you switch fonts. For instance, if "Set One" is applied for a specific font to display a simplified lowercase "g," and you then choose another font where "Set One" is defined as Swash Caps, the Swash Caps will be applied, and the simplified "g" will be removed.
Anti-Aliasing for Consistent Type Rendering
To ensure that text rendered in Photoshop matches its appearance in web browsers across different operating systems, Photoshop offers several anti-aliasing options. By selecting the Type tool and choosing the appropriate font matching option (MAC or MAC LCD on Macintosh, Windows or Windows LCD on Windows) from the Options bar, or through the application menu (Type > Anti-Alias), you can achieve consistent text rendering that looks the same as it would on their respective operating systems.
Leveraging Styles for Efficient Typography
Styles in Photoshop provide a powerful way to manage and apply consistent formatting to your text.
Paragraph and Character Styles
Video tutorials, such as "Paragraph and Character Styles in Photoshop CS6" by Julieanne Kost, demonstrate the creation and application of Paragraph and Character styles. These styles enable you to apply formatting to selected characters, lines, or entire paragraphs with a single click, saving considerable time and ensuring visual consistency.
Default Type Styles
Another valuable resource is the video tutorial "Julieanne’s 5 Favorite Features in Photoshop 13.1," which explains how to set Default Type styles in Photoshop. By choosing "Save Default Type Styles" from the Type menu, you can replace your existing default type styles or create them if they don't exist. Once defined, these default type styles are automatically loaded into any new document you create. If you open an existing document without any defined styles, Photoshop will automatically load your default set. However, if an existing document already has type styles defined, Photoshop will not load the default set automatically; you would need to load them manually.
Loading Default Type Styles Manually
If you choose "Load Default Type Styles," it will append the default styles to any type styles already present in the document. An important caveat is that if a type style with the same name already exists, Photoshop will not load that specific default type style. After loading default styles into a document, they are saved with that document, ensuring they are retained for future use within that specific file.
Conclusion: Your Workflow, Your Shortcuts
Mastering Photoshop's shortcut customization is not merely about memorizing key combinations; it's about fundamentally optimizing your workflow for efficiency and creativity. By understanding how to modify existing shortcuts, create new ones, and leverage specialized type and style shortcuts, you empower yourself to work faster, more precisely, and with greater creative freedom. The provided information and resources offer a solid foundation for beginning your journey into personalized Photoshop shortcuts, allowing you to "cheat yourself from time to time" by having all the essential commands readily accessible.