Creating captivating sparkle and glitter effects in Adobe Photoshop is an art form that can elevate designs from ordinary to extraordinary. Whether you aim to add a touch of magic to portraits, enhance text for logos and invitations, or craft enchanting scenes, understanding the nuances of Photoshop brushes, layer styles, and overlays is key. This tutorial delves into the creation of custom sparkle brushes, the application of glitter textures, and the generation of dynamic sparkle trails, providing a detailed guide for users of all skill levels.
The Foundation: Understanding Sparkle and Glitter in Digital Art
Sparkle and glitter effects evoke a sense of wonder, festivity, and glamour. Historically, achieving such visual effects in traditional art involved meticulous application of reflective materials. In the digital realm, Photoshop offers a versatile toolkit to replicate and even surpass these natural phenomena. The absence of a built-in "sparkle" or "glitter" brush in Photoshop underscores the importance of custom creation and the power of user-defined assets. These custom brushes act as unique tools for adding flares, lights, and an atmospheric quality to images, mimicking everything from fireflies on a summer night to the glint of distant stars.

The core principle behind Photoshop brushes is their definition based on grayscale values. White areas translate to 0% opacity, black areas to 100% opacity, and shades of gray fall within the spectrum of visibility. This grayscale foundation allows for the creation of intricate brush shapes that can then be manipulated with color and dynamic settings to produce stunning visual outcomes.
Crafting Your Own Sparkle Photoshop Brushes
Creating custom sparkle brushes in Photoshop is a fundamental skill for achieving unique and personalized effects. This process involves leveraging Photoshop's built-in brushes and defining new brush presets.
Creating a Basic Sparkle Brush
To begin crafting a sparkle brush, start with a new Photoshop document. A square document, such as 200x200 pixels, with a white background is ideal. This white background ensures that the brush itself is invisible, allowing only the drawn elements to form the brush shape.
- Set up the Document: Create a new document (File > New) with dimensions of 200x200 pixels and a white background.
- Draw a Base Shape: Select the Line Tool (U) and, while holding down the SHIFT key to ensure a straight line, draw a horizontal line across the canvas. Rasterize this line layer. Merge the line layers if multiple were created.
- Add Detail: Create a new layer above the line and use the Brush Tool (B) to draw a central point or a small star shape within the line's area. This central element will form the core of your sparkle.
- Define Brush Preset: With your shape complete, navigate to Edit > Define Brush Preset. Give your new brush a descriptive name, such as "Basic Sparkle."
This basic brush can then be refined. For more complex sparkles, you can combine multiple shapes, such as a star with a circle, and utilize layer styles like Outer Glow, Inner Glow, and Stroke to add depth and dimension. Remember to set the fill of any shape layers to 0% before applying layer styles to ensure the fill itself doesn't obscure the effect.
Advanced Sparkle Brush Creation
For more intricate and dynamic sparkle brushes, consider using a combination of Photoshop's default brushes. For instance, the "Star 70 Pixels" brush can provide a good starting point for star-like elements. Loading additional brush sets, such as "Round Brushes with Size" or "Assorted Brushes," can introduce softer airbrush-like qualities or more varied starburst shapes.
When creating your brush, aim to use black as your drawing color. The grayscale definition means that black will render as fully opaque. Experiment with different brush combinations and placements to create unique patterns. Once satisfied with the arrangement of your sparkle elements on the canvas, define this composite as a new brush preset.
Adjusting Brush Settings for Dynamic Effects
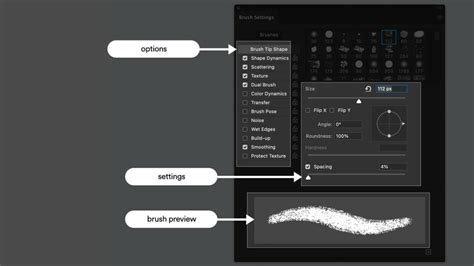
Simply defining a brush preset is only the first step. To achieve dynamic sparkle trails and varied scattering, you must adjust the brush settings in the Brush Settings panel (Window > Brush Settings).
- Shape Dynamics:
- Size Jitter: Controls the variation in the size of individual brush marks.
- Control (Size Control): Setting this to "Fade" causes the brush size to gradually decrease as you paint a stroke, creating a tapering effect ideal for trails. The "Steps" value determines how quickly this fade occurs.
- Angle Jitter: Randomizes the rotation of the brush tip, crucial for creating natural-looking sparkles that aren't all uniformly oriented. Setting this to 100% ensures maximum variation.
- Scattering:
- Scatter: Increases the spread of the brush marks around the cursor's path.
- Count: Determines the number of brush marks generated per dab.
- Spacing: This setting controls the distance between individual brush dabs along a stroke. Increasing spacing can create longer, more spaced-out trails.
- Opacity Jitter: Introduces variations in the opacity of individual sparkles, adding depth and realism.
By carefully adjusting these settings, you can transform a static brush into a tool capable of generating complex and visually appealing sparkle trails.
Applying Glitter Textures and Overlays
Beyond custom brushes, Photoshop offers powerful ways to apply glitter textures and overlays to images and text, adding instant glamour and polish.
Using Glitter Overlays
Glitter overlays, often provided as PNG files with transparent backgrounds, are a convenient way to add sparkle without creating brushes from scratch. These overlays come in various colors, including gold, rose gold, silver, pink, blue, purple, and green, ensuring a perfect match for any project.
- Place the Overlay: Open your image or text in Photoshop. Go to File > Place Linked and select your desired glitter overlay.
- Position and Scale: Position and scale the overlay to fit your needs.
- Blend Modes: Experiment with different blend modes in the Layers panel. "Screen" is often effective for light-based effects like glitter, as it hides black and reveals lighter pixels. "Overlay" or "Soft Light" can also produce good results, blending the texture with the underlying image.
- Masking and Refinement: Use a Layer Mask to selectively apply the glitter effect to specific areas of your image or text. Tools like the Lasso Tool or Quick Selection Tool can help create initial selections, which can then be refined with the Layer Mask.
Applying Glitter to Text
Achieving a glossy, glittery text effect often involves a combination of layer styles and textures.
- Create Text: Type your desired text using a suitable font.
- Layer Styles: Double-click the text layer to open the Layer Style dialog box. Apply effects such as:
- Gradient Overlay: Use a metallic or rainbow gradient to give the text a base shimmer.
- Bevel & Emboss: Adds depth and highlights.
- Stroke: Defines the edges of the text.
- Drop Shadow: Provides separation from the background.
- Glitter Texture: Place a glitter texture image (as described above) above your text layer.
- Clipping Mask: Create a clipping mask (Layer > Create Clipping Mask or Alt+Click between layers) to confine the glitter texture to the shape of your text.
- Adjustments: Use adjustment layers (e.g., Levels, Hue/Saturation) as clipping masks to fine-tune the color and intensity of the glitter. For instance, using Levels allows you to adjust the highlight and shadow intensity of the glitter texture.
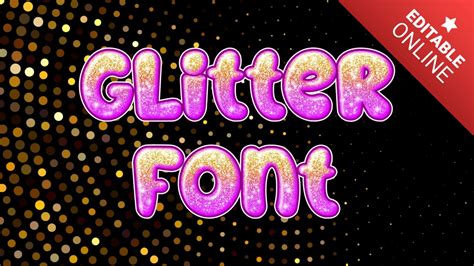
Create an Easy Gold Glitter Text Effect in Photoshop
Creating Sparkle Effects with Actions
Photoshop Actions are powerful tools for automating repetitive tasks, and they are particularly useful for applying consistent sparkle effects quickly.
Sparkle Effect Actions
Many tutorials and resources offer pre-made Photoshop actions designed to apply various sparkle effects. These actions can range from subtle shimmers to dramatic bursts of light. Simply loading and playing an action can transform an image or text in seconds.
To create your own sparkle effect action:
- Start Recording: Open the Actions panel (Window > Actions) and click the "Create new action" button. Give your action a name and click "Record."
- Perform Steps: Apply your desired sparkle effects using brushes, layer styles, or overlays.
- Stop Recording: Once you have achieved the desired effect, click the "Stop playing/recording" button in the Actions panel.
Now, you can apply this action to other images with a single click, ensuring consistency across your projects. Some actions are specifically designed to create animated GIFs, adding a dynamic sparkle trail to your designs.
Advanced Techniques and Applications
The application of sparkle and glitter effects extends to various creative endeavors, from portrait enhancement to creating unique digital art.
Creating a Sparkle Trail
To create a dynamic sparkle trail, youâll need a custom sparkle brush (as detailed earlier) and careful adjustment of brush settings.
- Create Sparkle Brush: Follow the steps to create a custom sparkle brush.
- Set Brush Dynamics: In the Brush Settings panel, configure Shape Dynamics (Fade, Jitter) and Scattering to control the brush's behavior. Set the Foreground color to white.
- New Layer: Create a new, blank layer above your image to house the sparkle trail.
- Paint the Trail: Position your brush cursor at the source of the desired trail (e.g., a magic wand). Click and drag to paint the trail, observing how the brush fades and scatters. Use keyboard shortcuts ( '[' and ']' ) to adjust brush size on the fly.
- Refine and Enhance: Undo (Ctrl+Z or Cmd+Z) and repaint if necessary. Duplicate the sparkle trail layer and apply a Gaussian Blur filter (Filter > Blur > Gaussian Blur) to create a soft glow. Add an Outer Glow layer style to this blurred layer for further enhancement and color.
Vector Sparkle Portraits in Illustrator
While this tutorial focuses on Photoshop, it's worth noting that similar effects can be achieved in Adobe Illustrator, particularly for creating vector graphics. A detailed sparkle texture tutorial in Illustrator might involve creating custom vector shapes for sparkles, rendering flawless skin tones, and crafting hair using brushes, all while incorporating a generous amount of glitter.
Utilizing Pre-made Resources
For those seeking immediate results or inspiration, a vast array of premium and free resources are available:
- Envato Elements: Offers unlimited access to glitter effect Photoshop add-ons for a monthly fee, including brushes, overlays, and styles.
- Creative Market: Hosts a wide selection of glitter and confetti toolkits, often created by talented designers, providing actions, layer styles, and brushes.
- Freebies: Many websites and designers offer free Photoshop brushes, overlays, and actions. These are excellent for experimenting and getting accustomed to using such assets.
These resources can significantly speed up the design process and provide professional-quality results, whether you need a subtle shimmer for a photograph or a dazzling glitter effect for a holiday flyer.
Conclusion: Unleashing Your Creative Sparkle
Mastering Photoshop brushes and glitter effects opens a world of creative possibilities. From crafting custom brushes that offer unparalleled control to applying pre-made overlays and actions for quick enhancements, the tools and techniques are diverse. Whether you are aiming to add a touch of enchantment to portraits, design eye-catching text effects, or create whimsical scenes, the principles of understanding brush dynamics, utilizing layer styles, and leveraging available resources will empower you to achieve the best sparkle and glitter effects imaginable. The ability to create these effects from scratch or to efficiently apply them using existing assets ensures that your designs will possess that coveted magical glow.