Creating repeating patterns, often referred to as seamless or repeat patterns, is a fundamental skill for graphic designers, surface designers, and anyone looking to add a professional touch to their digital creations. Photoshop offers powerful tools that make this process accessible to everyone, from beginners to seasoned professionals. This tutorial will guide you through the essential steps to design, define, and implement your own repeating patterns, ensuring a flawless, infinite repeat without visible seams or interruptions.
Understanding Seamless Patterns
At its core, a seamless pattern is a tile of artwork that can be repeated endlessly without any discernible breaks or edges. Imagine a wallpaper or fabric design; the motif repeats consistently across the entire surface. Historically, creating such patterns in Photoshop often involved complex manual calculations and meticulous placement of elements to avoid visible seams when an element was moved off the canvas. However, modern Photoshop features have significantly streamlined this process, making it more intuitive and efficient.
A seamless pattern is a block of artwork that can be repeated infinitely without any visible seams or interruptions. Before the advent of advanced tools, designers had to manually calculate and position elements anytime one was moved off the canvas. This was a laborious process that required a keen eye for detail and a deep understanding of the tile's dimensions. The goal with a seamless pattern is that the whole image looks fluid, with no obvious starting or stopping points, and elements that don't appear overly repetitive in an unnatural way.
Getting Started: Preparing Your Elements and Canvas
Before diving into pattern creation, it's crucial to have your individual design elements ready. These elements can be anything from digitized hand-drawn illustrations to vector graphics or photographic elements. A key preparatory step is ensuring that each element you intend to use is isolated on its own layer. If you're working with scanned artwork, such as watercolor paintings, it's essential to remove any white paper background first.
Digitizing and Isolating Elements
If you are working with analog artwork, the first step is to digitize it. This typically involves scanning your artwork at a high resolution. Once scanned, you'll need to remove the white paper background. This can be achieved using various Photoshop tools, such as the Magic Wand Tool or by adjusting Levels and Curves to isolate the artwork.
After digitizing, if your elements are not already on separate layers, you'll need to isolate them. The Lasso Tool, particularly the Polygonal Lasso Tool, is excellent for selecting individual elements. Once an element is selected, you can cut it (Ctrl+X or Cmd+X) and paste it in place (Ctrl+Shift+V or Cmd+Shift+V). This action places the selected element onto a new, independent layer, preserving its original position.
Converting to Smart Objects
For maximum flexibility and non-destructive editing, it's highly recommended to convert each element layer into a Smart Object. To do this, right-click on the layer in the Layers panel and select "Convert to Smart Object." You'll notice a small icon appear on the layer thumbnail, indicating its Smart Object status. This conversion allows you to resize, rotate, or apply transformations to your elements without permanently altering their original pixel data. You can always edit the contents of a Smart Object nondestructively.
Choosing Your Canvas Size
The size of your canvas, or "pattern block," is an important consideration. While smaller canvases (e.g., 100 x 100 pixels) can be used for simple patterns, larger canvases offer more flexibility, especially if you intend to use the pattern on large products. Many designers opt for larger dimensions, such as 12,000 x 12,000 pixels, to ensure they have ample room for intricate designs and can scale the pattern down for various applications without loss of quality. However, for practice or smaller projects, a smaller square canvas is perfectly adequate.
For creating a repeating pattern, a square canvas is essential. You will need to edit the width and height to a desired square dimension, for example, 1000 x 1000 pixels. This squared shape is fundamental to producing a repeat pattern. It's also advisable to set the resolution to 300 pixels/centimeter for print quality, or RGB if the pattern is intended for online use.
Creating the Pattern Tile: Designing Your Artwork
With your elements prepped and your canvas ready, it's time to arrange your artwork to form the repeating tile.
Laying Out Your Elements
Start by dragging and dropping your isolated elements onto your square canvas. You can arrange them in any configuration you desire. A common approach is to begin with the largest elements, then fill in the spaces with medium-sized elements, and finally add smaller details to fill any remaining gaps.
To facilitate precise placement, consider enabling rulers. This is easily done by clicking on ‘View’ then ‘Rulers’. Once rulers are visible, you can drag guides from them onto your document. These guides can help you center elements or align them precisely. If you have already chosen an image you would like to create a repeat pattern with, that's great. If not, now is your time. The image can be pretty much anything, but preferably a singular object, person, or animal to begin with. Pasting the image onto the new document can be done in several ways and is pretty straightforward; the easiest is copying the image and pasting it onto the document via 'Edit' then 'Paste' (CTRL+V).
Once pasted, use the transform tool (CTRL+T or Cmd+T) to resize and move your image. Holding the Shift key while transforming will keep the proportions the same. You can place the image in the center by using the guides you've set up.
Duplicating, Resizing, and Flipping
Photoshop provides shortcuts for efficiently manipulating your elements:
- Duplicate: To duplicate an element, select it and use the keyboard shortcut Ctrl+J (Cmd+J on Mac). This copies the selected element onto a new layer.
- Transform (Resize and Rotate): To resize or rotate an element, select it and press Ctrl+T (Cmd+T on Mac). This will bring up a bounding box around the element, allowing you to transform it. Remember to hold Shift to maintain proportions while resizing.
- Flip: Flipping elements horizontally or vertically can add variation and visual interest to your pattern. Use the ‘Edit’ > ‘Transform’ menu options for this.
Utilizing the Pattern Preview Tool
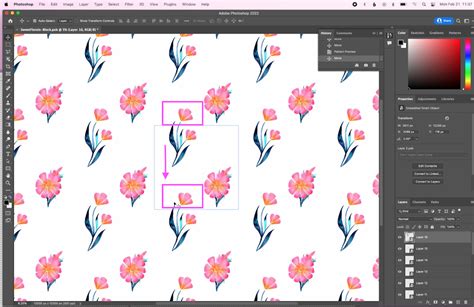
Photoshop's Pattern Preview tool is a game-changer for seamless pattern creation. To activate it, go to ‘View’ > ‘Pattern Preview’. This feature will instantly show you how your artwork will repeat infinitely, displaying the tiled version of your canvas in real-time as you work. This allows you to see how elements that go off one edge of the canvas reappear on the opposite edge, and you can make adjustments directly within this preview mode.
When using Pattern Preview, you'll notice that parts of your elements might appear cut off on the edges of your canvas. Don't worry! This is expected. These "cut-off" elements will seamlessly wrap around to the other side in the repeating pattern. The repeated elements are only visible in Pattern Preview. If you ever turn off Pattern Preview, you’ll see that some of the “cut-off” elements are missing. This doesn't mean they are lost; they are simply not displayed when the preview is inactive.
Learn to Unlock the Magic of Photoshop's Pattern Preview - Here's How!
Defining Your Pattern
Once you are satisfied with the arrangement of your elements within the canvas and are happy with how it repeats in the Pattern Preview, it's time to define it as a usable pattern in Photoshop.
The "Define Pattern" Command
Navigate to the ‘Edit’ menu and select ‘Define Pattern’. A dialog box will appear, prompting you to name your new pattern. It's a good practice to give it a descriptive name, perhaps including its dimensions, like "Floral_1000x1000". Click ‘OK’ to save the pattern. Your custom pattern is now stored in Photoshop's pattern library and ready to be used.
Applying Your Seamless Pattern
With your pattern defined, you can now apply it to any document or layer.
Filling a New Document with Your Pattern
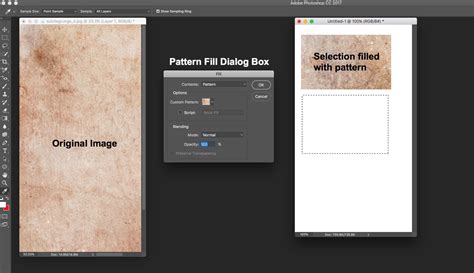
- Create a New Document: Open a new document in Photoshop. The size can be anything you prefer; an A4 size is often good for testing, or you can create a document specifically for your design needs. Ensure your document is set to the correct color mode (RGB for screen, CMYK for print).
- Access the Fill Command: Go to the ‘Edit’ menu and select ‘Fill’.
- Select Your Pattern: In the Fill dialog box, under the ‘Contents’ dropdown menu, choose ‘Pattern’. Then, select ‘Custom Pattern’. A pattern picker will appear, showing all your saved patterns, including the one you just created. Select your newly defined pattern.
- Apply the Fill: Click ‘OK’. Your new document will now be filled with your seamless pattern, repeating infinitely.
Using Pattern Fill Layers
A more flexible approach is to use a Pattern Fill Layer.
- Create a New Layer: In your target document, create a new, empty layer.
- Access Pattern Fill: Go to ‘Layer’ > ‘New Fill Layer’ > ‘Pattern’.
- Choose and Configure: A dialog box will appear. Select your desired pattern from the pattern picker. You can also adjust the scale of the pattern here to make it larger or smaller. Click ‘OK’.
This method is advantageous because the pattern is on its own layer, allowing you to easily adjust its opacity, blend modes, or even apply masks to reveal parts of the pattern selectively.
Using Layer Styles (Alternative for Pattern Application)
While Pattern Fill Layers are generally preferred for their flexibility, patterns can also be applied as a layer style.
- Select Your Layer: Choose the layer you want to apply the pattern to.
- Open Layer Styles: Double-click on the layer in the Layers panel, or go to ‘Layer’ > ‘Layer Style’ > ‘Pattern Overlay’.
- Configure Pattern Overlay: In the Layer Style dialog box, select ‘Pattern Overlay’. Choose your desired pattern from the picker and adjust the scale as needed. Click ‘OK’.
Both Pattern Fill Layers and the Pattern Overlay layer style offer effective ways to apply your defined patterns. The choice often depends on the desired workflow and the level of control needed. For instance, if you need to control the opacity of the pattern independently or use blend modes, a Pattern Fill Layer is often more straightforward. However, both methods allow for the pattern to be controlled via opacity, ensuring that the underlying content can show through.
Advanced Techniques and Tips
- Offset Filter for Seamlessness (Older Method): Before the Pattern Preview tool, the Offset filter was crucial. You would duplicate your layer, then apply the Offset filter (Edit > Offset) with values set to half the document's width and height. This would reveal the seams. You would then fill in the gaps on the canvas and repeat the process until the tile was seamless. While less common now with Pattern Preview, understanding the Offset filter is beneficial for troubleshooting or working with older techniques.
- Experiment with Element Placement: Don't be afraid to experiment with the arrangement of your elements. Try placing elements off-center, overlapping them, or creating more complex compositions.
- Varying Scales and Rotations: Use the Transform tool extensively to resize and rotate your elements. This helps create a more organic and less repetitive feel.
- Color Considerations: If your elements have color, consider how they will interact when repeated. Ensure color balance and harmony across the pattern.
- Zoom Out Frequently: When working on your pattern tile, zoom out regularly to view the overall composition. This helps identify any areas that might look too sparse, too crowded, or have awkward repetitions.
- Practice Makes Perfect: The more patterns you create, the more intuitive the process will become. Try creating a couple of different repeat patterns to familiarize yourself with these steps.
By following these steps, you can move from simple shapes to complex, professional-quality repeating patterns in Photoshop. The Pattern Preview tool, combined with the "Define Pattern" command and the versatile Fill Layer options, empowers you to generate an infinite array of designs for any application. You are now ready to explore the vast creative potential of Photoshop's pattern-making capabilities.