Adding grain to photographs and digital imagery is a highly sought-after and effective technique for imparting a distinct aesthetic and character to visuals. This tutorial delves into the multifaceted world of grain application, exploring various methods within Adobe Photoshop and beyond, to achieve anything from subtle texture to a pronounced, gritty, vintage look. Whether you're a seasoned professional or a budding enthusiast, understanding how to manipulate and apply film grain can significantly enhance your creative output.
Understanding the Essence of Film Grain
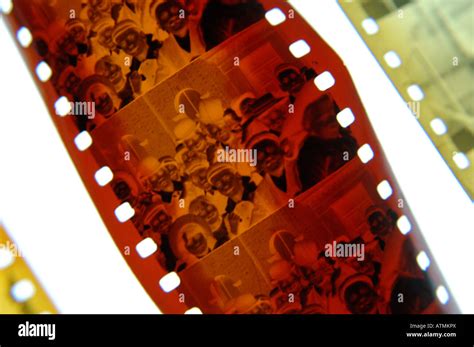
Before diving into the technical aspects, it's crucial to grasp what film grain actually is. In traditional film photography, ISO settings directly influence the film's sensitivity to light. Higher ISOs, while allowing for shooting in lower light conditions, intrinsically lead to more visible grain. This grain originates from the physical structure of celluloid film itself. The emulsion layer is coated with tiny crystals, primarily silver halides, which react chemically when exposed to light to form an image. The size and arrangement of these crystals vary depending on the specific film stock used, directly impacting the resulting grain's appearance. This inherent characteristic, often seen as a visual artifact in older films, is now actively emulated in digital photography and filmmaking to evoke a specific artistic feel.
In contrast, digital cameras produce "digital noise" when the sensor is pushed to its limits, typically in low-light situations or when high ISO settings are employed. While digital noise can often be perceived as undesirable and detracting from image clarity, film grain, when intentionally applied, is embraced for its textural qualities and the emotional connection it fosters. It's a deliberate artistic choice that aligns with our perception of cinema and a bygone era of visual storytelling.
Recreating Film Grain in Photoshop: Methodical Approaches
Adobe Photoshop offers several robust methods for introducing film grain to your digital images, each providing a different level of control and aesthetic outcome.
Method 1: Utilizing the "Add Noise" Filter
This method offers a good balance of control and ease of use, allowing you to precisely manage how the grain interacts with different tonal ranges of your image.
- Open Your Image: Begin by opening your chosen photograph in Adobe Photoshop. You can do this via
File > Openor by using the keyboard shortcutControl-O. - Create a New Layer: To preserve the integrity of your original photograph, it is essential to work on a separate layer. Navigate to the Layers panel, click on the "Create new fill or adjustment layer" icon (a half-filled circle) at the bottom of the panel, and select "Solid Color." Choose any color (black is often a good default) and click "OK."
- Convert to Smart Object: Right-click on this new color fill layer and select "Convert to Smart Object." A small icon will appear in the lower right corner of the layer's preview thumbnail, indicating this conversion. This is crucial for non-destructive editing, allowing you to modify filter settings later.
- Apply Gaussian Blur: With the Smart Object layer selected, go to
Filter > Blur > Gaussian Blur. A dialog box will appear. Adjust the Radius to a value that creates a smooth, uniform blur across the entire layer. The exact value will depend on your image resolution, but starting with a value around 10-20 pixels is a good starting point. Click "OK" to apply the blur. - Change Layer Blending Mode: In the Layers panel, change the blending mode of this blurred layer from "Normal" to "Screen." This will make the layer transparent, revealing your original image beneath, but the blurred content will now appear as a subtle, uniform texture.
- Add Noise: With the "Screen" layer still selected, go to
Filter > Noise > Add Noise. In the dialog box, you can adjust the Amount of grain. For a more realistic film grain effect, select "Gaussian" for the Distribution and check the "Monochromatic" box. Experiment with the Amount slider until you achieve the desired level of grain. Click "OK." - Refine with Smart Filters: Because you converted the layer to a Smart Object, the "Add Noise" filter is now a Smart Filter. You can reopen the filter dialog box by double-clicking on "Add Noise" under the layer in the Layers panel. This allows you to edit the photo grain texture in Photoshop even after it's been applied. You can also double-click on "Gaussian Blur" to adjust its settings.
This "Add Noise" method allows for precise control over the grain's size, strength, and appearance, as well as how it blends with the underlying image.
Method 2: Using a Dedicated Film Grain Overlay
For a highly authentic and often more nuanced film grain effect, employing pre-made film grain overlays is a popular and effective strategy. These overlays are typically created by photographing actual film grain or by meticulously simulating it.
- Obtain Film Grain Overlays: You can find numerous high-quality film grain overlays from various sources. Envato Elements offers packs with high-resolution patterns, blurred noise backgrounds, and even scratches to add grit and grunge. Other sources provide packs of 100 real film grain JPG images in 8K resolution, sourced from iconic film stocks like Kodak, Ilford, Cinestill, and Lomochrome.
- Import the Overlay: Open your chosen photo in Photoshop. Then, drag and drop one of the real film grain texture overlays onto your canvas, placing it on a new layer above your original photo.
- Scale and Position: Scale the grain overlay layer to fit your image dimensions. You may also want to rotate it slightly to avoid a repetitive pattern.
- Adjust Blending Mode: This is where the magic happens. Experiment with different blending modes for the grain overlay layer. Modes like
Lighten,Screen,Color Dodge,Linear Dodge,Overlay,Soft Light, andHard Lightall provide distinct filmic looks.ScreenandLightenare often good starting points for a more natural grain appearance. - Enhance Contrast (Optional): To make the grain more visible and to achieve a more pronounced filmic look, you can adjust the contrast of the grain layer. Select the grain layer, go to
Image > Adjustments > Curves(or use the shortcutControl-M). You can then create an "S-curve" by bringing up the whites and bringing down the blacks, which will make the grain texture pop. - Layering and Variation (Optional): For an even more complex and gritty look, you can duplicate the grain layer or drag and drop another film grain overlay on top. Scale and rotate this second layer differently from the first, and experiment with its blending mode. This layering approach can create a richer, more organic texture.
- Adding Film Burns and Frames (Optional): For a complete vintage film aesthetic, you can also incorporate film burn overlays (for simulated light leaks and imperfections) and film frame borders. These can be found in dedicated packs and applied similarly, using appropriate blending modes.
This method offers a fast and effective way to achieve a realistic film grain effect, especially when using high-quality overlays derived from actual film stocks.
Realistic Film Grain in Photoshop
Method 3: Leveraging the Camera Raw Filter
For a quick and often subtle application of grain, Photoshop's Camera Raw filter provides a streamlined solution. This is particularly useful when you need consistency and speed.
- Open Your Image: Open your image in Photoshop.
- Access Camera Raw: Go to
Filter > Camera Raw Filter. - Navigate to Effects: In the Camera Raw interface, locate the "Effects" tab.
- Apply Grain: Within the Effects tab, you'll find a "Grain" section. Here, you can adjust the "Amount," "Size," and "Roughness" of the grain.
- Amount: Controls the overall intensity of the grain.
- Size: Determines the scale of the grain particles.
- Roughness: Affects the uniformity and texture of the grain.
- Fine-tune and Apply: Adjust these sliders to achieve your desired look. The Camera Raw filter often produces a uniform, digital-style grain, which can be very effective for subtle enhancements. Click "OK" to apply the changes.
While the Camera Raw filter is quick, it offers less granular control over how the grain interacts with specific tonal areas compared to the "Add Noise" method.
Beyond Photoshop: Other Tools and Platforms
While Photoshop is a powerhouse for image editing, other tools and platforms also offer excellent film grain effects.
BeFunky's Film Grain Effect
BeFunky, an online photo editor, provides user-friendly options for adding film grain.
- Film Grain Effect: Found in the "Cinematic" category, this effect instantly applies a classic grainy texture. You can adjust the intensity using a slider and even select "Monochromatic" to make the grain black and white, independent of your photo's color.
- ISO/Grain Effect: Located in the "Darkroom" collection, this effect aims to recreate classic darkroom photo effects. It offers more customization than the Film Grain effect, including toggling "Black & White" for the entire photo, adjusting grain size, and adding blur.
Both of BeFunky's grain effects are designed for ease of use, allowing for quick application of realistic grain to any photograph.
VSCO's Grain Filter
VSCO, known for its film-inspired presets and editing tools, offers a highly regarded Grain filter.
- Control Sliders: VSCO's Grain tool provides "Strength," "Size," and "Color" sliders, allowing for precise control over the grain's intensity, particle size, and color characteristics, enabling the simulation of real color film grain without altering the overall image tone.
- Film X Presets: For VSCO Members, combining the Grain tool with their 40+ "Film X" presets, inspired by iconic film stocks, can achieve unparalleled authenticity.
- Film Frame Overlays: The Grain filter can be seamlessly combined with film frame overlays, complete with light leaks and sprocket holes, to perfectly mimic scanned film.
- Mobile and Desktop: VSCO's editing tools are available on mobile (iOS and Android) and through their Desktop Studio for bulk editing.
- In-Camera Application: VSCO's "Capture" app allows you to apply grain as you shoot, offering real-time adjustments and seamless integration with live presets.
VSCO's approach emphasizes authenticity and offers a comprehensive suite of tools for both subtle and bold grain effects.
The "Why" Behind Adding Film Grain
In an era dominated by digital clarity, why would creators actively seek to add an element that seemingly reduces image quality? The answer lies in the emotional and aesthetic resonance of film grain.
- Cinematic Association: Film grain has become an intrinsic part of our visual language for cinema. Its presence, even in digital images, aligns with our perception of "filmic" content, distinguishing it from standard commercial or digital output. It evokes a sense of nostalgia, depth, and artistic intention.
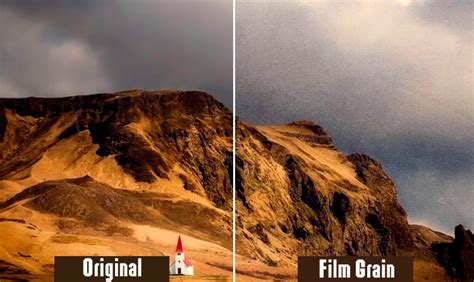
- Organic Feel: Film grain adds an organic, tactile quality to images that can be missing in the pristine, sometimes sterile, nature of digital captures. It introduces subtle imperfections that enhance realism and character.
- Texture and Depth: Grain adds a layer of texture that can make images more visually engaging. It can help to break up large areas of flat color and add a sense of depth and dimensionality.
- Masking Imperfections: While not its primary purpose, grain can sometimes subtly soften overly sharp details or mask minor digital artifacts, contributing to a more pleasing overall aesthetic.
- Artistic Expression: Ultimately, adding film grain is an artistic choice. It allows creators to imbue their work with a specific mood, style, or narrative, whether it's a gritty urban documentary, a romantic period piece, or a nostalgic portrait.
Film Grain vs. Digital Noise: A Crucial Distinction
It's important to differentiate between organic film grain and digital noise. Film grain is a physical characteristic of the film medium, resulting from the arrangement of silver halide crystals. It has a certain texture and character that is often perceived as pleasing and artistic. Digital noise, on the other hand, is an artifact of the digital sensor's response to light. It often appears as random, colorful speckles or banding, particularly in shadow areas, and is generally considered undesirable.
While both can manifest as speckling, the way they appear and the intent behind their application are vastly different. Creators often aim to reduce digital noise while actively adding film grain to achieve a specific aesthetic. VSCO's grain effect, for instance, is designed to mimic film textures, providing a gritty, artistic effect that many creators seek.
Best Practices for Applying Film Grain
- Subtlety is Key: Unless you're aiming for a very specific artistic statement, less is often more. Start with subtle grain levels and gradually increase them to avoid overwhelming the image.
- Consider the Subject: Grain can enhance certain subjects more than others. It often works well with portraits, street photography, and cinematic landscapes, adding a sense of mood and atmosphere.
- Balance with Sharpening: Film grain is usually best added after sharpening. Sharpening enhances edge contrast, while grain adds texture. Applying grain first might make sharpening less effective or introduce unwanted artifacts.
- Resolution Matters: When using grain overlays, ensure they are of a high enough resolution to match your image, preventing pixelation or a loss of detail in the grain itself.
- Avoid Over-Compression: Be mindful of how your final image will be compressed for online platforms. As explained in discussions about why snow and confetti can ruin YouTube video quality, compression algorithms can struggle with scenes containing numerous small, fast-moving objects. Film grain, as an additional layer, can sometimes reduce clarity when compressed, so use it judiciously.
Conclusion
Adding film grain to digital images is a powerful technique that can transform the aesthetic and emotional impact of your work. Whether you opt for the precise control of Photoshop's "Add Noise" filter, the authentic feel of film grain overlays, the speed of the Camera Raw filter, or the user-friendly interfaces of tools like BeFunky and VSCO, the ability to recreate this classic photographic element is now more accessible than ever. By understanding the origins of film grain and applying it thoughtfully, you can imbue your photographs and videos with a timeless, cinematic quality that resonates deeply with viewers.