The grunge aesthetic, characterized by its organic, realistic, and rugged look, has become a powerful trend in graphic design and photography. It’s a style that can instantly evoke a sense of history, drama, and authenticity, transforming ordinary images into compelling works of art. Whether you're aiming for a vintage feel, a raw, edgy vibe, or simply want to add depth and character to your visuals, understanding how to create a grunge effect in Photoshop is an invaluable skill. This tutorial will guide you through various methods, from utilizing pre-made actions and templates to crafting your own grunge elements with brushes and textures, ensuring you can achieve a sophisticated and impactful grunge look.
Understanding Grunge Textures and Their Appeal
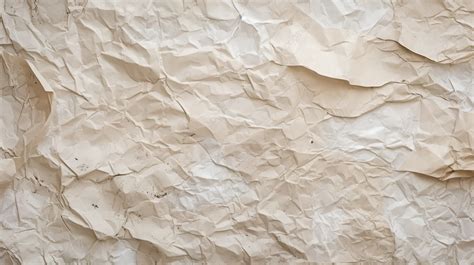
Grunge textures are a popular choice for designers and photographers seeking to imbue their work with a distinctive, lived-in quality. These textures are often derived from scans of paper, distressed surfaces, or organic materials, offering a rich tapestry of imperfections that can add significant visual interest. The appeal of grunge lies in its ability to send a picture back in time, creating a dramatic, vintage effect that resonates with viewers. They are an invaluable resource, providing a foundation for creating complex, multi-layered visuals. The inherent irregularity and ruggedness of these textures lend themselves perfectly to designs that aim for a raw, authentic feel.
Leveraging Photoshop Actions and Templates for Instant Grunge
For those seeking a quick and efficient way to achieve complex grunge Photoshop styles, pre-made actions and templates are excellent resources. Photoshop Actions are a series of recorded commands that can be played back to automate repetitive tasks. A well-crafted grunge action can transform your photos with a single click, applying a series of filters, adjustments, and texture overlays to create a sophisticated, multi-layered effect.
One such powerful tool is the "Grunge 2 Photoshop Action." This action is designed to create stunning artwork from almost any of your photos, resulting in a complex, multi-layered effect where colors and elements are fully editable. When you run such an action, you'll often encounter a popup window that prompts you to import the specific texture you wish to use, allowing for a degree of customization within the automated process.
Similarly, PSD template files offer a starting point for grunge designs. By opening a pre-designed PSD template, you can immediately begin working with a foundation that already incorporates grunge elements. These templates often come with a variety of pre-set textures, light leaks, and color correction layers, allowing you to easily customize the effect to your liking. For instance, a template might contain 15 different light leaks, three overlay textures, and several color correction layers, providing a comprehensive starting point for your grunge creation.
For those looking for an "old style" grunge effect, specific Photoshop templates are available that mimic the instant daguerreotype effect, directly inspired by the aesthetic of old photographs. These templates offer a shortcut to achieving a specific vintage feel without needing to manually recreate the nuances of historical photographic processes.
Creating Grunge Effects with Brushes
Beyond pre-made actions and templates, Photoshop offers robust tools for creating grunge effects from scratch, particularly through the use of brushes. Free brushes can be a fantastic way to add custom grunge elements to your designs.
Creating a Grunge Filter Using a Free Brush:
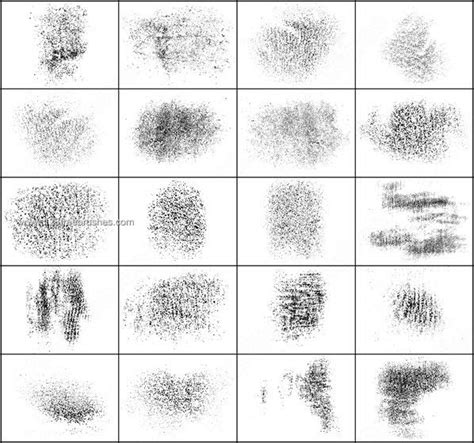
- Select a Grunge Brush: Many free grunge brushes are available online. Choose one that has the desired texture and irregularity.
- Open Your Image: Load the photo you wish to apply the grunge effect to in Photoshop.
- Create a New Layer: It's good practice to work on a new layer to maintain non-destructive editing.
- Apply the Brush: Select a dark color (often black or a dark gray) and use your chosen grunge brush to paint over areas of your image. You can vary the opacity and flow of the brush to control the intensity of the effect.
- Experiment with Blending Modes: Once you've applied the brush strokes, experiment with different blending modes for this new layer (e.g., Multiply, Overlay, Soft Light) to integrate the brush strokes seamlessly with your image.
This method allows for precise control over where and how the grunge elements are applied, enabling you to create a more tailored and organic look. You can also fix up any rough edges with tools like the Spot Healing Brush tool or the Rubber Stamp tool for a cleaner finish.
Incorporating Textures for an Authentic Grunge Look
Textures are fundamental to achieving a convincing grunge effect. They add depth, grit, and a sense of history to your images. Photoshop provides several ways to integrate textures, from dragging and dropping image files to using pattern overlays.
Adding a Grunge Texture to an Image in Five Easy Steps:
- Choose Your Image: Select a photograph that you believe will benefit from a vintage or distressed look. Images with strong subjects or a sense of narrative often work well. You can download a sample image if you're following a specific tutorial.
- Open Your Image in Photoshop: Load your chosen image into your Photoshop workspace.
- Add the Grunge Texture:
- Find a grunge texture file (e.g., a scanned paper texture, a distressed concrete image).
- Drag this texture file directly onto your Photoshop workspace, placing it on a new layer above your image.
- Resize the texture by dragging its corners to fit your image as needed.
- Choose a Blending Mode: This is a crucial step for integrating the texture. With the texture layer selected, go to the "Layers" panel and experiment with the blending mode dropdown menu. Popular choices for grunge effects include:
- Hard Light: Often creates a strong, high-contrast effect.
- Overlay: Blends the texture with the image, enhancing contrast and color.
- Soft Light: A gentler version of Overlay.
- Multiply: Darkens the image based on the texture's color.
- Screen: Lightens the image based on the texture's color.Experiment until you find a blending mode that complements your image and desired aesthetic. For this tutorial, "Hard Light" is a common selection.
- Add a Black & White Adjustment Layer: To further enhance the vintage or gritty feel, convert your image to black and white.
- Go to the "Adjustments" panel and click the "Black and White" icon.
- Alternatively, navigate to
Image > Adjustments > Black & Whitein the menu bar. - You can further fine-tune the black and white conversion by adjusting the sliders for different color channels.
- Adjust the Opacity on the Grunge Texture Layer: Once the texture is applied and blended, you may need to soften its impact.
- Select your grunge texture layer.
- Locate the "Opacity" slider in the "Layers" panel and adjust it down until you achieve the desired level of grunge. This allows the underlying image to show through while still benefiting from the texture's effect.
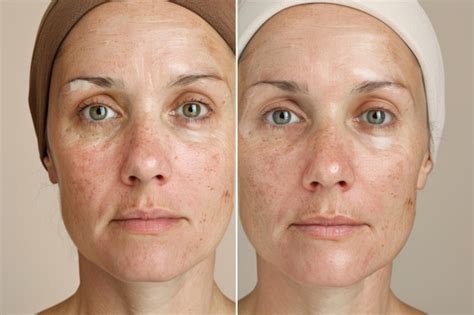
Pro-tip: Removing Unwanted Marks from the Image:
Sometimes, a grunge texture can be a little too intense, obscuring important details in your image, such as a person's face. You can selectively remove these marks:
- Rasterize the Texture Layer: If your texture layer is a Smart Object, you'll need to rasterize it first. Select the texture layer and go to
Layer > Rasterize > Smart Object. - Use the Healing Brush Tool: Select the "Healing Brush" tool (it looks like a band-aid).
- Select a Source Point: To repair an area, you need to tell Photoshop where to sample from. Hold down the
Optionkey (Mac) orAltkey (Windows) and click on a clean area of the image near the mark you want to remove. This area will become your source point. - Paint Over the Unwanted Marks: Click and drag your mouse over the area you want to repair. The Healing Brush tool will blend the sampled texture with the surrounding pixels, effectively removing the unwanted grunge marks. Experiment with the length and direction of your strokes for the best results.
Exploring High-Quality Grunge Resources
The availability of high-quality grunge resources can significantly elevate your designs. When you know how to create a grunge effect in Photoshop, you'll naturally want to find excellent overlays, brushes, and textures to work with.
Grunge Brush Photoshop Packs: A good grunge brush Photoshop package can contain numerous unique brushes, often with large sizes (up to 1400 px), making them versatile for various projects. These brushes are essential for adding custom-shaped grunge elements, from splatters and scratches to rough edges.
Hand-Crafted Textures: For an authentic look, hand-crafted textures are invaluable. These can include dusty textures created from paper scans, or handmade textures offered as transparent PNGs or scalable vector files. A package of 25 dusty textures, for example, can provide a wide range of options for adding subtle grunge filters or creating extremely grungy looks by combining multiple textures.
Thematic Packs: Some resources are curated into thematic packs. For instance, a "Dust Textures Megapack Vol." might offer a broad selection of dusty, gritty, and worn-out effects. Similarly, templates might include specific elements like light leaks, which are often associated with vintage or lo-fi photography and can complement a grunge aesthetic.
Video Tutorials: A Visual Approach to Grunge
For those who prefer a visual learning experience, video tutorials offer a dynamic way to learn Photoshop techniques.
Suggested Video Topics:
- "Creating Realistic Light Leaks in Photoshop": This would cover techniques for adding authentic-looking light leaks, often a component of vintage or grunge styles.
- "Advanced Grunge Effects with Custom Brushes and Textures": This tutorial could delve deeper into creating unique grunge looks by combining various brush types and texture blending techniques.
- "Mastering Grunge Photoshop Actions: A Step-by-Step Guide": This video would focus on utilizing and customizing pre-made Photoshop actions to achieve professional-level grunge effects quickly.
- "From Photo to Vintage Masterpiece: The Complete Grunge Workflow": This comprehensive video could guide viewers through the entire process of transforming a photograph into a grunge-inspired artwork, covering everything from initial image selection to final touches.
HOW TO DISTRESS YOUR GRAPHICS IN ADOBE PHOTOSHOP [HELLSTAR INSPIRED]
Integrating Grunge into Your Design Workflow
Knowing how to create a grunge effect in Photoshop opens up a world of creative possibilities. You can use these techniques to:
- Add a Vintage Feel: Transform modern photographs into images that look like they were taken decades ago.
- Create Edgy and Urban Designs: Give posters, social media graphics, or website elements a raw, street-art-inspired aesthetic.
- Enhance Portraits: Add a dramatic or artistic flair to portrait photography.
- Design Unique Backgrounds: Create textured and visually interesting backgrounds for various design projects.
- Add Depth and Realism: Even subtle grunge textures can add a sense of tactility and depth to otherwise flat designs.
When creating heavily textured and worn, grunge designs, the goal is often to achieve a natural, imperfect look. This can involve layering multiple textures, using brushes with varied opacity and flow, and carefully selecting blending modes. For instance, you might start with a base photo, overlay a paper texture, then add further grunge elements using brushes, and finally apply color adjustments.
Adding Structure and Text:
Once the grunge effect is established, you might want to add structural elements or text. This can be done by drawing horizontal bars with the Rectangle Shape Tool (U) or by incorporating grunge fonts. To maintain design consistency, even icons can be given a grunge style using texture brushes or by applying a Pattern Overlay in the Layer Styles.
Ultimately, the grunge effect in Photoshop is about embracing imperfection and using textures, brushes, and creative adjustments to evoke a specific mood or aesthetic. Whether you're using automated actions or meticulously building your effect layer by layer, the key is experimentation and a keen eye for detail.