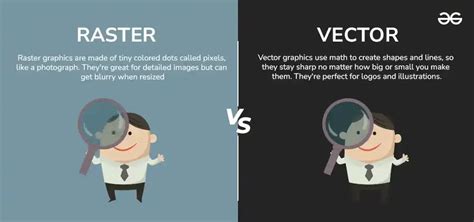
In the realm of digital design, understanding the fundamental differences between vector and raster graphics is crucial for designers to make informed decisions on which format to use in their projects. Raster images, also known as bitmap images, are made up of pixels, which stay the same size as you zoom in and out of an image. Vector images, however, are made up of geometric polygons and colors, and thanks to the mathematical equations behind them, they adjust to stay crisp and clean at any size. This makes them popular assets in graphic design and digital arts. Vectors are a great format for any image that has to change size, like logos and graphics that have to look good in a variety of contexts. Raster images excel at holding detail. Digital photos and paintings are raster graphics.
Adobe Photoshop is the best-known photo editing software among professionals and non-professionals. It is not explicitly designed to work with vector graphics because Adobe Illustrator is there for that, but it also offers a way to vectorize an image. While Photoshop is primarily designed for raster-based editing, Illustrator is tailored for working with vectors. Unlike raster images, which are pixel-based, vector images consist of mathematical formulas that define the points, lines, and shapes within the image. This means vector images can be resized without losing quality, making them ideal for designs that need to be scaled or printed at various sizes. Photoshop has some limited vector capabilities, like using the Pen Tool to create paths and vector masks.
Understanding the Core Differences: Vector vs. Raster
Two-dimensional digital images are either vectors or rasters. Vector graphics are digital designs that stay sharp at any size. Vectors are described mathematically using points, lines and curves and are created regardless of the size and resolution of the image. Vector graphics are based on mathematical equations, which means they can be scaled without losing quality. On the other hand, raster graphics, also known as bitmap graphics, are made up of individual pixels that form an image. In terms of color depth, raster images are capable of displaying a wider range of colors, while vector images are generally limited to solid colors. The primary difference that sets raster and vector images apart is the impact on image quality when resizing an image. When scaling a raster image, the pixels can become visible, leading to a blurred or pixelated appearance. Conversely, scaling a vector image retains its sharpness, as the mathematical equations defining the image adjust to maintain clean edges throughout the resizing process.
When deciding whether to use vector or raster graphics in a design project, it's crucial to consider the application of each and their specific strengths. Vector graphics are ideal for logo design and other graphics requiring clean, scalable shapes with sharp edges. Raster graphics, however, are better suited for complex, detailed images, such as photographs. In conclusion, understanding the fundamental differences between vector and raster graphics is crucial for designers to make informed decisions on which format to use in their projects. The choice between vector and raster graphics ultimately depends on the specific needs and intended applications in each design scenario.
Preparing Your Image for Vectorization in Photoshop
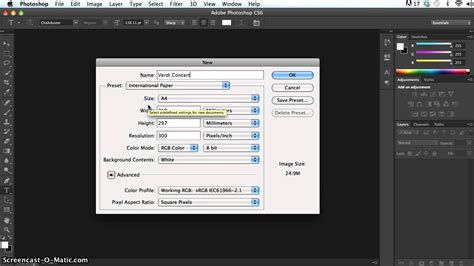
In a previous article, we discussed vector graphics and the differences between vector and raster. As promised in the previous article, in which we explained how to convert to vector in Illustrator, here is the tutorial for vectorizing an image with Adobe Photoshop. Even today, it is a professional method, requiring at least a basic program knowledge. To vectorize an image in Photoshop, first, prepare the image by importing it and setting the resolution to 300 using the Control + Alt + I keys. The Image Size window (Ctrl + Alt + I) allows you to set the resolution to 300.
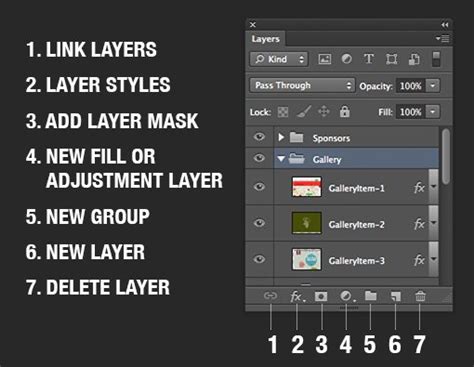
Separate the image you want to vectorize from the background. The next step is to make a work path by clicking the layer icon on the Layers panel while holding down the ctrl or cmd key. This creates a selection of the image. Use the Marquee Tool (M) to move the cursor over to the selection and right-click. Choose Make Work Path from the menu. Press A to switch to the Direct Selection tool and right-click on the image. Create a vector mask. This will now show up in the Layers panel.
Step-by-Step Vectorization Process in Photoshop
Manually redesigning an image to vectorize it is a long job. It requires experience and a few manual skills with the tools. Unfortunately, resorting to an automatic conversion does not always pay off. The premise, the conversion itself, is nothing too complicated. The part that requires a little familiarity is the one that will follow now, which is a fundamental step for the job's success. I'm talking about cleaning the image and highlighting the subject's details to make them appear in the illustration to obtain an optimal result.
Isolating the Subject
Step 2. The first thing to do is to eliminate the background to isolate your subject. If you choose the first option, after drawing all the outlines of your subject, go to the Paths panel and with the path active, right-click > Make Selection. Either way, once you've made your object selection, you can create a clipping mask or make a reverse selection and delete the part you don't need. To create the mask, click in the Layers panel on the Add Mask symbol at the bottom with the selection active. For example, to make the Inverse Selection, go to Select > Inverse and then delete [Delete / Backspace key].
Enhancing Details and Thresholding
You need to enhance your image to highlight the details at this point. Start by increasing the sharpness. After that, create a New Adjustment Layer and choose > Threshold; here, too, in the panel that will appear on the screen, move the slider and establish the right threshold point suitable for your image. The key details must be there, but the image shouldn't be too full. This will depend on your image. These steps are more than enough if you need to convert a reasonably simple image. Instead, if you have a more complex one, you will have to work more on the original image.
Creating a Solid Background for Outline Clarity
Step by step, your vector image begins to take shape. First, create another New Layer > Solid Color and set a white background to your image to better see its outlines. Now that we have obtained a drawing entirely in black and white, if necessary, we can still go and intervene on the image with the Brush tool. The goal is to fill in all those small parts that did not give a clean result during the previous steps.
Converting Selection to a Work Path
We have finally reached the point where your image will become a vector element. Now with the selection active, go to the Toolbar on the left and select any Selection Tool, for example, the Rectangle; go back to your image and do Right Button > Create Work Path. For the second option, always with the path active, create a New Solid Color Layer; doing so will create a new layer with your drawing in vector format.
how to create work path in Photoshop
Creating a Solid Color Layer for Vector Representation
Go to the Layers panel and create a new Fill layer or Adjustment layer. Choose Solid Color from the menu. This new layer defines the shape of the vector on top of the Threshold layer. This new layer defines the shape of the vector on top of the Threshold layer.
Finalizing and Exporting Your Vector Image
To do a quick check, you can check that enlarging the image does not change its quality. Make Ctrl / Comm + T, and with the handles, enlarge the rectangle to scale the drawing; as you can see, the edges remain sharp.

Saving as an SVG File
Then, all you have to do is export your vector illustration. Save the Vector Image as an SVG file. Right-click on the layer, select Export As, and choose SVG file. The Scalable Vector Graphics format is based in XML (a markup language used widely across the Internet that's readable by both machines and humans).
Vector Graphics in Photoshop: Tools and Techniques
In Photoshop, we can create vector graphics such as logos and icons that are infinitely scalable without losing their quality. Vectors are defined by mathematical equations rather than pixels, allowing them to maintain their sharpness no matter how large or small they are resized. Paths are essential components of vector graphics in Photoshop, formed by anchor points and lines. We can create a path using the Pen tool, which allows us to plot anchor points and draw curves or straight lines between them. Working with layers is also important when dealing with vector graphics in Photoshop. Multiple layers can help us organize and arrange different parts of the image.
The simplest way to create a vector object in Photoshop is with the Shape tools. Photoshop comes with hundreds of pre-built vector shapes called Custom shapes. Custom shapes are created on separate Shape layers, so you can edit a shape without affecting the rest of the image. Photoshop has dedicated tools for drawing basic geometric shapes, such as rectangles, circles, and lines. Illustrator has a variety of selection tools available to help us work with vector objects more efficiently. The Direct Selection Tool allows us to select, move, and modify individual anchor points that make up the paths of vector objects. In contrast, the Selection Tool lets us select entire vector objects, change their size or rotation, and manipulate the appearance using the Appearance panel.
When working with vector graphics in Photoshop, color selection and application is crucial to create visually appealing designs. We can use the Color Picker to choose colors based on hue, saturation, and brightness, or select colors with the Eyedropper tool. In vector graphics, objects are primarily created using anchor points and paths. To draw paths in Photoshop, we utilize the Pen tool which allows us to place anchor points and manipulate their handles to create curves or straight lines. Mastering anchor points and paths is essential as it allows us to easily resize, edit, and transform our vector artwork without losing quality. Because vector graphics are composed of mathematical equations, they don't suffer from pixelation when resized. This is a significant advantage over raster graphics, which are made up of pixels and can become pixelated when scaled up or down beyond their original resolution.
File Formats and Alternatives
Common vector file formats include Adobe Illustrator AI, SVG (Scalable Vector Graphics), and EPS (Encapsulated PostScript). For logo design, we recommend using formats such as AI (Adobe Illustrator) and SVG (Scalable Vector Graphics), as they provide the best scalability and quality for various applications, from print materials to digital platforms. Yes, there are alternatives to Photoshop for vector graphics editing, such as Adobe Illustrator, CorelDRAW, Affinity Designer, and Inkscape.
In the end, each shape that makes up your new vector image can only be one color. So in order to convert the thousands of colored pixels in a photograph into a vector, you must first simplify your image into one foreground color and one background color, like black and white. You can choose a new color for each piece of your new vector image after itâs been converted.
Select the part of the image you want to vectorize. Choose the section you want to vectorize with an appropriate selection tool. If you want to select a rectangular area, use the Rectangular Marquee tool. If you want everything of a particular color, use the Magic Wand tool. Add a Threshold layer. To convert your selection into a single-color image, add a new Threshold layer using the Layers panel, and select Create New Fill or Adjustment layer. Select Tonal Areas with the Color Range Command. Use the Color Range command to make a selection that includes all pixels that share a similar color. Youâll want to select all of the white or black in your image depending on which part youâd like to vectorize. Go to Select ⺠Color Range. Convert your selection into a path. Right-click inside your selection and choose Make Work Path to set a tolerance value for your path. A tolerance value determines how much your path should stick to the contours of the selection. Create a solid color layer. Go to the Layers panel and create a new Fill layer or Adjustment layer. Choose Solid Color from the menu. This new layer defines the shape of the vector on top of the Threshold layer. Save the Vector Image as an SVG file. Right-click on the layer, select Export As, and choose SVG file.
Photoshop Express doesnât allow you to vectorize an image at this time. You cannot currently vectorize an image in Photoshop on the iPad. Yes, you can. Select a tracing type that supports transparency from the available options in the Trace Bitmap dialog window.
With a little effort, we have reached the end of this tutorial. As anticipated at the beginning of the article, converting a complex image into a vector or digitally redrawing it is never a simple thing. I hope this guide will be helpful to you! Remember, the Oppaca team is at your disposal and will gladly answer your questions, so do not hesitate to write to us. Share your new project with us. Who knows, maybe a happy collaboration will be born!