Procreate's Brush Studio is a powerful and intricate environment that allows artists to move beyond the limitations of pre-made brushes and delve into the creation and meticulous customization of their own unique digital tools. Whether you're a seasoned digital painter or just beginning your journey with Procreate, understanding the depths of Brush Studio is key to unlocking a new level of artistic expression. This tutorial will guide you through the essential components and settings within Brush Studio, empowering you to craft brushes that perfectly suit your workflow and creative vision.
There are essentially two primary approaches to utilizing Brush Studio. The first involves diving in with a clear vision of the brush you wish to create, systematically adjusting settings until your desired outcome is achieved. The second, equally valid approach, is to start with an existing brush and tweak its parameters to refine its behavior or adapt it for a specific purpose. Regardless of your starting point, entering Brush Studio is straightforward. You can tap an existing brush to select it, and then tap it again to open its settings within Brush Studio. Alternatively, to forge a completely new brush from the ground up, you simply tap the '+' button located in the brush library.
The Core Components: Shape and Grain
At the fundamental level, a Procreate brush is constructed from two principal elements: a Shape and a Grain. The Shape acts as the container, defining the basic form or tip of your brush. Think of it as the physical silhouette of your brush tip. The Grain, on the other hand, provides the texture. It’s akin to a paint roller that is stamped repeatedly by the Shape as you draw. The interplay between these two components forms the basis of almost every brush's appearance and behavior.
Understanding Shape Source
The Shape Source dictates the fundamental form of your brush tip. When you draw with a brush, Procreate repeatedly "stamps" this shape along the path of your stroke. The nature of this shape significantly influences the resulting mark. A simple, smooth circular shape will produce a clean, even stroke, while an irregular or textured shape will result in a rougher, more organic mark.
You can access and modify the Shape Source by navigating to the 'Shape' tab within Brush Studio. Here, you can select from Procreate's extensive Source Library, which offers a diverse range of pre-made shapes, or you can import your own custom images. To import a new shape, tap 'Import' and choose either 'Source Library' to browse Procreate's collection or select 'Photos' or 'Files' to import an image from your device. The 'Source Library' provides a searchable collection of textures and forms that can serve as excellent starting points for your custom brushes.
When working with imported images as shapes, remember that black areas in the image will be rendered as transparent, while white areas will be solid. Grayscale values will produce varying levels of opacity. This allows for intricate and detailed brush tip designs.
Harnessing the Power of Grain Source
The Grain Source is where the texture of your brush comes to life. While the Shape defines the tip's outline, the Grain provides the internal pattern or texture that is applied as the shape is stamped. Imagine the Grain as a tiny, repeating pattern that's applied by your brush tip. This can range from subtle paper textures to complex fabric weaves or even abstract patterns.
To access and edit the Grain Source, navigate to the 'Grain' tab in Brush Studio. Similar to the Shape Source, you can choose from Procreate's built-in textures in the 'Source Library' or import your own images to create unique tiling textures. The Grain Editor offers advanced controls for fine-tuning how the texture behaves.
Within the Grain Editor, you'll encounter settings that determine how the grain interacts with your stroke. 'Movement' dictates whether the grain stays static behind your stroke or moves along with it. Setting it to 'Moving' can create a more streaky, blurred effect, mimicking the way paint might smear. 'Texturized' keeps the grain fixed, providing a consistent texture regardless of stroke direction.
Texture scaling is another crucial setting. 'Follow Size' ensures the grain scales proportionally with your brush size, maintaining its relative appearance. 'Cropped' keeps the texture size fixed, meaning it won't change even if you drastically alter your brush size, which can be useful for specific pattern effects. 'Scale' controls the overall size of the grain pattern.
The 'Rotation' setting determines how the grain pattern aligns with your stroke. 'Follow Stroke' makes the grain rotate to follow the direction of your stroke, while 'Inverse' rotates it in the opposite direction. Setting it to '0%' locks the grain's rotation. 'Offset Jitter' randomizes the placement of the grain texture with each stamp, leading to a more organic and less repetitive look. 'Blend Mode' under the Grain settings controls how the grain texture interacts with the underlying color of your brush.
Shaping Your Stroke: The Stroke Path
The 'Stroke Path' settings allow you to control the fundamental rhythm and spacing of your brush stamps. This is where you define how the Shape and Grain are laid down along the path you draw.
The 'Spacing' slider is particularly illuminating. By increasing it significantly, you can see the individual stamps of your brush shape rather than a continuous stroke. This visualization helps in understanding how the shape is being applied. Adjusting 'Jitter' adds randomness to the spacing, making the stamps less uniform.
'Scatter' introduces randomness to the position of each stamp perpendicular to the stroke's direction, while 'Jitter Linear' randomizes the stamp's position along the stroke's direction. These jitter settings can be further controlled by 'Pressure', 'Tilt', and 'Barrel Roll' for more dynamic and responsive brushes.
'Azimuth' is a fascinating setting that detects the radius of your Apple Pencil's tilt. This allows the stamped shape to rotate based on the tilt angle, creating effects similar to a calligraphy pen, where the angle of the nib changes the line width and shape. 'Barrel Roll' offers even more intuitive control, allowing the shape to rotate as you physically rotate your Apple Pencil Pro, providing precise directional control over the stroke's orientation. 'Relative to stroke' ensures that the shape's orientation starts consistently at the beginning of each stroke, offering predictable results.
'Count' and 'Count Jitter' allow you to stamp the brush shape multiple times at each point along the stroke, with 'Count Jitter' introducing randomness to this count. This can create denser or more textured marks.
Adding Dynamics and Responsiveness
The 'Dynamics' section is where you imbue your brushes with life and responsiveness, making them react to your input in nuanced ways.
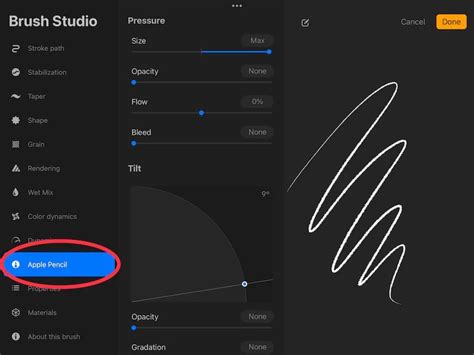
Pressure Curve and Tilt
The 'Pressure Curve' is a critical tool for controlling how your brush's properties change based on how hard you press with your Apple Pencil. By tapping the numerical value of a slider and selecting 'Pressure', you can access the Pressure Curve editor. Here, you can draw a custom curve that dictates the relationship between pressure and a specific brush setting (like opacity, size, or flow). A steeper curve at the beginning means that even light pressure will have a significant effect, while a flatter curve requires more pressure to achieve a change. This allows for incredibly subtle control over your brushwork, mimicking traditional media like pencils and brushes where pressure is paramount.
Similarly, 'Tilt' settings allow your brush to react to the angle of your Apple Pencil. You can set specific tilt angles to trigger changes in brush properties. This is excellent for creating brushes that mimic the varied marks of chalk, charcoal, or calligraphy pens, where the angle of the tool dramatically alters the stroke. The 'Tilt Graph' within the advanced settings allows you to define trigger points for these changes.
Barrel Roll
For users of the Apple Pencil Pro, 'Barrel Roll' offers another layer of dynamic control. This setting allows the brush to respond to the physical rotation of the Apple Pencil itself. This can be used to control shape rotation, texture orientation, or other brush parameters, offering a highly intuitive and tactile way to manipulate your digital strokes.
The Art of Wet Media and Blending
Procreate's 'Wet Mix' attributes are designed to simulate the behavior of traditional wet media, such as paints and inks. These settings allow your brush to interact with the color already on the canvas, blending and mixing pigments in a way that is difficult to achieve with standard digital brushes.
'Dilution' controls how much "water" is mixed into your digital paint, affecting how the color spreads and blends. 'Charge' influences the amount of pigment applied to the canvas. 'Attack' determines how much paint the brush "holds" and deposits. 'Pull' dictates how strongly the brush drags and mixes existing colors on the canvas. By carefully adjusting these sliders, you can create brushes that mimic the look of watercolor washes, oil paints, or even the nuanced blending of pastels. A blender brush, for instance, would typically have 'Dilution' set to a high value to effectively mix and move existing colors.
WATERCOLOR AF BRUSHES FOR PROCREATE
Color Dynamics: Unleashing Digital Possibilities
'Color Dynamics' opens up a realm of possibilities unique to digital art. This feature allows your brush to dynamically change color, saturation, brightness, or darkness based on various inputs. You can set your brush to shift through a spectrum of hues with each stroke, vary its saturation randomly, or even transition between a primary and secondary color.
The 'Jitter' sliders within Color Dynamics are key here. 'Hue Jitter' introduces randomness to the color, 'Saturation Jitter' randomizes the intensity of the color, 'Brightness Jitter' affects how light or dark the color becomes, and 'Darkness Jitter' specifically controls the darkening effect. These jitters can be influenced by 'Pressure', 'Tilt', and 'Barrel Roll', allowing for incredibly complex and expressive color behaviors. For example, you could create a brush that becomes more saturated the harder you press or shifts in hue as you tilt your pencil.
Enhancing Strokes: Stabilization and Taper
Stabilization and StreamLine
'Stabilization' is a crucial feature for achieving clean, smooth lines, especially for inking, calligraphy, or precise illustration work. Within the 'Stroke Path' settings, you'll find 'StreamLine'. Increasing the StreamLine value smooths out any wobbles or jitters in your strokes, creating a more polished appearance. Procreate offers different levels of stabilization, allowing you to choose how much smoothing is applied. 'Motion Filtering' is an advanced form of stabilization that uses more sophisticated algorithms for even smoother results, regardless of drawing speed.
Brush Taper
'Brush Taper' controls the reduction in brush size at the beginning or end of a stroke. This is particularly useful for creating natural-looking strokes that start thin, widen, and then taper off again, mimicking the behavior of traditional brushes and pens. You can set 'Pressure Taper' for Apple Pencil input and 'Touch Taper' for finger input. The sliders allow you to adjust the length and sharpness of the taper. A sharp taper setting will result in a very pointed end to your stroke.
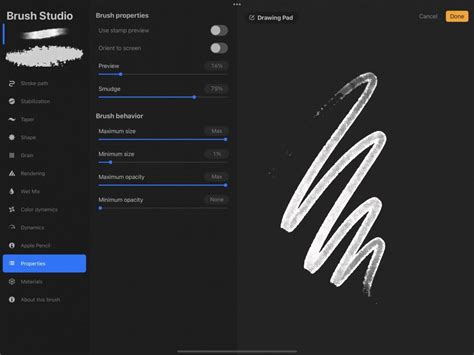
The Drawing Pad: Your Personal Testing Ground
Within Brush Studio, the 'Drawing Pad' serves as an invaluable preview window. It functions like a digital notepad where you can immediately test any changes you make to your brush settings. As you adjust sliders and experiment with attributes, you can draw, scribble, and test your brush's behavior in real-time.
Tapping the square-and-pencil icon in the top left corner of the Drawing Pad brings up its settings. Here, you can 'Clear Drawing Pad' to start fresh, or 'Reset all Brush Settings' to revert the current brush to its default state. You can also adjust the 'Preview Size' of your brush to see how it performs at different scales.
Advanced Settings and Numerical Control
Every slider in Brush Studio can be adjusted numerically for unparalleled precision. Tapping on the numerical value next to a slider will open the advanced brush settings panel. This panel offers more granular control and allows you to input exact values, or even 'Scribble' them in using your Apple Pencil.
Within this advanced panel, you can often assign 'Pressure', 'Tilt', and 'Barrel Roll' independently to a specific setting. This level of control is what truly allows for the creation of highly specialized and responsive brushes. For instance, you could have a brush where the 'Spacing' is controlled by 'Tilt' or the 'Opacity' is influenced by 'Barrel Roll'.
Tips for Brush Creation and Editing
- Backup Your Brushes: Before making significant changes to an existing brush, always create a backup. You can do this by opening the brush panel, swiping left on the brush thumbnail, and selecting 'Duplicate'. This ensures you can always revert to the original if your modifications don't yield the desired results.
- Experiment and Iterate: Brush creation is an iterative process. Don't be afraid to experiment with different settings, combine attributes in unexpected ways, and test your brush frequently on the Drawing Pad.
- Understand the Interaction of Settings: Sometimes, one setting can cancel out or modify the effect of another. If a change you make doesn't seem to have the expected impact, consider how other settings might be influencing it.
- Consider Your Workflow: Think about the types of art you create and the tools you typically use. Aim to replicate the feel and behavior of traditional media, or invent entirely new digital effects that suit your unique style.
- Explore the Source Libraries: Procreate's built-in Shape and Grain Source Libraries are excellent resources for inspiration and for finding starting points for your custom brushes.
By delving into the intricacies of Procreate's Brush Studio, you gain the power to shape your digital art tools with remarkable precision. From the fundamental structure of Shape and Grain to the dynamic responsiveness of Pressure and Tilt, and the unique blending capabilities of Wet Mix, the possibilities for brush creation are virtually limitless. Mastering these tools will not only enhance your existing workflow but also inspire new creative avenues, allowing you to bring your most imaginative artistic visions to life.