Embarking on the journey of digital painting in Adobe Photoshop can feel like stepping into a vast, unexplored territory. However, with the right guidance and a willingness to explore, this powerful software can transform your creative vision into stunning visual realities. This tutorial is designed to be your friendly companion, whether you're a complete novice taking your first digital brushstrokes or an experienced artist looking to refine your techniques. We will navigate the essential tools, delve into fundamental concepts, and explore advanced methods that will empower you to create captivating digital art. Forget the intimidation of a blank canvas; our aim is to make digital painting in Photoshop an accessible, enjoyable, and ultimately rewarding experience. So, ready your digital stylus or mouse, and let's embark on this exciting creative expedition!
Preparing Your Digital Studio: Essential Setup
Before we unleash our inner artists, let’s get our digital studio ready. First things first: Photoshop! Make sure you have the latest version installed on your computer. If you’re new to this, don’t worry, Adobe offers free trials, so you can test the waters before diving in. The software itself is the foundation, providing an extensive suite of tools and functionalities specifically designed for creative professionals and enthusiasts alike.
Now, onto the fun stuff. The most important tool in your arsenal? A drawing tablet! It’s not strictly necessary, but trust me, it’s a game-changer. A tablet gives you pressure sensitivity, allowing you to control the thickness and opacity of your brushstrokes naturally. Imagine painting with a real brush; that’s the feeling you’ll get! If a tablet isn’t in the budget right now, a mouse will do, but prepare for a bit more of a learning curve. The pressure sensitivity offered by a drawing tablet is paramount for achieving nuanced and organic brushwork, mimicking the tactile experience of traditional media.
Next, let’s talk about the Photoshop interface. Familiarize yourself with the layout. The toolbar, usually on the left, houses all your essential tools: the brush tool, eraser, eyedropper, and more. On the right, you’ll find your layers panel, which is crucial for organizing your artwork. Layers are like transparent sheets of paper stacked on top of each other. You can draw on each layer independently, allowing for easy editing and experimentation. Understanding the interface is the first step to efficient workflow.
Then, there are the brushes themselves. Photoshop comes loaded with a ton of default brushes, but you can also download or create your own. We’ll get into customizing brushes later, but for now, explore the brush presets and see what feels good. Experiment with different brush sizes, hardness, and opacity to see how they affect your strokes. Finally, understand color selection. The color picker is your best friend. Learn how to use the color wheel and sliders to find the perfect hues for your painting. Don’t be afraid to experiment! This will determine your success in Photoshop painting. Remember, digital painting is all about practice and patience. The more you play around with the tools and settings, the more comfortable and confident you’ll become.

The Heart of the Matter: Brushes and Layers
Alright, now that we’re set up, let’s dive into some cool techniques and tools that will help you create amazing digital art.
Unleashing the Power of Brushes
First up: brushes! The brush tool is the heart and soul of Photoshop painting. Experiment with different brush types - soft round brushes for blending, hard round brushes for crisp lines, and textured brushes for adding detail and interest. You can adjust brush settings like size, opacity, flow, and spacing to achieve a wide range of effects. To access brush settings, click on the brush icon in the toolbar, then go to the brush settings panel (Window > Brush Settings). This is where the magic happens!
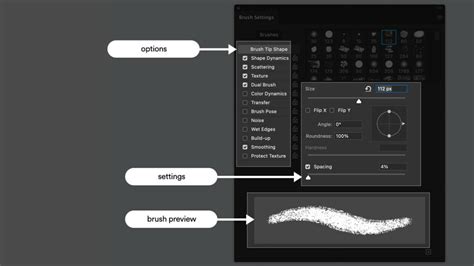
Within the Brush Settings panel, a universe of customization awaits. You can control the shape dynamics, scattering, texture, dual brush settings, color dynamics, and even transfer. For instance, the "Shape Dynamics" section allows you to vary the size, angle, and roundness of your brush tip based on factors like pen pressure, tilt, or even a stylus wheel if you're using a drawing tablet. This level of control is what truly elevates digital painting from simple coloring to nuanced artistic expression. The "Texture" option allows you to apply a pattern to your brush stroke, simulating materials like canvas or watercolor paper, adding an organic feel to your digital creations.
The options bar for each painting tool, including the Brush tool, offers critical controls. You can set the "method for blending" the color you paint with the underlying existing pixels, which are essentially paint modes similar to layer blending modes. "Opacity" dictates the transparency of the color you apply; as you paint over an area, the opacity does not exceed the set level no matter how many times you move the pointer over the area, until you release the mouse button. If you stroke over the area again, you apply additional color, equivalent to the set opacity. "Flow" sets the rate at which color is applied as you move the pointer over an area. As you paint over an area, while holding down the mouse button, the amount of color builds up based on the flow rate, up to the opacity setting. For example, if you set the opacity to 33% and the flow to 33%, each time you move over an area, its color moves 33% toward the brush color. You can also simulate painting with an airbrush, where paint builds up as you hold down the mouse button.
The Indispensable Layer Panel
Another essential tool is the layer panel. Mastering layers is key to non-destructive editing. Each element of your painting should be on a separate layer. This way, you can easily modify, rearrange, or delete parts of your artwork without affecting other areas. For example, if you’re painting a portrait, you might have separate layers for the skin, eyes, hair, and clothing. This will help with your Photoshop painting creation.
The eraser tool is also your friend. But instead of erasing directly on your layers, consider using layer masks. Layer masks allow you to hide or reveal parts of a layer without permanently deleting anything. This is super handy for making adjustments and corrections.
Then we have blend modes. Blend modes control how a layer interacts with the layers below it. They’re a powerful way to create interesting effects, like shadows, highlights, and glows. Try experimenting with blend modes like Multiply, Screen, Overlay, and Soft Light. You can find them in the layers panel.
Don’t forget about keyboard shortcuts! They’ll save you tons of time. Learn the shortcuts for commonly used tools and actions, such as brush size, opacity, zooming, panning, and layer operations.
Finally, practice, practice, practice! The more you paint, the better you’ll become. Don’t be afraid to experiment, make mistakes, and learn from them. Digital painting is a journey, not a destination. Embrace the process, have fun, and enjoy the ride. With time, you’ll master these tools and techniques and be on your way to creating stunning digital art. Now go forth and create something beautiful!
From Sketch to Masterpiece: A Step-by-Step Workflow
Okay, buckle up, because we’re about to walk through a complete Photoshop painting tutorial, from start to finish! We’ll cover the basic steps, but remember, this is just a starting point. Feel free to adapt and experiment to find what works best for you.
The Foundation: Sketching and Line Art
First, start with a sketch. This is the foundation of your painting, so take your time. Use a soft round brush with low opacity to block in the basic shapes and composition. Don’t worry about details at this stage; just focus on getting the proportions and overall structure right.
Once you’re happy with your sketch, create a new layer and lower the opacity of the sketch layer so you can see it underneath. On the new layer, start refining your lines with a harder brush. This will be your line art, so make sure the lines are clean and clear. Add details and define the shapes of your subject.
Laying Down the Colors: Base Colors and Shading
Now, add your base colors. Create a new layer below your line art layer. Using the brush tool or the paint bucket tool, fill in the different areas of your painting with their base colors. For example, if you’re painting a landscape, you might have separate layers for the sky, grass, trees, and ground. This will provide a good base for your Photoshop painting.
Begin shading and highlighting. Create new layers above your base color layers, and set their blend modes to Multiply for shadows and Screen or Overlay for highlights. Use a soft round brush to add shadows and highlights, blending them smoothly with your base colors. Pay attention to the light source and how it affects the different areas of your painting.
Adding Depth and Detail: Textures and Refinements
Add details and textures. This is where you can really bring your painting to life. Create new layers and use a variety of brushes to add details, textures, and patterns. For example, you might use a textured brush to add fur to an animal or create the texture of leaves on a tree. Adjust the blending modes and opacity of your detail layers to achieve the desired effect.
Fine-tune your colors and lighting. This is where you can make final adjustments to your painting. Use adjustment layers (such as Levels, Curves, and Color Balance) to fine-tune the colors and lighting. Experiment with different settings to see how they affect the overall look of your painting. And don’t forget to clean up any stray lines or imperfections.
Once you’re happy with your painting, save it in a high-resolution format (like JPEG or PNG) to preserve the quality. Congratulations! You’ve completed your first Photoshop painting!
Elevating Your Artistry: Advanced Techniques and Considerations
Alright, you’ve mastered the basics, now it’s time to level up your skills! Let’s explore some advanced techniques to make your digital art even more stunning.
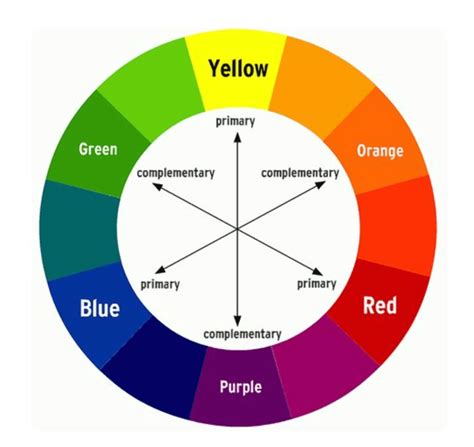
The Science of Color: Understanding Color Theory
First, let’s talk about color theory. Understanding color theory will significantly improve your paintings. Learn about the color wheel, complementary colors, analogous colors, and how to use them effectively in your art. Experiment with different color palettes to create specific moods and effects.
Mastering Non-Destructive Editing: Layer Masks and Adjustment Layers
Another awesome technique is layer masking. We touched on this earlier, but it’s such a powerful tool that it deserves a deeper dive. Layer masks allow you to hide or reveal parts of a layer non-destructively. This means you can make changes without permanently deleting any pixels. Use layer masks for detailed shading, blending, and creating complex effects.
The dodge and burn tools are excellent tools for refining the lighting in your artwork. The Dodge tool lightens areas, while the Burn tool darkens them. Use these tools subtly to add highlights and shadows, and to create a more three-dimensional effect. Digital painting has a wide range of techniques for your Photoshop painting.
Blending, Brushes, and References: The Pillars of Realism
Mastering blending is crucial for creating smooth transitions and realistic effects. Experiment with different brushes, opacities, and flow settings. Use the smudge tool to blend colors and create soft gradients.
Also, it’s vital to learn about texture and brush customization. Photoshop offers a wide range of brushes. However, the true power lies in customizing them. Explore the brush settings panel to adjust brush shape, dynamics, scattering, and texture. Create your own custom brushes to achieve unique effects. Experiment with adding textures to your brushes. You can create the effect of canvas, paper, or other materials and even add more detail for your painting.
Consider the use of reference images. Don’t be afraid to use reference images! They’re incredibly valuable for learning and improving your art. Use references to study anatomy, lighting, color, and composition. Don’t copy directly from the reference, but use it as a guide to improve your understanding. Even the most experienced digital artists encounter challenges.
How to Draw from Reference PROPERLY like RossDraws
Troubleshooting Common Photoshop Painting Pitfalls
Even the most experienced digital artists encounter challenges. Let’s tackle some common Photoshop painting issues and how to solve them.
Tackling Technical Glitches: Pixelation, Banding, and Lag
First, pixelation and blurry edges. This often happens when you’re working with a low-resolution canvas. Ensure you’re starting with a high-resolution document (at least 300 DPI) for your paintings. Also, use anti-aliasing to smooth out edges.
Next, color banding. Color banding can occur when there aren’t enough color gradations. This can be caused by using a low-bit depth (8-bit) document, or by excessive use of gradients. To fix it, you can add a little noise to the affected area or use dithering techniques.
Then we have brush lag. Brush lag can be frustrating. This can be caused by having too many layers, a slow computer, or outdated drivers. Try merging some layers, closing unnecessary programs, and updating your graphics card drivers. Optimize your performance settings in Photoshop (Edit > Preferences > Performance).
Workflow and Color Management: Layers, Files, and Monitors
Remember that every time you are making a Photoshop painting you should focus on your layers. Layer management is key! Organize your layers logically and group related layers together. Make sure to name your layers so you know what they are. Also, be mindful of the file size of your artwork. Large files can slow down your computer and make it difficult to work. Keep your file size manageable by merging unnecessary layers and using appropriate image formats.
Then color matching issues. Color matching between your monitor and your final print can be tricky. Calibrate your monitor to ensure accurate color representation. Use color profiles for print to see what your colors will look like when printed.
Overcoming Creative Blocks: Finding Inspiration and Pushing Boundaries
Finally, lack of inspiration. We all hit creative blocks sometimes. To combat this, take breaks, look at other artists’ work, and find inspiration from everyday life. Experiment with different styles and techniques. Don’t be afraid to try new things and push your boundaries.
Continuing Your Learning Journey: Resources for Growth
Ready to dive deeper into the world of Photoshop painting? Here are some amazing resources and learning opportunities:
First, there is Adobe’s official tutorials. They cover everything from the basics to advanced techniques. Then there are online courses. These courses are great for structured learning and personalized feedback. Be sure to check what other artists have for Photoshop painting techniques.
Next, there are YouTube channels. There are tons of talented digital artists who share their knowledge and techniques on YouTube. Subscribe to channels that inspire you and learn from their processes. Find artists that do Photoshop painting and use their techniques.
Books and magazines also provide valuable information. There are plenty of books and magazines dedicated to digital art and Photoshop. They’re great for in-depth learning and inspiration.
Finally, online communities and forums. Join online communities and forums to connect with other artists, share your work, and get feedback. This is a great way to learn and grow. Be an active member of the Photoshop painting community. Remember, learning never stops! Keep practicing, experimenting, and exploring, and you’ll be well on your way to becoming a skilled digital painter.
Welcome to my course, "Digital Painting in Photoshop - A Beginner's Guide." This course is designed to help you feel comfortable with painting inside of Photoshop. The lessons here are taught in an easy-to-understand way. You will learn how to use the basic tools that you need to get up and running with your own digital painting process very quickly. Photoshop has some extremely advanced capabilities but to utilize them, you must first master the fundamentals. That is exactly what this course is created for.
Section 1 - The Introduction Video to this Course.
Section 2 - You will learn the interface of Photoshop and how to navigate through it efficiently. You will learn many short cut commands as well as how the tools can be used from the perspective of an artist. We will cover the main tools for digital painting such as layers and groups, blending modes, brush settings, file sizes, selection tools, quick mask, rulers and guides, dodge and burn tool, color balance, transform tool, hue/saturation, and the smudge tool.
Section 3 - In this course project you will work along side me in REAL-TIME as we create this space scene. This way you can implement all of the tools we have studied and learn how effective they can be. You will learn how to build up on the paint work to create depth. You will learn how to apply texture with basic brush settings. You will also learn how to study from reference and create your own painting. That way you are learning from the world around you while using your own artistic abilities to create the work.
You will get a copy of the Layered Art File as well as my custom brush pack along with this course. ( Over 50 Custom Brushes! )
I am here if you have any questions about this course. Feel free to contact me and let me know if you would like me to add any additional lessons. It is my goal to make this course an amazing experience for all of my students. It is my absolute honor to be your instructor and good luck with your studies!
In this course, you also have a Q+A Section where we will cover your questions. I will respond back to any of your valuable requests by adding new video in the Q+A. This will give you a more interactive learning experience with this course!
Robert A. Dream it.
Adobe Photoshop provides several tools for painting and editing image color. The Brush tool and the Pencil tool work like traditional drawing tools, applying color with brush strokes. Tools like the Eraser tool, Blur tool, and Smudge tool modify the existing colors in the image. In the options bar for each of these painting tools, you can set how color is applied to an image and choose from preset brush tips. You can save a set of brush options as a preset so you can quickly access brush characteristics you use frequently. Photoshop includes several sample brush presets. You can start with these presets and modify them to produce new effects. Save tool presets when you want to store customized brush tip characteristics along with settings from the options bar such as opacity, flow, and color. Along with settings in the options bar, brush tip options control how color is applied. You can apply color gradually, with soft edges, with large brush strokes, with various brush dynamics, with different blending properties, and with brushes of different shapes. You can apply a texture with your brush strokes to simulate painting on canvas or art papers. You can also simulate spraying paint with an airbrush. You use the Brush Settings panel to set brush tip options. If you work with a drawing tablet, you can control how color is applied using pen pressure, angle, rotation, or a stylus wheel.
When using the Brush tool, the current foreground color is applied to an image with soft strokes of color. Click and drag in the image to paint. To draw a straight line, click a starting point in the image, hold down Shift, and click an ending point. You can also build up color by clicking the mouse button without dragging. The cursor display can be customized in the Preferences dialog box under the Cursor area and the Other Cursors area. You can choose to display a precise crosshair or a brush tip preview. To combine different types of cursors, select "Show Crosshair In Brush Tip" or "Show Only Crosshair While Painting."
Set the following in the options bar:
- Mode: Sets the method for blending the color you paint with the underlying existing pixels. Available modes change with the currently selected tool. Paint modes are similar to layer blending modes.
- Opacity: Sets the transparency of color you apply. As you paint over an area, the opacity does not exceed the set level no matter how many times you move the pointer over the area, until you release the mouse button. If you stroke over the area again, you apply additional color, equivalent to the set opacity.
- Flow: Sets the rate at which color is applied as you move the pointer over an area. As you paint over an area, while holding down the mouse button, the amount of color builds up based on the flow rate, up to the opacity setting. For example, if you set the opacity to 33% and the flow to 33%, each time you move over an area, its color moves 33% toward the brush color.
- Number Keys for Opacity: Press a single number key to set a tool’s opacity in multiples of 10% (pressing 1 sets it to 10%; pressing 0 sets it to 100%). Press two number keys to set a specific opacity.
- Airbrush Simulation: Simulates painting with an airbrush. As you move the pointer over an area, paint builds up as you hold down the mouse button. Brush hardness, opacity, and flow options control how fast and how much the paint is applied.
- Pencil Tool Background Color: Paints the background color over areas containing the foreground color. Select the foreground color you want to erase and the background color you want to change to.