Capture One has established itself as a premier RAW editing software, particularly for Fujifilm users, offering a powerful suite of tools that go beyond basic adjustments. While the software automatically recognizes Fujifilm's in-camera Film Simulation modes, many other specific in-camera parameters require manual application to achieve desired results. This article delves into the features of Capture One that are especially beneficial for those shooting with Fujifilm cameras, exploring how to harness its capabilities for a more refined and efficient workflow.
Understanding Fujifilm's In-Camera Parameters and Capture One's Interpretation
When importing Fujifilm RAW files into Capture One, the software intelligently detects and applies the Film Simulation mode used during capture. This is a significant advantage, providing a strong starting point for color and contrast. However, it's crucial to understand that many other Fujifilm-specific in-camera settings, such as shadow and highlight tone adjustments, sharpening parameters, and importantly, the Dynamic Range (DR) modes, are not automatically translated. While exposure settings are universally carried over with all RAW files, these more nuanced Fuji parameters need to be manually replicated or adapted within Capture One.
The DR modes (DR200, DR400) are a prime example. In-camera, these modes function by lowering the exposure during capture and then compensating in post-processing while compressing highlights to preserve detail. This process is seamless when shooting JPEGs, often going unnoticed by the photographer. When shooting RAW, Capture One correctly compensates for the camera's underexposure, presenting a correctly exposed image. However, it does not automatically apply the highlight compression associated with the DR modes. Earlier RAW converters sometimes struggled with this, resulting in underexposed images when DR modes were used. Fortunately, most modern RAW conversion software, including Capture One, handles the exposure compensation correctly, but the highlight compression aspect still requires manual intervention if replicating the in-camera DR effect precisely is desired.
Fujifilm and Capture One: A Synergistic Partnership
Capture One is frequently described as a "match made for Fujifilm." This strong synergy is attributed to the presence of customized camera profiles for each supported Fujifilm camera and lens. These profiles are meticulously crafted to accurately interpret the unique characteristics of Fujifilm sensors and their color science. This deep integration allows Capture One to deliver "mind-blowing colors and image quality" directly from Fujifilm RAW files, providing a foundation for creating and delivering stunning photos quickly and easily. The software's precise editing tools, coupled with fast tethering capabilities, further enhance the shooting and post-processing experience.
For Fujifilm users, Capture One offers a free, exclusive version with basic editing tools. While these tools are somewhat limited compared to the Pro version, they provide a valuable entry point for photographers to experience the software's core functionalities. The partnership extends to advanced features like tethered shooting, allowing seamless collaboration and immediate image review. Users can connect their Fujifilm cameras and shoot directly into their iPhone or iPad, enabling instant viewing, editing, and sharing of images, which is particularly beneficial for team-based or client-driven projects.
Exploring Capture One's Powerful Editing Tools
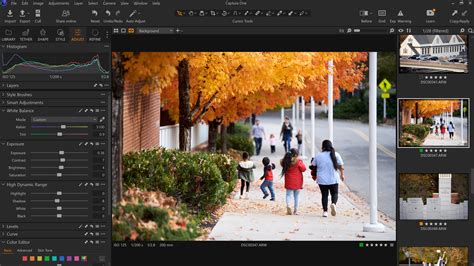
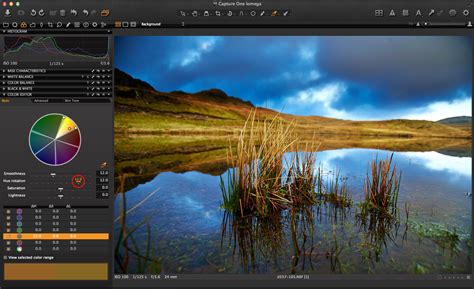
Capture One Pro boasts a range of features that significantly accelerate workflow and elevate image quality. Among these, the Color Balance tool stands out for its intuitive approach to color grading. This tool allows for precise adjustments to specific areas of an image, enabling photographers to craft a particular mood or add a personal signature to their work. By using an eyedropper sampling tool and a color wheel, users can select and fine-tune the hue, saturation, and lightness of any color within an image. This granular control is invaluable for everything from subtle enhancements to dramatic stylistic transformations. For instance, a photographer might use the Color Balance tool to cool down the highlights and background to add depth or to precisely adjust the color of a specific object, like a reddish-brown rock wall or a purple sky.
The Layers functionality in Capture One is another transformative feature, often compared to or even considered more powerful than Photoshop's layer system for certain tasks. In Capture One, nearly any adjustment that can be made to the background layer can also be applied to a mask. This opens up immense possibilities for selective editing. Photographers frequently utilize Linear Gradient Masks to guide the viewer's eye through an image. The ability to manage these masks on separate layers and adjust more than just exposure or brightness offers a significant advantage. Furthermore, Capture One's Luma Range tool, often used in conjunction with layers, allows for highly precise selections based on luminosity. This is particularly useful for applying adjustments to specific tonal ranges, such as targeting only the lightest areas for a cooler tone or isolating the darkest areas for specific adjustments. This level of control streamlines complex editing tasks that might otherwise require extensive masking in other software.
Capture One Tutorial | Combine masks
The Focus Mask feature is hailed by some as the most useful tool ever seen in any RAW editing platform. Available under View > Focus Mask, it allows users to quickly scan a grid of images and instantly identify those where the subject is out of focus. When a specific image is selected from the grid, the Focus Mask remains overlaid on the larger preview, providing a clear visual indicator of focus accuracy. This dramatically speeds up the culling process, especially when dealing with large volumes of images.
Another highly regarded tool is the Auto Levels Adjustment within the Levels tool. While many photographers, particularly those accustomed to other RAW editors like Lightroom, are hesitant to use "auto" functions, Capture One's Auto Levels Adjustment is remarkably effective, often delivering excellent results with a single click. This tool provides a substantial head start in adjusting image levels, saving considerable time in the initial stages of editing.
Streamlining Workflow with Customization and Efficiency
Capture One's commitment to a user-centric workflow is evident in its highly customizable interface. Users can rearrange tools, resize them, and even hide or show them as needed, creating a personalized workspace that suits their individual preferences and editing style. This flexibility allows for a much faster and more efficient workflow. For example, assigning keyboard shortcuts to frequently used functions, such as "Show/Hide Viewer" (often mapped to the "~" key), further streamlines operations.
The software also introduces small but impactful updates designed to enhance efficiency. The addition of text to icons makes tools instantly recognizable, while simplified adjustment clipboards and easily accessible masking tools reduce friction in the editing process. New default shortcuts for zoom, full-screen viewing, and the aforementioned Focus Mask contribute to faster editing. The "switch to next" option for image sorting, which automatically moves to the next photo after rating or tagging, can save up to 50% of keystrokes, significantly speeding up the image selection process.
Advanced RAW Processing and Color Management
Capture One's approach to RAW processing is often lauded for its ability to retain colors and details, even at high ISOs. The Noise Reduction Tool is robust, and the software's ability to handle large files from medium format cameras like the Fujifilm GFX series without performance degradation is critical for professionals working on strict schedules.
The Color Editor is a powerful component of Capture One's color management capabilities. Beyond the basic Color Editor, which offers a simplified, compact interface for quick adjustments, the full Color Editor provides extensive control. It includes an eyedropper tool for sampling colors directly from the image and a color wheel for intuitive manipulation. Users can fine-tune hue, saturation, and lightness by adjusting sliders and defining the specific range of colors to be affected. This precision is essential for professional work, particularly in fashion and beauty photography, where accurate skin tones and precise color rendition are paramount.
When it comes to Fujifilm's signature Film Simulations, while Capture One Pro versions now offer more direct support, earlier versions might not have fully replicated them natively. However, the software's strength lies in its ability to interpret RAW data and provide tools to recreate or emulate these looks. The availability of specific ICC profiles and Curves that correspond to Fujifilm's film styles further aids in achieving authentic-looking results. Users can explore a wide array of camera profiles, often finding that selecting a different profile can drastically alter the look and feel of an image, offering a rich palette for creative exploration.
Dynamic Range and Highlight/Shadow Recovery
The handling of dynamic range is a critical aspect of RAW processing. While Fujifilm's in-camera DR modes have specific behaviors, Capture One provides powerful tools for recovering detail in highlights and shadows. The dedicated Highlight and Shadow recovery sliders allow for significant adjustments. Unlike some other applications where these sliders might have limitations or be used in reverse, Capture One's implementation offers robust control for bringing out detail in the extreme tonal areas of an image. This is particularly important when dealing with high-contrast scenes, allowing photographers to retain detail that might otherwise be lost.
The High Dynamic Range (HDR) tool in Capture One further expands the possibilities for managing contrast and tone, enabling creators to visualize and transform their images with greater control. The Crop tool has also seen improvements, with visible handles making it easier to visualize and adjust crops precisely.
A Note on Learning and Evolution
Embarking on a new RAW editor, especially after proficiency in another, can be daunting. Capture One offers resources like a free learning hub and short video tutorials to aid users in mastering its tools, layers, and overall program functionality. The development of Capture One, particularly versions like Capture One 20, has been heavily influenced by user feedback from the Capture One community. This iterative process has led to a refined design, enhanced processing capabilities, and significant workflow improvements, ensuring the software continues to meet the evolving needs of photographers. Phase One's commitment, as stated by VP Software Business Jan Hyldebrandt-Larsen, is to provide a seamless photo-editing experience by developing requested features and innovating new ones, empowering creatives to achieve their best photos effortlessly.
The evolution of Capture One ensures that it remains at the forefront of RAW editing, offering a powerful and flexible environment for photographers, especially those who choose Fujifilm cameras for their exceptional image quality and unique color science.