Adding page numbers to an Adobe InDesign document might seem like a daunting task at first, but understanding the underlying logic transforms it into a remarkably straightforward process. This guide will demystify InDesign's page numbering system, enabling you to implement this essential feature with confidence. We will explore how to insert page numbers, customize their appearance, manage different numbering schemes across sections, and incorporate advanced elements like section markers and prefixes.
The Foundation: Understanding InDesign Page Numbering
At its core, InDesign's automatic page numbering relies on a special placeholder called the "Current Page Number." This placeholder, when inserted into a text frame, dynamically displays the number of the page it resides on. The true power of this feature is unlocked when these placeholders are placed on Master Pages (or Parent Pages, as they are now referred to in newer versions).
Why Master Pages are Crucial for Page Numbers
Master Pages act as templates for your document. Any element placed on a Master Page will automatically appear on all document pages to which that Master Page is applied. This is particularly beneficial for page numbers because:
- Consistency: Ensures every page has a page number in the same location and style.
- Efficiency: You only need to set up the page number once on the Master Page, and it propagates across your entire document.
- Automatic Updates: If you add, delete, or reorder pages, the page numbers update automatically.
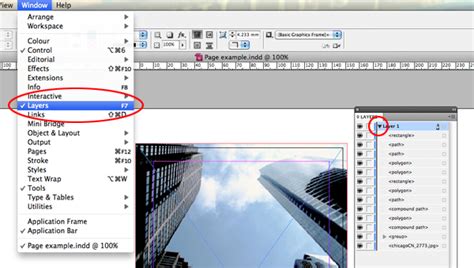
The Role of Layers in Page Number Placement
For optimal results, it's best practice to organize your InDesign documents using layers. As explained by InDesign expert Lukas Engqvist, a recommended layer structure, from bottom to top, includes: Background, Images, Text, and finally, Page Numbers/Headers/Footers.
Layers function as containers, with those at the top having higher display priority. Placing page numbers in a top layer ensures they are always visible and are not obscured by background elements, images, or text. If you're unfamiliar with layers, consulting Adobe's video tutorials on the subject is highly recommended.
Implementing Automatic Page Numbers
Once you grasp the concept of Master Pages and layers, the process of adding page numbers becomes intuitive.
Step-by-Step Insertion
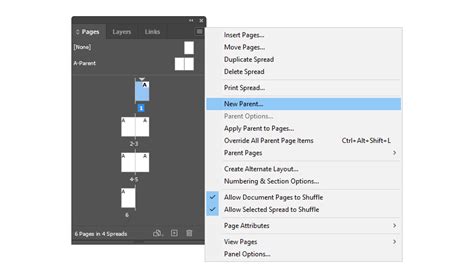
- Access the Pages Panel: If the Pages panel is not visible, navigate to
Window > Pages. - Select a Master Page: Double-click on the "A-Parent" (or your designated Master Page) thumbnail in the Pages panel. Ensure the correct layer is selected if you are using a layered system.
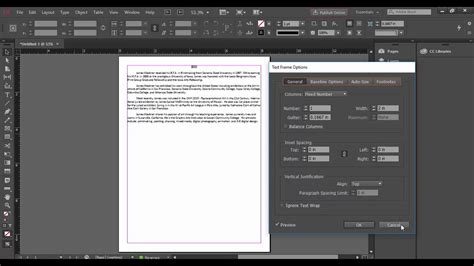
- Create a Text Frame: Using the Type Tool, draw a text frame on the Master Page where you want your page numbers to appear.
- Insert the Placeholder: With the text frame selected, go to
Type > Insert Special Character > Markers > Current Page Number. You will see a placeholder character (often an 'A' or similar, indicating it's a Master Page element) appear in the text frame. - Position and Style: Adjust the position of the text frame on the Master Page. You can then format this placeholder like any other text - change the font, size, color, and alignment. For instance, right-aligning text on the right-hand page of a spread can ensure consistent spacing for multi-digit numbers.
- Apply to Facing Pages: If your document has facing pages, copy the text frame containing the page number placeholder to the corresponding location on the other Master Page of the spread.
- Apply Master Page: The Master Page, with the page number placeholder, is now applied to all document pages by default. If you need to apply a different Master Page or ensure the correct one is applied, you can do so through the Pages panel.
When you navigate to your document pages, you will now see the correct page numbers automatically populated.
Customizing Page Numbering Styles
InDesign offers flexibility in how your page numbers are displayed. You can switch between various numbering styles, such as Arabic numerals (1, 2, 3), Roman numerals (i, ii, iii), or letters (a, b, c).
Changing the Numbering Style
- Select the First Page of the Section: In the Pages panel, select the first page of the section for which you want to change the numbering style.
- Open Section Options: Right-click on the selected page and choose
Numbering & Section Options.... - Choose Style: In the dialog box, select your desired
Page Numbering Stylefrom the dropdown menu. - Confirm: Click
OK.
This change will affect all pages within that section, using the selected style.
Handling Specific Page Numbering Scenarios
Often, documents require more complex numbering schemes, such as skipping the first page or starting from a different number. InDesign's sectioning feature is key to managing these requirements.
Skipping the First Page or Starting from a Different Number
By default, InDesign begins numbering from page 1. To change this, you need to create a new section.
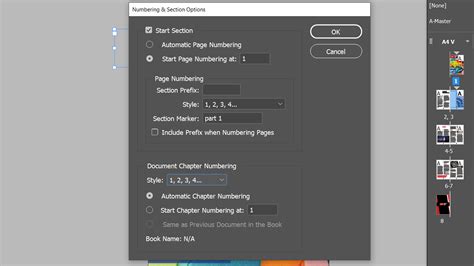
- Define a New Section: In the Pages panel, select the page where you want a new numbering sequence to begin. Right-click and select
Numbering & Section Options.... - Initiate Sectioning: Click
OKto create a new section. InDesign may warn you that a section already exists; this is normal. - Adjust First Section Style (Optional but Recommended): To avoid potential conflicts or unexpected behavior, it's often advisable to adjust the numbering style of the first section before defining the start of the second. Select the first page of your document, right-click, choose
Numbering & Section Options..., and set your preferred numbering style. - Start New Numbering: Go back to the first page of your new section. Right-click, select
Numbering & Section Options.... - Set Starting Number: Check the
Start Page Numberingbox and enter the desired starting number (e.g.,1if you want the first page of this section to be numbered '1'). - Confirm: Click
OK.
Your document will now follow the new numbering scheme, effectively skipping or renumbering pages as intended.
Adobe InDesign Page Numbers Tutorial using Parent Pages
Adding Section Markers
Section Markers provide readers with context, indicating which part of a larger document (like a chapter or section of a catalog) they are currently viewing.
- Edit Section Marker Value: In the
Numbering & Section Optionsdialog box for a specific section, you can edit theSection Markerfield. This text will be associated with that section. - Insert Section Marker Placeholder: On the Master Page, within the text frame containing your page number, go to
Type > Insert Special Character > Markers > Section Marker. This placeholder will display the text you entered in theSection Markerfield. - Repeat for Each Section: You will need to perform these steps for each distinct section in your document to label them accordingly.
Adding a Section Prefix
A Section Prefix allows you to prepend text to your page numbers, useful for indicating language, volume, or other categorizations. For example, you might use 'EN' for an English section or 'Vol1' for the first volume.
- Edit Section Prefix: In the
Numbering & Section Optionsdialog box, enter your desired prefix in theSection Prefixfield. - Include Prefix: Ensure the
Include Prefix when Numbering Pagesbox is checked. - Confirm: Click
OK.
The specified prefix will now appear before each page number in that section.
Best Practices and Advanced Considerations
- Text Frame Size: Ensure your text frames for page numbers are wide enough to accommodate the longest possible number or prefix, especially as your document grows.
- Alignment: Consider right-aligning text on right-hand pages and left-aligning on left-hand pages for consistent margins.
- Multiple Parent Pages: InDesign allows for multiple Parent Pages within a single document. This is invaluable for documents with varying layouts or distinct sections that require different Master Page elements.
- Interactive Documents: For interactive PDFs, page numbers can be crucial for navigation. You can also explore adding animations and interactivity to your InDesign documents, often managed through layers.
- Headers and Footers: The principles of using text variables and Master Pages extend to headers and footers, allowing you to dynamically insert information like document titles, dates, or author names.
By mastering these techniques, you can ensure your InDesign documents are not only well-organized and navigable but also present a polished and professional appearance, saving you significant time and effort in the long run.